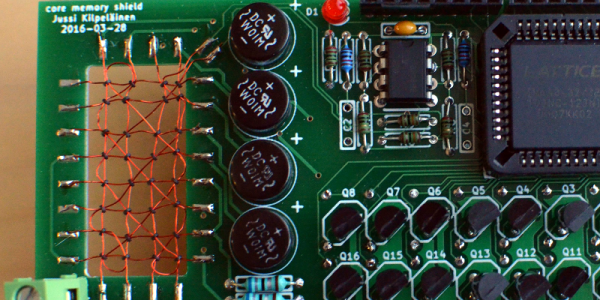
Building A Better Kerbal Space Program Controller

If you have even the most passing interest in space and what it takes to get there, you’ve probably already played Kerbal Space Program (KSP). If you haven’t, then you should set aside about ten hours today to go check that out real quick. Don’t worry, Hackaday will still be here when you get back. Right now you need to focus on getting those rockets built and establishing a network of communication satellites so you can get out of low orbit.

For those of you who’ve played the game (or are joining us again after playing KSP for the prescribed 10, 12, 16 hours), you’ll know that the humble computer keyboard is not very well suited to jaunts through space. You really want a joystick and throttle at the absolute minimum for accurate maneuvers, but even you’ll be spending plenty of time back on the keyboard to operate the craft’s various systems. If you want the ultimate KSP control setup, you’ll need to follow in the footsteps of [Hugo Peeters] and build your own. Luckily for us, he’s written up an exceptionally well detailed guide on building KSP controllers that should prove useful even if you don’t want to clone his.

Wiring switches and buttons to the Arduino.

At the most basic level, building a KSP controller consists of hooking a bunch of switches and buttons to a microcontroller such as the Arduino or Teensy, and converting those to USB HID key presses that the game understands. This works fine up to a point, but is limited because it’s only a one-way method of communication. For his controller, [Hugo] forked KSPSerialIO, a plugin for KSP that allows bidirectional communication between the game and your controller, enabling things like digital readouts of speed and fuel levels on the controller’s panel.

Once the logistics of how you’ll talk to the game are settled, the rest is really up to the individual. The first step in building your own KSP controller is deciding what you want it to do. Are you looking to fly planes? Control a rover? Maybe you just want a master control panel for your space station. There’s a whole lot of things you can build in KSP, and the layout, inputs, and displays on your controller should ideally reflect your play style.

[Hugo] went with a fairly general purpose panel, but did spend quite a bit of extra time to get some slick LED bar graphs hooked up to display resource levels of different systems on his craft. That’s an extra step that isn’t strictly required for a build like this, but once you see it, you’re going to have a hard time not wanting to include it on your own panel. He also went through the expense of having the panel and case professionally laser cut and etched, which definitely gives it a polished feel.

We’ve covered quite a number of custom KSP controllers here at Hackaday. The overlap between KSP players and hackers seems unusually high, but of course a game that lets you build and fly contraptions of your own design does sound like something that would be right up our alley.

We Couldn’t Afford An Oculus, So We Built One

Like a lot of 16-year-olds, [Maxime Coutté] wanted an Oculus Rift. Unlike a lot of 16-year-olds, [Maxime] and friends [Gabriel] and [Jonas] built one themselves for about a hundred bucks and posted it on GitHub. We’ll admit that at 16 we weren’t throwing around words like quaternions and antiderivatives, so we were duly impressed.

Before you assume this is just a box to put a phone in like a Google Cardboard, take a look at the bill of materials: an Arduino Due, a 2K LCD screen, a Fresnel lens, and an accelerometer/gyro. The team notes that the screen is what will push the price unpredictably, but they got by for about a hundred euro. At the current exchange rate, if you add up all the parts, they went a little over $100, but they were still under $150 assuming you have a 3D printer to print the mechanical parts.

Continue reading “We Couldn’t Afford An Oculus, So We Built One”

Interactive LED Table

Some hackers make functional things that you can’t allow to be seen in polite company. Others make beautiful things that could come from a high-end store. [Marija] falls into the second category and her interactive LED coffee table would probably fetch quite a bit on the retail market. You can see a video of the awesome-looking table, below.

It isn’t just the glass, MDF, and pine construction. There’s also a Bluetooth interface to a custom Android application from [Dejan], who collaborated on the project. However, if you aren’t comfortable with the woodworking, [Marija’s] instructions are very detailed with great pictures so this might be a good starter project.

Continue reading “Interactive LED Table”

A Keyboard To Stomp On

Macros are useful things. They allow one to execute a series of commands with a single keypress. There exists a wide variety of hardware and software solutions to create and use macros to improve your workflow, and now [Evan] has brought the open-source ManyKey into the fray, along with a build tutorial to boot.

The tutorial acts as a great introduction to ManyKey, as [Evan] walks through the construction of a macro keyboard designed to be operated by the feet. Based around the Arduino Leonardo and using off-the-shelf footswitches commonly used in guitar effects, it’s accessible while still hinting at the flexibility of the system. Macros are programmed into the keyboard through a Python app which communicates over serial, and configurations are saved into the Arduino’s onboard EEPROM. The ManyKey source is naturally available over at GitHub.

[Evan] tells us he uses his setup to run DJ software with his feet while his hands are busy on the turntables. That said, there’s all manner of other applications this could be used for. Efficiency is everything, and we love to see keyboard projects that aim to improve workflow with new ideas and custom builds – this shortcut keyboard makes a great example.


Big Trak Gets A New Brain

If you were a kid in the 1980s you might have been lucky enough to score a Big Trak — a robotic toy you could program using a membrane keyboard to do 16 different motions. [Howard] has one, but not wanting to live with a 16-step program, he gave it a brain transplant with an Arduino and brought it on [RetroManCave’s] video blog and you can see that below.

If you want to duplicate the feat and your mom already cleaned your room to make it a craft shop, you can score one on eBay or there’s even a new replica version available, although it isn’t inexpensive. The code you need is on GitHub.

Continue reading “Big Trak Gets A New Brain”

Over The Air Updates For Your Arduino

An Arduino and a data radio can make a great remote sensor node. Often in such situations, the hardware ends up installed somewhere hard to get to – be it in a light fitting, behind a wall, or secreted somewhere outdoors. Not places that you’d want to squeeze a cable repeatedly into while debugging.

[2BitOrNot2Bit] decided this simply wouldn’t do, and decided to program the Arduinos over the air instead.

Using the NRF24L01 chip with the Arduino is a popular choice to add wireless communications to a small project. By installing one of these radios on both the remote hardware and a local Arduino connected to the programming computer, it’s possible to remotely flash the Arduino without any physical contact whatsoever using Optiboot.

The writeup is comprehensive and covers both the required hardware setup for both ends of the operation as well as how to install the relevant bootloaders. If you’re already using the NRF24L01 in your projects, this could be the ideal solution to your programming woes. Perhaps you’re using a different platform though – like an Arduino on WiFi? Don’t worry – you can do OTA updates that way, too.

Flying The Friendly Skies With A Hall Effect Joystick

There are plenty of PC joysticks out there, but that didn’t stop [dizekat] from building his own. Most joysticks measure position mechanically using potentiometers or encoders. Only a few high-end models use Hall effect sensors. That’s the route [dizekat] took.

Hall effect sensors are non-contact devices which measure magnetic fields. They can be used to measure the position and orientation of a magnet. That’s exactly how [dizekat] is using a trio of sensors in his design. The core of the joystick is a universal joint from an old R/C car. The center section of the joint (called a spider) has two one millimeter thick disc magnets glued to it. The Hall sensors themselves are mounted in the universal itself. [Dizekat] used a small piece of a chopstick to hold the sensors in position while he found the zero point and glued them in. A third Hall effect sensor is used to measure a throttle stick positioned on the side of the box.

An Arduino micro reads the sensors and converts the analog signal to USB.  The Arduino Joystick Library by [Matthew Heironimus] formats the data into something a PC can understand.

While this is definitely a rough work in progress, we’re excited by how much [dizekat] has accomplished with simple hand tools and glue. You don’t need a 3D printer, laser cutter, and a CNC to pull off an awesome hack!

If you think Hall effect sensors are just for joysticks, you’d be wrong – they work as cameras for imaging magnetic fields too!