Hacklet 111 – Advanced Microscopy Projects

Last week on the Hacklet we covered optical microscopy projects. Those are the familiar scopes that many of us have at work or even at home on our benches. These are scopes that you typically can use with your eye, or an unmodified camera. This week we’re taking a look at more extreme ways of making small things look big. Electron streams and the forces of a single atom can be used to create incredibly magnified images. So let’s jump right in and check out the best advanced microscopy projects on Hackaday.io!

blubeam
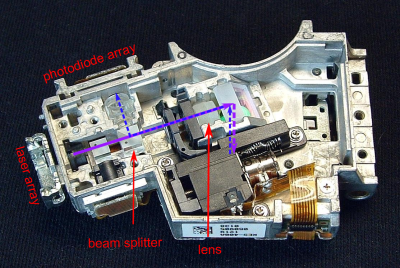
We start with [andreas.betz] and BluBEAM – a scanning laser microscope. [Andreas] aims to create a scanning confocal microscope. The diffraction limit is the law of the land for standard optical microscopes. While you can’t break the law, you can find ways around it. Confocal microscopy is one technique used quite a bit in medicine and industry. Confocal scopes are generally very expensive, well outside the budget of the average hacker. [Andreas] hopes to break that barrier by creating a scanning confocal microscope using parts from a PlayStation 3 Blu-Ray optical drive. Optical drives use voice coils to maintain focus. [Andreas] had to create a custom PCB with a voice coil driver to operate the PS3 optics assembly. He also needed to drive the laser. BluBeam is still very much a work in progress, so keep an eye on it!

stm
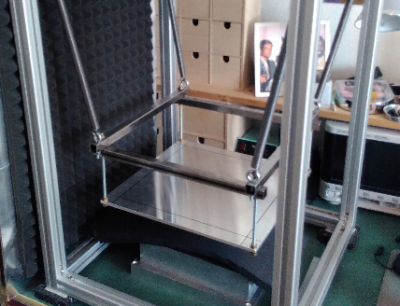
Next up is [MatthiasR.] with DIY Scanning tunneling microscope. Open atmosphere scanning tunneling microscopes are popular on Hackaday.io. I covered [Dan Berard]’s creation in Hacklet 103. Inspired by Dan, [Matthias] is building his own STM.

Environmental vibration is a huge problem with high magnification microscopes. [Matthias] is combating this by building a vibration isolation platform using extruded aluminum. He’s currently working on the STM preamplifier, which amplifies and converts the nano amp STM values to voltages which can be read by a digital to analog converter. [Matthias] is using the venerable Analog ADA4530 for this task. With an input bias of 20 femtoamps (!) it should be up to the task.

desem
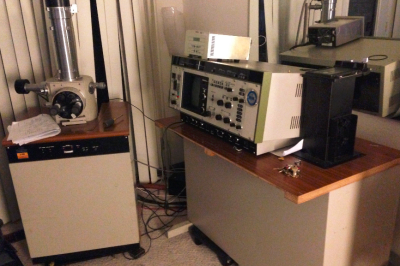
Next we have [Jerry Biehler] AKA [macona] with Hitachi S-450 Scanning Electron Microscope. Scanning electron microscopes have to be the top of the microscopy food chain. Jerry got his hands on a 1980’s vintage Hitachi SEM which was no longer working. The problem turned out to be a dodgy repair made years earlier with electrical tape. Fast forward a couple of years of use, and [Jerry] has done quite a lot to his old machine. He’s learned how to make his own filaments from tungsten wire. The slow oil diffusion vacuum pump has been replaced with a turbomolecular pump. The SEM now resides in [Jerry’s] living room, which keeps it at a relatively constant temperature.

Bild1
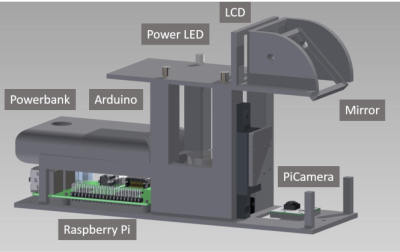
Finally, we have [beniroquai] with Holoscope – Superresolution Holographic Microscope. Holoscope is a device which increases the resolution of a standard camera by using the physical properties of light to its advantage. Precise tiny shifts of the object being magnified cause minute changes in a reflected image, which is captured by a Raspberry Pi camera. The Pi can then reconstruct a higher resolution image using the phase data. [beniroquai] has put a lot of time into this project, even sacrificing an expensive Sony connected camera to the ESD gods. I’m following along with this one. I can’t wait to see [beniroquai]’s first few images.

If you want to see more advanced microscopy projects, check out our new advanced microscope projects list! If I missed your project, don’t be shy, just drop me a message on Hackaday.io. That’s it for this week’s Hacklet. As always, see you next week. Same hack time, same hack channel, bringing you the best of Hackaday.io!

Ask Hackaday: Where Are The Flying Cars?

I could have sworn that we have asked this one before, but perhaps I’m thinking of our discussion of nuclear aircraft. In my mind the two share a similar fate: it just isn’t going to happen. But, that doesn’t mean flying cars can’t happen. Let me make my case, and then we want to know what you think.

[Steve] sent in a link to a Bloomberg article on Larry Page’s suspected investment in personal flying cars. It’s exciting to hear about test flights from a startup called Zee.Aero with 150 people on staff and a seemingly unlimited budget to develop such a fantastic toy. Surely Bruce Wayne Mr. Page is onto something and tiny 2-person vehicles will be whizzing up and down the airspace above your street at any moment now? Realistically though, I don’t believe it. They definitely will build a small fleet of such vehicles and they will work. But you, my friend, will never own one.
Continue reading “Ask Hackaday: Where Are The Flying Cars?”

3D Internal Structure For Better 3D Printed Objects

Makerbot is in the gutter, 3D Systems and Stratasys stock is only a shadow of their 2014 glory, but this is the best year 3D printing has ever had. Machines are now good and cheap, there’s a variety of various thermoplastic filaments, and printing useful objects – instead of just plastic trinkets – is becoming commonplace.

Gradient-Grid
The standard rectilinear infill from Slic3r

There’s one area of 3D printing that hasn’t seen as much progress, and it’s the software stack. Slicing, the process of turning a 3D object into a Gcode file for a printer has been basically the same for the last few years. Dual extrusion is still a mess, and automated bed leveling is still in its infancy.

One aspect of slicing that has been severely overlooked is infill. Obviously, you don’t want to print plastic trinkets completely solid – only the outside surface matters, and a part with 100% infill is just a waste of plastic. Different slicers have come up with different ways of filling the inside of a print, usually with a grid of squares, triangles, or hexagons.

While the most popular methods of filling in a 3D printed objects do the job of adding a little bit of strength to a print and supporting the top layers of a print, it’s not an ideal solution. The desired strength of the finished part is never taken into account, print artifacts are sometimes visible through the side of a print, and the spacing of the infill grid is completely arbitrary. You can only set a percentage of infill, and telling a slicer to make an internal support grid with 10mm spacing is impossible.

Type A Machines just changed all of this. With the release of their public beta of Cura Type A, the infill for a 3D printed part is also 3D. The dimensions of the infill are predictable, opening the door to stronger and better looking parts.

From the Type A press literature and white paper, this new type of ‘infill’ isn’t; it’s more properly referred to as ‘internal structure’, with proper dimensions between infill features. Instead of a grid of squares or triangles stacked one layer on top of each other, it’s a true structure, with the infill following the perimeter of the 3D printed object.

Generating 3D Infill

3D
Infill generated from Type A Machine’s Cura beta. Note the 3D structure of the infill.

Right now, infill is generated in a slicer by specifying a percentage. Zero percent infill means a hollow object, and 100% infill is a completely solid part. These two edge cases are easy, but anything else means the slicer must fill the part with filament in a grid of tessellating shapes, either rectangles, triangles, or hexagons. With current slicers, the dimensions of this internal structure are, for all practical purposes, random. Printing an object with 20% infill might mean a grid of squares with 5mm or 2mm spacing. Telling the slicer to infill a part with a grid of squares spaced 10mm apart is impossible.

Type A Machine’s latest Cura release changes all of this, allowing a designer to set a precise distance between rows and columns of infill. By defining infill in absolute dimensions, this allows for stronger parts using less infill.

Absolute dimensioning is only one feature of the Type A Machine’s latest release of Cura. Even more exciting is the development of 3D internal structure. Instead of stacking layers of squares, triangles, or hexagons on top of each other, Type A Machine’s Cura uses an infill of cubes turned on their side. While each individual layer of infill looks like a series of triangles and irregular hexagons, when assembled into a printed 3D object, this infill forms a true 3D structure.

The closest comparison to this sort of structure is the difference between graphite and diamond. Both of these materials are made out of the same element, carbon. The physical structure of graphite is just, 1-atom-thick layers of graphene, producing a relatively weak material. Diamond, on the other hand, has a true 3D structure and is one of the hardest materials known to man. While adding 3D structure to the infill of 3D printed objects won’t make the objects any stronger, it will drastically reduce delamination, and be much more resistant to stresses in all three dimensions.

While Type A Machines has done some great work here, it does mean there’s yet another version of Cura to deal with. Type A Machine’s Cura, in addition to the LulzBot edition and the original are now the defacto standard for turning 3D objects into printed parts. Having an open source solution is great, but forking the development this much surely can’t be ideal.

The Dark Arts: Hacking Humans

One of the biggest challenges for a company that holds invaluable data is protecting it. At first, this task would seem fairly straightforward. Keep the data on an encrypted server that’s only accessible via the internal network. The physical security of the server can be done with locks and other various degrees of physical security. One has to be thoughtful in how the security is structured, however. You need to allow authorized humans access to the data in order for the company to function, and there’s the rub. The skilled hacker is keenly aware of these people, and will use techniques under the envelope of Social Engineering along with her technical skills to gain access to your data.

Want to know how secure your house is? Lock yourself out. One of the best ways to test security is to try and break in. Large companies routinely hire hackers, known as penetration testers, to do just this. In this article, we’re going to dissect how a hired penetration tester was able to access data so valuable that it could have destroyed the company it belonged to.

Information Gathering

se_02
Source

The start of any hack involves information gathering. This is usually pretty easy for larger companies. Their website along with a few phone calls can reveal quite a bit of useful information. However, you can be assured that any company who has hired a pen tester has taken the necessary precautions to limit such information.

And such was the case for our hacker trying to gain access to the ACME Corp. servers. Her first target was the dumpsters – dumpster dives have been proven to unearth a trove of valuable information in the past. But the dumpsters were inside the complex, which was guarded by a contracted security firm. Through a bit of website snooping and a few phone calls, she was able to find out the department that was in charge of trash removal for the company. She then placed a phone call to this department. Using a social engineering (SE) technique known as pretexting, she pretended to be with a trash removal company and wanted to submit a quote to service their business. Using another SE technique called elicitation, she was able to find out:

  • that trash collection took place on Wednesdays and Thursdays
  • the total number of dumpsters
  • that there was a special dumpster for paper and technology trash
  • the name of the current waste removal company – Waster’s Management
  • the name of the employee in charge of the waste removal – [Christie Smith]

Dumpster Dive

Armed with this information, she went to the Waster’s Management website and grabbed their JPEG logo. se_01
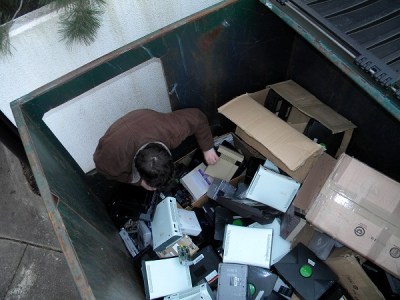
Within a few days, she had a shirt and hat with the logo in her hands. She called the security department and said she was with Waster’s Management, and that [Christie Smith] had told her one of the dumpsters was damaged, and she needed to take a look at it before the next trash removal.

The next day, wearing the shirt and hat she had ordered online, she was given a badge from security and allowed access to the dumpsters. Now, any hacker worth her weight in PIC16F84’s already knows what dumpster she dove into. It didn’t take her long to walk away with several hard drives, a few USB drives and some useful documents. She was able to gain knowledge of an upcoming IT contract work, the name of the CFO, and the name of a server with some level of importance – prod23.

Hacking the Server

With some more SE, she was able to find out when the IT work was scheduled. It was after hours. She showed up a bit late and was able to walk right through the front door by claiming she worked for the IT contract company. She then shifted roles and pretended to be an employee. She approached one the real IT contract guys, and said she worked for the CFO, [Mr. Shiraz], and asked if he knew to be careful with the prod23 server. With more SE, she was able to find out the prod23 server was off-limits, encrypted, and only accessible by specific admins.

se_03
Source

She was able to access an admin office, and it was there she would don her black hat. She booted the computer with BackTrack via USB and installed a key logger. She made an SSH tunnel to her personal server where she could dump the contents of the key logger, along with some other shells. Now, this is where things get interesting. She opened Virtual Box and used the computer’s hard drive as the boot medium. The VM booted the OS, and she hid all of the screen decorations to make it look like the target OS was running. The admin would log in without a clue, and our hacker would get their username and password through the key logger.

Once the login information came in, she was able to access the admin’s computer, and from there the prod23 server. You can imagine the look on the faces of the top executives for ACME Corp when our hacker handed them a copy of the keys to their kingdom.

Social engineering is human hacking, and a dark art in itself. Our hacker in this story would have never been able to even get close to the server if she did not have SE skills. No matter how secure you make something, so long as you allow humans access to it, it’s vulnerable to attack. And then it’s down to how well-trained your people are in repelling these kinds of intrusions.Just ask Target.

You can find the full story in the source below.

Sources

Social Engineering, The Art of Human Hacking, Chapter 8, by Christopher Hadnagy, ISBN-13: 860-1300286532

Some early work from UFID shows how even different Slic3rs can change the expected material properties of a filament.

Ask Hackaday: Material Databases

With more and more previously industrial processes coming online in the home shop, people are finding that getting the information that was previously provided by the manufacturer of a hundred thousand dollar machine for their three hundred dollar Shenzen special is not easy.

Some early work from UFID shows how even different Slic3rs can change the expected material properties of a filament.

A common example is this, a hacker purchased themselves a brand new 3D printer off amazon for a price too good to be true. After a week of tinkering with it, a small fire, and a few replacement parts later, they get it to work. After they’ve burned through, perhaps literally, the few hundred grams of filament that came with the printer at the setting recommended by the manufacturer, they do a small blanket order of the different filaments out there. Now comes the trouble, each printer is a little different and each filament has different properties. Most people find that the second spool of filament they feed into their printer doesn’t work at all. What’s the quickest way to get the right temperature, cooling, and feed settings for your printer configuration?

This isn’t a problem for the expensive machines. Epilog, a manufacturer of laser cutters, provides a grid of settings for each material you’re likely to cut, tuned to the different properties of each model of laser cutter they sell. Same goes for the expensive industrial 3D printers, each (very expensive) spool of material has the setting sitting in a chip in the casing. When the spool is slotted in the machine, it reads the settings and adjusts accordingly. All the work of tuning was done in a lab somewhere and the print is, theoretically, guaranteed.

Your Oshpark order would get delayed, your lulzbot support case would be dropped, teensies would ship late, and the Amp Hour would just be the EEVBlog Podcast if this bar burnt down, but it was a great event!
Your Oshpark order would get delayed, your Lulzbot support case would be dropped, Teensies would ship late, and the Amp Hour would just be the EEVBlog Podcast if this bar burnt down, but it was a great event!

While we were at the Bay Area Makerfaire 2016, we had a chance to talk to [Gauthier de Valensart] and buy him a beer at the Hackaday Meet-up. [Gauthier] is from Belgium where he is the founder of a start-up with one of those fancy new TLDs: filaments.directory. The goal of filaments.directory is to create a database of 3D printer materials and link that up with a user’s 3D printer settings. The eventual goal being, much like the industrial printers, a user would be able to simply scan a barcode, or wave the spool over an RFID reader to input the needed settings into his slicing software or printer.

This sounded familiar to me, not the least because I had started work on it as an extension for repables.com when that was a larger focus in my life. In fact, I remember, while I was kicking the idea around to people at MRRF, that they kept telling me someone else was working on a similar project. I wanted to introduce [Gauthier] to the person who was working on the project back then. Since I was at a bar full of people in the industry, I sort of helplessly rotated in my spot trying to find someone who might remember. I spied [whosawhatsis], a common attendee of MRRF, and asked him. Okay, that was easy, [whosawhatsis] informed us that is was his project… introduction complete. Goes to show you what a good networking event buying a bunch of nerds beer can be.

They got a pretty okay logo while they were at it.

The project was called, “Universal Filament Identification System,” and it proposed to, “… eliminate the guess-work,” by, “…developing a method for tagging, tracking, and identifying filament for 3d printing in machine-readable formats…” The project appears to be mostly dead now and its domain is a placeholder. I think it suffered from the standard open source feature creep, but the idea is sound.

Which gets us to the questions. There are a lot of difficulties with creating such a system. The first being the data collection. Who should be responsible for measuring the filaments, the materials for laser cutting, or any other process that needs tuned settings? The ideal track, of course, would be for the manufacturers to hold themselves accountable and report on the settings for their filaments. However, many filament manufacturers rely on the ignorance of users to sell dodgy products, it’s only in the interest of a few top-quality ones to do so. If the users do so, then how will the information provided be vetted? You definitely don’t want someone’s ignorance about a faulty thermistor to encourage you to run PLA at 280C.

More and more difficulties arise. How should the information be transferred, etc. What properties should even be recorded? UFID was going as far as to use a color sensor to keep track of colors between batches from 3D printer manufacturers. In the end it’s about creating standards in a standard-less industry by using crowdsourcing. Either way, take a look at what [Gauthier]’s doing (and send him some feedback), read the backlogs of UFID, think about how annoying it was to get the right settings for a laser cutter the last time you used one, and let us know your thoughts in the comments.

Data Logging; Everyone’s Doing It, Why Aren’t You?

Between Tesla Motors’ automobiles and SpaceX’s rockets, Elon Musk’s engineers just have to be getting something right. In part, SpaceX’s success in landing their first stage rockets is due to analysis of telemetry data. You can see some of the data from their launch vehicles on the live videos and there is surely a lot more not shown.

An article in MIT Technology Review provides similar insights in how Tesla came from behind in autonomous vehicle operation by analyzing telemetry from their cars. Since 2014 their Model S received an increasing number of sensors that all report their data over the vehicle’s always-on cellular channel. Sterling Anderson of Tesla reported they get a million miles of data every 10 hours.

Image Credit Tesla
Image Credit Tesla

The same approach can help us to improve our systems but many believe creating a log of key data is costly in time and resources. If your system is perfect (HA HA!) that would be a valid assessment. All too often such data becomes priceless if analysis explains why your drone or robot wanted to go left into a building instead of right into the open field.

Continue reading “Data Logging; Everyone’s Doing It, Why Aren’t You?”

Gcc: Some Assembly Required

There was a time when you pretty much had to be an assembly language programmer to work with embedded systems. Yes, there have always been high-level languages available, but it took improvements in tools and processors for that to make sense for anything but the simplest projects. Today, though, high-quality compilers are readily available for a lot of languages and even an inexpensive CPU is likely to outperform even desktop computers that many of us have used.

So assembly language is dead, right? Not exactly. There are several reasons people still want to use assembly. First, sometimes you need to get every clock cycle of performance out of a chip. It can be the case that a smart compiler will often produce better code than a person will write off the cuff. However, a smart person who is looking at performance can usually find a way to beat a compiler’s generated code. Besides, people can make value trades of speed versus space, for example, or pick entirely different algorithms. All a compiler can do is convert your code over as cleverly as possible.

Besides that, some people just like to program in assembly. Morse code, bows and arrows, and steam engines are all archaic, but there are still people who enjoy mastering them anyway. If you fall into that category, you might just want to write everything in assembly (and that’s fine). Most people, though, would prefer to work with something at a higher level and then slip into assembly just for that critical pieces. For example, a program might spend 5% of its time reading data, 5% of its time writing data, and 90% of the time crunching data. You probably don’t need to recreate the reading and writing parts. They won’t go to zero, after all, and so even if you could cut them in half (and you probably can’t) you get a 2.5% boost for each one. That 90% section is the big target.

The Profiler

Sometimes it is obvious what’s taking time in your programs. When it isn’t, you can actually turn on profiling. If you are running GCC under Linux, for example, you can use the -pg option to have GCC add profiling instrumentation to your code automatically. When you compile the code with -pg, it doesn’t appear to do anything different. You run your program as usual. However, the program will now silently write a file named gmon.out during execution. This file contains execution statistics you can display using gprof (see partial output below). The function b_fact takes up 65.9% of CPU time.

screenshot_232

If you don’t have a profiling option for your environment, you might have to resort to toggling I/O pins or writing to a serial port to get an idea of how long your code spends doing different functions. However you do it, though, it is important to figure it out so you don’t waste time optimizing code that doesn’t really affect overall performance (this is good advice, by the way, for any kind of optimization).

Assembly

If you start with a C or C++ program, one thing you can do is ask the compiler to output assembly language for you. With GCC, use a file name like test.s with the -o option and then use -S to force assembly language output. The output isn’t great, but it is readable. You can also use the -ahl option to get assembly code mixed with source code in comments, which is useful.

You can use this trick with most, if not all, versions of GCC. Of course, the output will be a lot different, depending. A 32-bit Linux compiler, a 64-bit Linux compiler, a Raspberry Pi compiler, and an Arduino compiler are all going to have very different output. Also, you can’t always figure out how the compiler mangles your code, so that is another problem.

If you find a function or section of code you want to rewrite, you can still use GCC and just stick the assembly language inline. Exactly how that works depends on what platform you use, but in general, GCC will send a string inside asm() or __asm__() to the system assembler. There are rules about how to interact with the rest of the C program, too. Here’s a simple example from the a GCC HOWTO document (from a PC program):

__asm__ ("movl %eax, %ebx\n\t"
"movl $56, %esi\n\t"
"movl %ecx, $label(%edx,%ebx,$4)\n\t"
"movb %ah, (%ebx)");

You can also use extended assembly that lets you use placeholders for parts of the C code. You can read more about that in the HOWTO document. If you prefer Arduino, there’s a document for that, too. If you are on ARM (like a Raspberry Pi) you might prefer to start with this document.

So?

You may never need to mix assembly language with C code. But if you do, it is good to know it is possible and maybe not even too difficult. You do need to find what parts of your program can benefit from the effort. Even if you aren’t using GCC, there is probably a way to mix assembly and your language, you just have to learn how. You also have to learn the particulars of your platform.

On the other hand, what if you want to write an entire program in assembly? That’s even more platform-specific, but we’ll look at that next time.