How To Design, Manufacture, And Document A Hardware Product

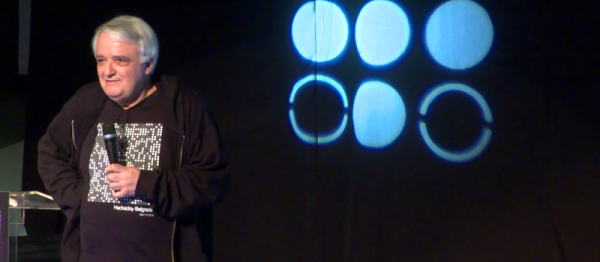
It’s pretty awesome to have a hardware design hero jump at the chance to work on a Hackaday conference badge. I am of course talking about Voja Antonic.

I’ve gotten to know him over the last two years when we were introduced and he agreed to work on some original articles. He’s long been a hacker and shared his story of technology despite politics and society changing around him. His Galaksija computer was the first personal computer available in Yugoslavia with over 8,000 kits sold. Since those days he never stopped refining his design and fabrication skills. For instance, his method of making cases from FR4 is beyond compare, and reading some of his wisdom from hardware design in the casino industry is the kind of fascinating stuff that rarely makes it out for others to enjoy.

But I digress — the point is Voja’s been around the block, he knows what he’s doing, and he does it at an amazingly high level. He did an incredible job with the Hackaday | Belgrade conference badge. It features a 16×8 LED display, IR comms hardware, 5 user buttons, USB programming, an option for an accelerometer module, and has spectacular life running on two AAA batteries. It was a hit at the conference, and so was his talk discussing the design and fabrication. Check it out below and then join me below the fold.

Continue reading “How To Design, Manufacture, And Document A Hardware Product”

Hackaday Dictionary: Transformers

Funny stuff, electricity. It’s all about the volts and the amps, and controlling these two factors. Most of the time, the electricity coming into your device is at a higher voltage than you need, so you have to convert it down to something more usable. The easiest way to do this is with a transformer.

The transformer in your power supply takes a high voltage from the mains and converts it down into a lower voltage to power your gadgets. You’ll find one in all power supplies, from the miniature USB version that powers your cell phone to the big ones hanging on a telephone pole that drive your home’s mains electricity. Although these transformers are different sizes, they share the same fundamental design.

Continue reading “Hackaday Dictionary: Transformers”

Fail Of The Week: ESP8266 Heats Temperature Sensor

[Richard Hawthorn] sent us in this interesting fail, complete with an attempted (and yet failed) clever solution. We love learning through other people’s mistakes, so we’re passing it on to you.

First the obvious-in-retrospect fail. [Richard] built a board with a temperature sensor and an ESP8266 module to report the temperature to the Interwebs. If you’ve ever put your finger on an ESP8266 module when it’s really working, you’ll know what went wrong here: the ESP8266 heated up the board and gave a high reading on the temperature sensor.

temp2
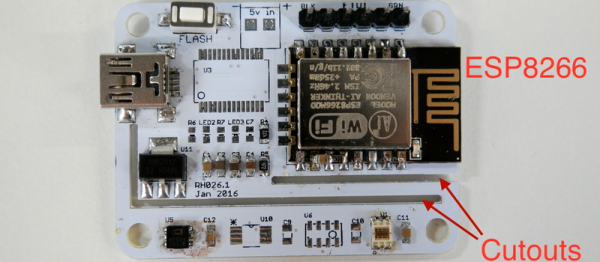
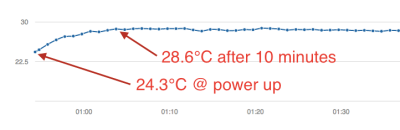
Next came the clever bit. [Richard] put cutouts into the board to hopefully stop the flow of heat from the ESP8266 module to the temperature sensor. Again, he found that the board heats up by around four degrees Celcius or nine degrees Farenheit. That’s a horrible result in any units.

What to do? [Richard’s] first ideas are to keep hammering on the thermal isolation, by maybe redoing the board again or adding a heatsink. Maybe a daughterboard for the thermal sensor? We can’t see the board design in enough detail, but we suspect that a flood ground plane may be partly to blame. Try running thin traces only to the temperature section?

[Richard]’s third suggestion is to put the ESP into sleep mode between updates to reduce waste heat and power consumption. He should be doing this anyway, in our opinion, and if it prevents scrapping the boards, so much the better. “Fix it in software!” is the hardware guy’s motto.

But we’ll put the question to you electronics-design backseat drivers loyal Hackaday readers. Have you ever noticed this effect with board-mounted temperature sensors? How did you / would you get around it?


2013-09-05-Hackaday-Fail-tips-tileFail of the Week is a Hackaday column which celebrates failure as a learning tool. Help keep the fun rolling by writing about your own failures and sending us a link to the story — or sending in links to fail write ups you find in your Internet travels.

JIT Learning Using Expert Systems

Chris Gammell is a guy that should need no introduction around these parts. He’s a co-host on The Amp Hour, and the guy behind Contextual Electronics, a fabulous introduction to electronics and one of the best ways to learn KiCad. If you want to talk about the pedagogy of electronics, this is the guy you want.

Chris’ talk at the Hackaday | Belgrade conference was on just that – the pedagogy of electronics. Generally, there are two ways to learn how to blink an LED. The first, the bottom-up model taught in every university, is to first learn Ohm’s law, resistance, current, voltage, solve hundreds of resistor network problems, and eventually get around to the ‘electrons and holes’ description of a semiconductor. The simplest semiconductor is a diode, and sometime in the sophomore or junior year, the student will successfully blink a LED.

The second, top-down method is much simpler. Just wire up a battery, resistor, switch, and LED to a breadboard. This is the top-down model of electronics design; you don’t need to know everything to get it to work. You don’t need to do it with a 555, and you certainly don’t have to derive Maxwell’s equations to make something glow. Chris is a big proponent of the top-down model of learning, and his Belgrade talk is all about the virtues of not knowing everything.

Continue reading “JIT Learning Using Expert Systems”

Getting Ugly, Dead Bugs, And Going To Manhattan

Back in the 1980s I was a budding electronics geek working in a TV repair shop. I spent most of my time lugging TVs to and from customers, but I did get a little bench time in. By then new TVs were entirely solid-state and built on single PC boards, but every once in a while we’d get an old-timer in with a classic hand-wired tube chassis. I recall turning them over, seeing all the caps and resistors soldered between terminal strips bolted to the aluminum chassis and wondering how it could all possibly work. It all looked so chaotic and unkempt compared to the sleek traces and neat machine-inserted components on a spanking new 19″ Zenith with the System 3 chassis. In a word, the old chassis was just – ugly.

Looking back, I probably shouldn’t have been so judgmental. Despite the decades of progress in PCB design and the democratization of board production thanks to KiCad, OSH Park, and the like, it turns out there’s a lot to be said for ugly methods of circuit construction.

Continue reading “Getting Ugly, Dead Bugs, And Going To Manhattan”

Carbon Monoxide: Hunting A Silent Killer

Walt and Molly Weber had just finished several long weeks of work. He was an FBI agent on an important case. She had a management job at Houghton Mifflin. On a sunny Friday evening in February of 1995, the two embarked on a much needed weekend skiing getaway. They drove five hours to the Sierra Mountains in California’s Mammoth Lakes ski area. This was a last-minute trip, so most of the nicer hotels were booked. The tired couple checked in at a lower cost motel at around 11:30pm on Friday night. They quickly settled in and went to bed, planning for an early start with a 7am wakeup call Saturday morning.

When the front desk called on Saturday, no one answered the phone. The desk manager figured they had gotten an early start and were already on the slopes. Sunday was the same. It wasn’t until a maid went to check on the room that the couple were found to be still in bed, unresponsive.

Continue reading “Carbon Monoxide: Hunting A Silent Killer”

Retrotechtacular: TV Troubleshooting

As technology advances, finding the culprit in a malfunctioning device has become somewhat more difficult. As an example, troubleshooting an AM radio is pretty straightforward. There are two basic strategies. First, you can inject a signal in until you can hear it. Then you work backwards to find the stage that is bad. The other way is to trace a signal using a signal tracer or an oscilloscope. When the signal is gone, you’ve found the bad stage. Of course, you still need to figure out what’s wrong with the stage, but that’s usually one or two transistors (or tubes) and a handful of components.

A common signal injector was often a square wave generator that would generate audio frequencies and radio frequency harmonics. It was common to inject at the volume control (easy to find) to determine if the problem was in the RF or audio sections first. If you heard a buzz, you worked backwards into the RF stages. No buzz indicated an audio section problem.

A signal tracer was nothing more than an audio amplifier with a diode demodulator. Starting at the volume control was still a good idea. If you heard radio stations through the signal tracer, the RF section was fine. Television knocked radio off of its pedestal as the primary form of information and entertainment in most households, and thus the TV repair industry was created.

Continue reading “Retrotechtacular: TV Troubleshooting”