It’s TikTok, On Your Wrist!

One of the ultimate objects of desire in the early 1980s was the Seiko TV wristwatch. It didn’t matter that it required a bulky external box in your pocket for its electronics, it was a TV on your wrist, and the future was here! Of course, now we have the technology to make wrist-mounted video a practical reality, but it’s sad to see we’ve opted to use our phones for video and never really followed up on the promise of a wrist-mounted television. There’s always hope though, and here it is in the form of [Dave Bennett]’s ESP32-powered TikTok wristwatch.

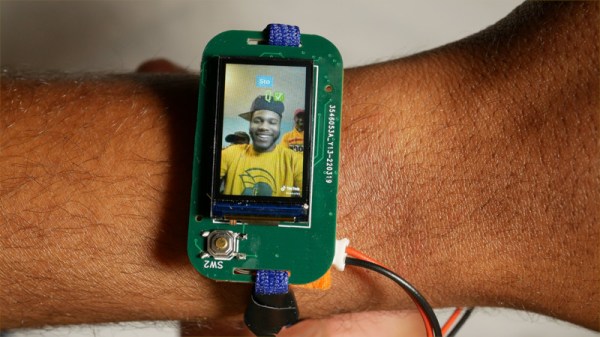
On the wrist is the ESP32 itself with an audio DAC and amplifier, LCD screen, and battery, but sadly this combo doesn’t have quite the power to talk to TikTok directly. Instead that’s done using Python on a companion PC with the resulting videos uploaded to the device over WiFi. It’s not the bulky electronics of the Seiko TV, so we’ll take it. All the info can be found on GitHub, and there’s a YouTube video below the break.

So the viral videos of a generation can now be taken on the move without resorting to a slightly less portable mobile phone. It may not be the most unobtrusive of timepieces, but it’ll certainly get you noticed.

Continue reading “It’s TikTok, On Your Wrist!”

Electronic Dice Is Introduction To Microcontroller Programming

By now most of us are familiar with the Arduino platform. It’s an inexpensive and fairly easy way into the world of microcontrollers. For plenty of projects, there’s no need to go beyond that unless you have a desire to learn more of the inner workings of microcontrollers in general. [Cristiano] was interested in expanding some of his knowledge, so he decided to build this electronic dice using a PIC microcontroller instead of the Arduino platform he was more familiar with.

As a result, this project is set up as a how-to for others looking to dive further into the world of microcontrollers that don’t have the same hand-holding setup as the Arduino. To take care of the need for a random number for the dice, the PIC’s random number generator is used but with the added randomness of a seed from an internal timer. The timer is started when a mercury tilt switch signals the device that it has been rolled over, and after some computation a single digit number is displayed on a seven-segment display.

While it might seem simple on the surface, the project comes with an in-depth guide on programming the PIC family of microcontrollers, and has a polish not normally seen on beginner projects, including the use of the mercury tilt switch which gives it a retro vibe. For some other tips on how to build projects like this, take a look at this guide on how to build power supplies for your projects as well.

Continue reading “Electronic Dice Is Introduction To Microcontroller Programming”

SWO: An ARM Printf By Any Other Name

I’ll confess. Although printf-style debugging has a bad rep, I find myself turning to it on occasion. Sure, printf is expensive and brings in a lot of code, but if you have the space and time to use it while debugging you can always remove it before you are finished. However, what if you don’t have an output device or you are using it for something else? If you are using most modern ARM chips, you have another option — a dedicated output channel that is used for several things, including debugging output. I decided I wanted to try that on the Blackpill running mbed, and found out it isn’t as easy as you might think. But it is possible, and when you are done reading, you’ll be able to do it, too.

I’m writing this using the STM32-specific ST-LINK hardware. If you use other JTAG devices like the BlackMagic probe, you probably already have this set up for you.

What You Get

I’ll start backward with the end result, then talk about the software, so you’ll be good and motivated by the time you get to the hardware requirements. Spoiler alert: your existing hardware might need a quick hack to make it work, although you can buy something off the shelf if you prefer.

Here is a very simple test program:


SWO_Channel debugport;  // requires #include "SWO.h"
int main() 
  {
  unsigned count=0;
  debugport.printf("\r\nHello World from SWO\r\n");
  debugport.printf("CPU SystemCoreClock is %d Hz\r\n", SystemCoreClock);

  while (1) 
    {
    led = !led; // flip LED if output is true
    ThisThread::sleep_for(rate); // sleepy time
    if (count % 10) debugport.putc('*'); else debugport.printf("%d\r\n",count); 
    count++;
    }
}

Continue reading “SWO: An ARM Printf By Any Other Name”

A wooden picture frame with an e-ink display

Receive Virtual Postcards On This Beautiful E-Ink Photo Frame

Sending postcards to loved ones used to be standard procedure for travelers back when travel was glamorous and communications were slow. While some travelers still keep this tradition alive, many have replaced stamps and post offices with instant messaging and social media — faster and more convenient, but a lot less special than receiving a postcard with a handwritten message from a faraway land.

[Cameron] designed a postcard picture frame that aims to bring back a bit of that magic. It’s a wooden frame that holds an e-ink display, which shows pictures sent to it by your friends. All they need to do is open the unique link that you sent them beforehand and upload an interesting photo; the picture frame will cycle through the submissions based on an adjustable schedule. A web interface allows you to change settings and delete any inappropriate images.

A black PCB with an ESP32 mounted on itThe wooden frame is beautifully made, but the sleek black PCB inside is an true work of art. It holds a battery and a USB-C charging circuit, as well as an ESP32 that connects to WiFi, stores images and downscales them to the 800×480 monochrome format used by the display. [Cameron] has not accurately measured the current consumption, but estimates that it should work for about one year on a single charge thanks to the extremely low power requirements of e-ink displays.

Having your friends decide on the images shown in your house is an interesting idea, if you can trust them to keep it decent. If you like to have more control over your e-ink display, have a look at this solar-powered model or this wall-mounted newspaper display.

Continue reading “Receive Virtual Postcards On This Beautiful E-Ink Photo Frame”

TurtleAuth DIY Security Token Gets (Re)designed For Durable, Everyday Use

[Samuel]’s first foray into making DIY hardware authentication tokens was a great success, but he soon realized that a device intended for everyday carry and use has a few different problems to solve, compared to a PCB that lives and works on a workbench. This led to TurtleAuth 2.1, redesigned for everyday use and lucky for us all, he goes into detail on all the challenges and solutions he faced.

When we covered the original TurtleAuth DIY security token, everything worked fantastically. However, the PCB layout had a few issues that became apparent after a year or so of daily use. Rather than 3D print an enclosure and call it done, [Samuel] decided to try a different idea and craft an enclosure from the PCB layers themselves.

The three-layered PCB sandwich keeps components sealed away and protected, while also providing a nice big touch-sensitive pad on the top, flanked by status LEDs. Space was a real constraint, and required a PCB redesign as well as moving to 0402 sized components, but in the end he made it work. As for being able to see the LEDs while not having any component exposed? No problem there; [Samuel] simply filled in the holes over the status LEDs with some hot glue, creating a cheap, effective, and highly durable diffuser that also sealed away the internals.

Making enclosures from PCB material can really hit the spot, and there’s no need to re-invent the wheel when it comes to doing so. Our own [Voja Antonic] laid out everything one needs to know about how to build functional and beautiful enclosures in this way.

Scott’s CPU From The Bottom Up

It isn’t for everyone, but if you work much with computers at a low level, you’ll probably sooner or later entertain the idea of creating your own CPU. There was a time when that was a giant undertaking, but with today’s tools and FPGAs it is… well, not easy, but certainly easier. If you have the urge to try your own, you might have a look at [Simply Explained’s] video series called “Building Scott’s CPU.

The 11 videos cover everything from basic transistor logic to sequential circuits and moves on to things like ALUs, clock units, and how jump instructions work.

Continue reading “Scott’s CPU From The Bottom Up”

OpenCV Running On A Tiny Microcontroller

At first blush, it might seem like projects that make extensive use of computer vision or machine learning would need to be based on powerful computing platforms with plenty of clock cycles and memory to handle this type of application. While there is some truth to this, as the field progresses it becomes possible to experiment with these tools on low-power devices as well. Take this OpenCV project which is built entirely on an ESP32 for example.

With that being said, there are some modifications that need to be made to the ESP32 in order to use OpenCV in any meaningful way. The most important of these is the use of the ESP32-DOWDQ6 module which increases the available memory of the ESP32 to allow it to make better use of camera functions. Even then, the ESP32 can’t run the entire OpenCV application, so a shrunken version of OpenCV is required before the device can run it natively. Once those two obstacles are out of the way, though, doing things like edge detection, as this project demonstrates, are well in the realm of possibility.

If running OpenCV on something as small as an ESP32 is possible, it is even easier to run on something orders of magnitude more powerful and yet still inexpensive, such as the Raspberry Pi. While the project’s code is available on its GitHub page for those interested, there are plenty of other OpenCV projects that we have featured on more powerful platforms as well, like this clock which falls off of the wall whenever someone looks at it.

Continue reading “OpenCV Running On A Tiny Microcontroller”