OTTO: A Pi Based Open Source Music Production Box

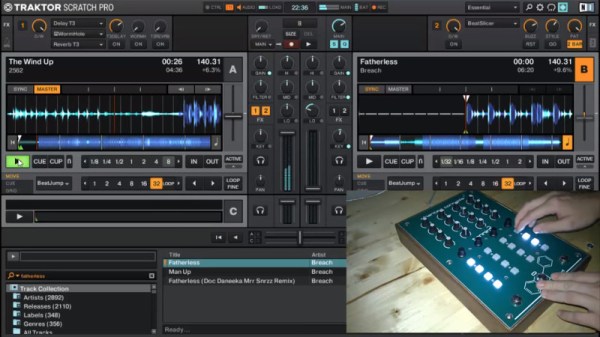
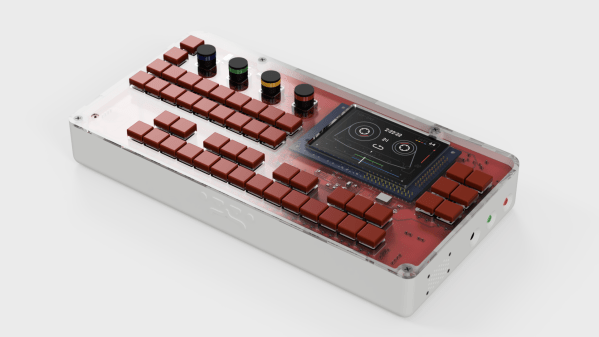
Want an open source portable synth workstation that won’t break the bank? Check out OTTO. [Topisani] started OTTO as a clone of the well-known Teenage Engineering OP-1. However, soon [Topisani] decided to branch away from simply cloning the OP-1 — instead, they’re taking a lot of inspiration from it in terms of form factor, but the UI will eventually be quite different.
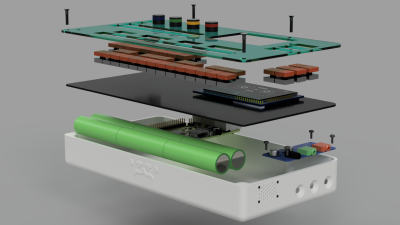
On the hardware side, the heart of the OTTO is a Raspberry Pi 3. The all-important audio interface is a Fe-Pi Audio Z V2, though a USB interface can be used. The 48 switches and four rotary encoders are wrangled by a pair of Arduino pro micros which pass the data on to the Pi. Data is related to the user through a 320×200 LCD.

The software is being written from scratch in C++17. If you’re not a hardcore C++ developer, don’t worry. The synth engines, audio effects, and other DSP software is written in Faust, which is a bit easier to learn.

OTTO is actively being developed, with synth engines already running, a prototype in progress, and fleshed out guidelines for programming the UI. If you’re into creating music, this one is worth checking out, as is Zynthian, another Raspberry Pi based synth.
The Precise Science Of Whacking A Wine Glass

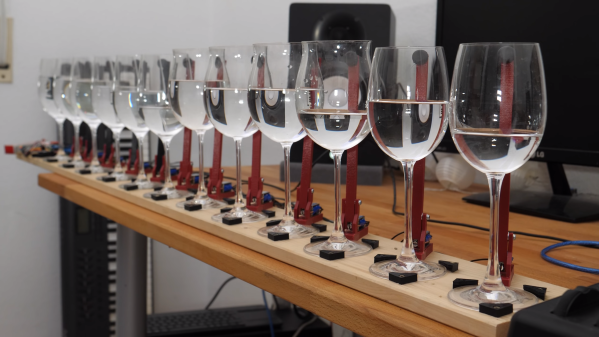
It’s common knowledge that tapping a wine glass produces a pitch which can be altered by adjusting the level of the tipple of choice inside. By filling twelve glasses with different amounts of liquid and tuning them to the twelve notes of the scale, it’s possible to make a one-octave instrument – though the speed and polyphony are bottle-necked by the human operator. If you think it sounds like a ripe project for automation, you’re correct: [Bitluni’s lab] has done what needed to be done, and created a MIDI instrument which plays the glasses using mallets.

Electronically it’s a simple build – some 12 V solenoids driven by MOSFETs, with an Arduino in charge. For the mechanical build, a 3D printer proved very useful, as each mallet could be made identical, ensuring a consistent tone across all glasses. Rubber covers printed in flexible filament were fitted to reduce the overtones and produce a clearer sound. [Bitluni] also utilised different types of glasses for the low and high pitches, which also helped to improve the clarity of the tone.

MIDI is of course the perfect protocol for this application; simple, lightweight and incredibly widely used, it’s the hacker’s delight for projects like this. The instrument can perform pre-programmed sequences, or be played live with a MIDI controller. Both of these are shown in the video after the break – stick around for a unique rendition of Flight Of The Bumblebee. For a more compact wine glass based music creation solution, we recommend this nifty project, which alters pitch using a water balloon raised and lowered into the glass by a servo.  Continue reading “The Precise Science Of Whacking A Wine Glass”

Turn A Cheap Bluetooth Speaker Into An Audio Receiver

Cheap Bluetooth speakers come in all different kinds of shapes and colors, and they let you conveniently stream music, for example from your mobile phone. For [mcmchris], they had one significant shortcoming though: while most of them come with some auxiliary input port as alternative audio source, they usually lack an audio output port that would let him route the audio to his more enjoyable big-speaker sound setup. Lucky for him, it’s a problem that can be fixed with a wire cutter and soldering iron, and so he simply turned his cheap speaker into a Bluetooth audio receiver.

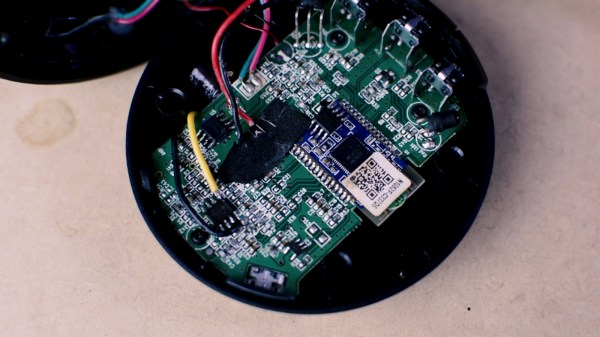
After opening the speaker, [mcmchris] discovered a regular F-6188 Bluetooth audio module built around the BK8000L chip, with the audio jack connected to the chip’s aux input pins. Taking a close look at the PCB, the solution seemed obvious: cut the connection to the chip’s aux input pins, and connect the audio jack parallel to the audio signal itself. After some trial and error, the output pins of the on-board op amplifier seemed to provide the best audio signal for his shiny new output jack. You can see more details about the speaker’s inner life and a demonstration in the video after the break — in Spanish.

If the concept looks familiar to you, we’ve indeed seen a very similar approach to equip a Google Home Mini with an audio output jack before. The alternative is of course to just build a decent sized Bluetooth speaker yourself.

Continue reading “Turn A Cheap Bluetooth Speaker Into An Audio Receiver”

OpenDeck Makes Spinning Your Own MIDI Controller Easy

These days, MIDI controllers are just plain cool. There are a million of them out there, and they’re all dressed to the nines in flashing LEDs and sporting swag like USB MIDI interfaces and sliders that just feel right. With our italics budget running out, I should get to the point – you can make your own, and the OpenDeck platform makes it easy.

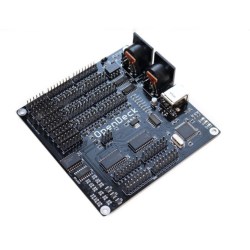
The OpenDeck board. Readily apparent is the fact that it has tons of IO.

In its most refined form, the OpenDeck is a board covered in pin headers. To these, you may connect an absolute truckload of buttons, encoders, sliders, and LEDs. The OpenDeck handles all of the inputs and outputs, while you get to have fun attaching your various gizmos to the control surface/keytar/birthday cake you happen to be building. It saves you reinventing the wheel as far as reading switches and potentiometers goes, allowing you to focus on the creative side of your project. All configuration is handled through a simple web interface.

Boards are available on Tindie,  but it’s also possible to take the code and run it on various Arduinos and the like, as it’s wonderfully opensource. This gives you the power to take things to a higher level once you’re good and ready.

We’ve seen a rather cool OpenDeck build already, and if you’ve got more, you know where to reach us.


Circuit Bent Keyboard Is Pretty In Pink

If you’re anything like us, more than a few of your projects were borne out of the fact that you had some crusty bit of gear that was badly in need of a second lease on life. Whether it was a hand-me-down or pulled out of the garbage, we’ve all at one time or another had some piece of hardware in our hands that might not be worth anything in its current form, but would make an awesome excuse for warming up the soldering iron.

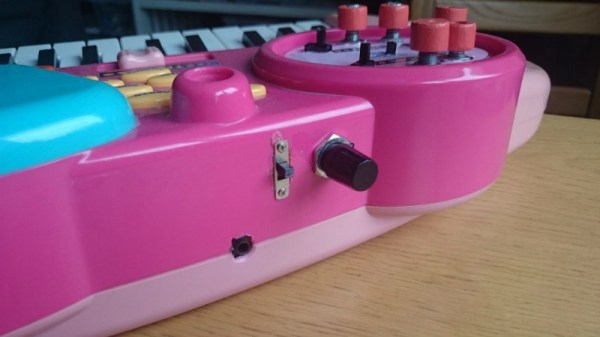
That’s what happened when [joekutz] got his hands on this exceptionally juvenile keyboard toy. In its original state, it was so janky it couldn’t even reliably detect two keys being pressed at the same time; sort of a problem for a keyboard. So he decided to pull it apart and use it as a circuit bending playground. Thanks in part to how much free space was inside of the case, he was able to pack in a number of interesting modifications which he’s kindly detailed on Hackaday.io.

[joekutz] started by adding a headphone jack to the device, as well as a switch to disable the keyboard’s speaker. That allows not only listening to digital jams in private, but makes it possible to capture high-quality audio when connected to the computer. He then started poking around the PCB with a resistor and listening for changes. When the pitch of the keyboard changed, he soldered a potentiometer into its place and now had a way to adjust it on the fly.

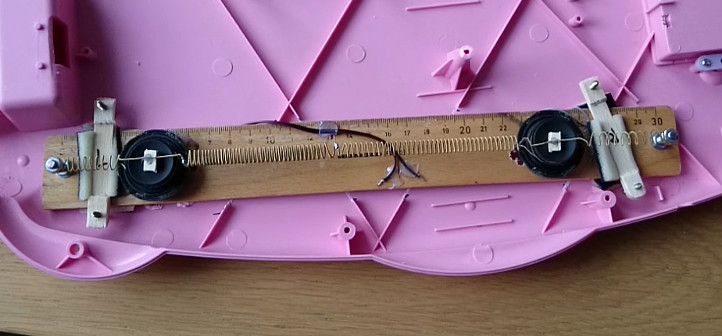
Of particular note is the clever physical reverb he came up with. A microphone and speaker are connected to each other with a spring made out of an old guitar string. Audio from the keyboard’s PCB is played on the speaker and a TDA2022 low-voltage amplifier boosts the signal from the microphone. The end result is a very cool ethereal metallic effect.

If you’re looking for a slightly larger DIY reverb, we’ve covered a few builds in the past which should give you some inspiration. You might want to check the dumpster behind the abandoned local Toys R’ Us for some donor keyboards while you’re at it.

Continue reading “Circuit Bent Keyboard Is Pretty In Pink”

A MIDI Sequencer To Be Proud Of

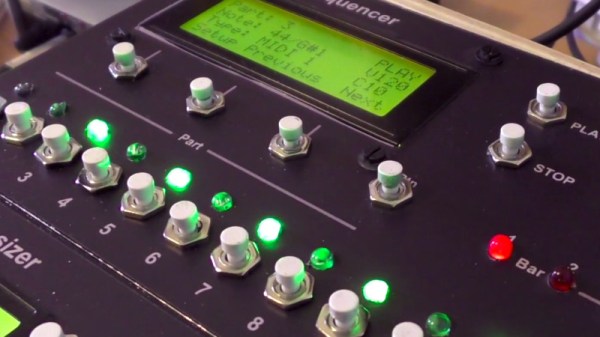
MIDI sequencers are surprisingly expensive, making them an excellent target for [RH Electronics] who has created a sixteen-step device. It supports up to eight playable parts per step, which can be either MIDI or drum triggers.

The case and front panel are built to a very high standard, and on a piece of stripboard within lies an ATmega644 which does all the MIDI work, an ATmega328 that runs the many LEDs, and an ATtiny85 that reads the front panel buttons. The whole is kept in sync by a timer on the 644 set to produce the required MIDI clock. There is an LCD display too, which carries the status and programming interface.

You can see the result in the video below the break, in which the sequencer is put through its paces alongside a tantalising glimpse of a matching synthesiser. Is this another project, or a commercial device on which Google fails us when we try to find it? Meanwhile this is certainly not the first MIDI sequencer we’ve brought you here at Hackaday, this Arduino one is another example of several also using Atmel parts.

Continue reading “A MIDI Sequencer To Be Proud Of”

DIY Talkbox Gives You More Bounce To The Ounce

Back in the 70s, you couldn’t swing a macrame plant hanger around a record store without knocking over numerous displays of albums featuring talkboxes. They were all over 70s music, kind of like how almost every 80s song has a sax solo and/or Michael McDonald on backing vocals. Not sure you’ve heard one being used? Trust us, you definitely have and just don’t realize it.

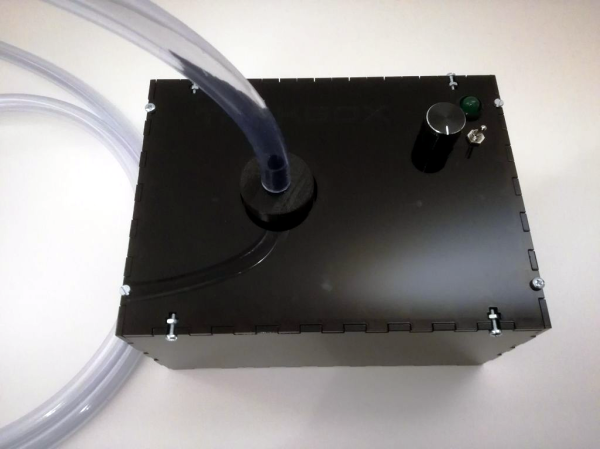
Talkboxes are essentially an amplifier and a speaker contained in a box. The speaker is the acoustic diaphragm type used in bullhorns and civil defense sirens. You run your guitar, keyboard, or electrified hurdy gurdy into the box, and instead of driving a horn, the sound travels up a clear plastic tube and into your mouth. Your mouth, fine resonant cavity that it is, becomes the final effect pedal. Any way you can manipulate it will shape the sound coming from the instrument. Flap those lips, and suddenly you’re talking like a robot. Who wouldn’t want one of these?

So they aren’t complicated, but you wouldn’t know it from the price of commercial ones. [mosivers] really digs the sound and wanted to build one, so he scoured the internet to figure out how to do so properly and shared his findings in this Instructable. The most important bit is the compression driver. The drivers that featured in the original talkboxes aren’t made anymore, but there are suitable replacements for ~$40.

The next most important part is a high-pass filter to keep really low frequencies from damaging the driver. After that it’s down to the amplifier, some passives, and the all-important tube. You could laser cut an enclosure as [mosivers] did, or be the first person in history to reuse a Danish butter cookie tin for something other than sewing supplies. Boogie on down past the break and let’s groove tonight.

Speaking of the 80s, here’s a DIY talkbox built on a Game Boy.

Continue reading “DIY Talkbox Gives You More Bounce To The Ounce”