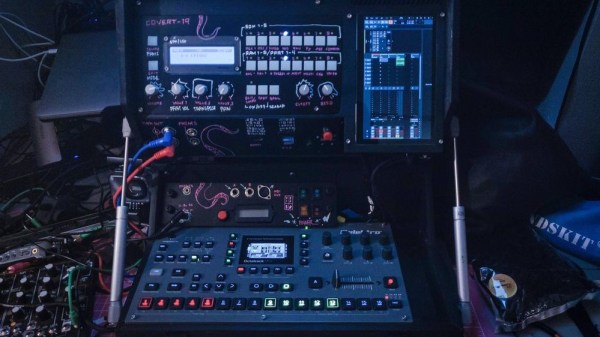
Don’t Fret Over The Ukulele

A ukulele is a great instrument to pick to learn to play music. It’s easy to hold, has a smaller number of strings than a guitar, is fretted unlike a violin, isn’t particularly expensive, and everything sounds happier when played on one. It’s not without its limited downsides, though. Like any stringed instrument some amount of muscle memory is needed to play it fluidly which can take time to develop, but for new musicians there’s a handy new 3D printed part that can make even this aspect of learning the ukulele easier too.

Called the Easy Fret, the tool clamps on to the neck of the ukulele and hosts a series of 3D printed “keys” that allow for complex chord shapes to be played with a single finger. In this configuration the chords C, F, G, and A minor can be played (although C probably shouldn’t be considered “complex” on a ukulele). It also makes extensive use of compliant mechanisms. For example, the beams that hit the chords use geometry to imitate a four-bar linkage. This improves the quality of the sound because the strings are pressed head-on rather than at an angle.

While this project is great for a beginner learning to play this instrument and figure out the theory behind it, its creator [Ryan Hammons] also hopes that it can be used by those with motor disabilities to be able to learn to play an instrument as well. And, if you have the 3D printer required to build this but don’t have an actual ukulele, with some strings and tuning pegs you can 3D print a working ukulele as well.

Homebrew Grain Synth Has A Rad Step Sequencer

In the world of homebrew synthesizers, there are plenty of noiseboxes and grooveboxes that make all kinds of wacky and wild noises. However, common projects like the Auduino and Atari Punk Console are often limited in that they can’t readily be programmed to play multiple notes or any sort of discernable rhythm. [Nick Poole] changes this with his Auduino step sequencer build.

The build takes the Auduino grain synthesizer, and modifies it by adding a step sequencer. This is possible as the Auduino code, which runs on the old-school ATMEGA-based Arduinos, is incredibly fast, leaving plenty of processing time for extra features to be added. [Nick] adds eight LEDs and eight buttons to the build, allowing the user to select one of eight steps to modify. Then, the sound parameters for the step can be altered with the standard Auduino controls. This lets the user quickly and easily build up 8-step melodies, something that was previously impossible with the Auduino.

It’s a fun build, and one that makes a great intro into the world of DIY synth builds. The techniques learned here will serve any aspiring maker well if they dive further into the world of modular synthesis and associated arcana. Video after the break.

Continue reading “Homebrew Grain Synth Has A Rad Step Sequencer”

Guitar Effects With No (Unwanted) Delay

MIDI has been a great tool for musicians and artists since its invention in the 1980s. It allows a standard way to interface musical instruments to computers for easy recording, editing, and production of music. It does have a few weaknesses though, namely that without some specialized equipment the latency of the signals through the various connected devices can easily get too high to be useful in live performances. It’s not an impossible problem to surmount with the right equipment, as illustrated by [Philip Karlsson Gisslow].

The low-latency MIDI interface that he created is built around a Raspberry Pi Pico. It runs a custom library created by [Philip] called MiGiC which specifically built as a MIDI to Guitar interface. The entire setup consists of a preamp to boost the guitar’s signal up to 3.3V where it is then fed to the Pi. This is where the MIDI sampling is done. From there it sends the information to a PC which is able to play the sound back quickly with no noticeable delay.

[Philip] also had to do a lot of extra work to port the software to the Pi which lacks a lot of the features of its original intended hardware on a Mac or Windows machine, and the results are impressive, especially at the end of the video where he uses the interface to play a drum machine via his guitar. And, while MIDI is certainly a powerful application for a guitarist, we have also seen the Pi put to other uses in this musical realm as well.

Continue reading “Guitar Effects With No (Unwanted) Delay”

Peek Into This Synth’s Great Design (And Abandoned Features)

[Tommy]’s POLY555 is an analog, 20-note polyphonic synthesizer that makes heavy use of 3D printing and shows off some clever design. The POLY555, as well as [Tommy]’s earlier synth designs, are based around the 555 timer. But one 555 is one oscillator, which means only one note can be played at a time. To make the POLY555 polyphonic, [Tommy] took things to their logical extreme and simply added multiple 555s, expanding the capabilities while keeping the classic 555 synth heritage.

The real gem here is [Tommy]’s writeup. In it, he explains the various design choices and improvements that went into the POLY555, not just as an instrument, but as a kit intended to be produced and easy to assemble. Good DFM (Design For Manufacturability) takes time and effort, but pays off big time even for things made in relatively small quantities. Anything that reduces complexity, eliminates steps, or improves reliability is a change worth investigating.

For example, the volume wheel is not a thumbwheel pot. It is actually a 3D-printed piece attached to the same potentiometer that the 555s use for tuning; meaning one less part to keep track of in the bill of materials. It’s all a gold mine of tips for anyone looking at making more than just a handful of something, and a peek into the hard work that goes into designing something to be produced. [Tommy] even has a short section dedicated to abandoned or rejected ideas that didn’t make the cut, which is educational in itself. Want more? Good news! This isn’t the first time we’ve been delighted with [Tommy]’s prototyping and design discussions.

POLY555’s design files (OpenSCAD for enclosure and parts, and KiCad for schematic and PCB) as well as assembly guide are all available on GitHub, and STL files can be found on Thingiverse. [Tommy] sells partial and complete kits as well, so there’s something for everyone’s comfort level. Watch the POLY555 in action in the video, embedded below.

Continue reading “Peek Into This Synth’s Great Design (And Abandoned Features)”

A Sympathetic Nail Violin

As a hacker community, we are no strangers to beautiful and unique musical instruments. A sympathetic nail violin built by [Nicolas Bras] is a welcome addition to the eclectic family. Working up from the simple idea of a nail in a piece of wood and adjusting the pitch by hammering the nail farther into the wood, [Nicolas] expanded the idea. With careful planning and tuning, the nails can have sympathetic properties. These properties mean that when one nail is played via a bow, it causes other nails to sound, creating harmonies and sustains.

With a bit of careful woodworking and a scant touch of metalwork, an instrument was crafted. It offers vast flexibility as it can be played by bow, by plucking with your finger, or by strumming. There are several levels of nails, each level having a paired sympathetic nail. This allows for a diverse and versatile instrument.

Here at Hackaday, we seem to have a thing for tiny violins, whether physical or virtual. While the nail violin may not look like your traditional violin, we can certainly appreciate the wonderful music it creates.

Continue reading “A Sympathetic Nail Violin”

An Homage To Daft Punk In Fan-Made Helmets Through The Years.

It’s with sadness that we note the end to an end. The French dance music duo Daft Punk have split up, announced in a video that’s has already clocked 22 million views.The band have inspired hardware geeks across the world not just with their music but the way they present themselves. A perennial project has been to replicate in some way their iconic robot helmets.

Ben Heck's 2009 take on the helmet
Harrison Krix’s 2009 take on Guy-Manuel de Homem-Christo’s helmet.

The artists themselves have been reticent about the exact technology that powers their headgear, but while this is a source of endless mystery and speculation to the music press it’s safe to assume from our perspective that their designers have the same parts at their disposal as we have. Microcontrollers, EL wire, and LEDs are universal, so the challenge lies in artistic expression with the helmet design rather than in making the effects themselves. We’ve reached into the archives for a bit of Daft Punk helmet nostalgia, so stick on Harder Better Faster and lets take a look at them, er, one more time.

Continue reading “An Homage To Daft Punk In Fan-Made Helmets Through The Years.”

Audio Out Over A UART With An FTDI USB-To-TRS Cable

What is the easiest way to get audio from a WAV file into a line-level format, ready to be plugged into the amplifier of a HiFi audio set (or portable speaker)? As [Konrad Beckmann] demonstrated on Twitter, all you really need is a UART, a cable and a TRS phono plug. In this case a USB-TTL adapter based around the FTDI FT232R IC: the TTL-232R-3V3-AJ adapter with 12 Mbps USB on one end, and a 3 Mbps UART on the other end.

[Konrad] has made the C-based code available on GitHub. Essentially what happens underneath the hood is that it takes in a PCM-encoded file (e.g. WAV). As a demonstration project, it requires the input PCM files to be a specific sample rate, as listed in the README, which matches the samples to the baud rate of the UART. After this it’s a matter of encoding the audio file, and compiling the uart-sound binary.

The output file is the raw audio data, which is encoded in PDM, or Pulse-Density Modulation. Unlike Pulse-Code Modulation (PCM), this encoding method does not encode the absolute sample value, but uses binary pulses, the density of which corresponds to the signal level. By sending PDM data down the UART’s TX line, the other side will receive these bits. If said receiving device happens to be an audio receiver with an ADC, it will happily receive and play back the PDM signal as audio. As one can hear in the video embedded in the tweet, the end result is pretty good.


If we look at at the datasheet for the TTL-232R-3V3-AJ adapter cable, we can see how it is wired up:

When we compare this to the wiring of a standard audio TRS jack, we can see that the grounds match in both wirings, and TX (RX on the receiving device) would match up with the left channel, with the right channel unused. A note of caution here is also required: this is the 3.3V adapter version, and it lists its typical output high voltage as 2.8V, which is within tolerances for line-level inputs. Not all inputs will be equally tolerant of higher voltages, however.

Plugging random TRS-equipped devices into one’s HiFi set, phone or boombox is best done only after ascertaining that no damage is likely to result.  Be safe, and enjoy the music.