[darNES] Stores Cached Netflix On NES Cartridge

Let’s play a quick word association game: Peanut butter…jelly. Arches…golden. NES…Netflix?  That last one sounds like a stretch, but the [darNES] development team had a Hack Day and a dream.  They started with cached Netflix data and ended up playing it on an ordinary NES. (YouTube link)

The data was pre-converted so that the video frames were stored as tilesets and stored in the ROM image. [Guy] used the NES memory mapper (MMC3) to swap the frames. [darNES] had originally planned to use a Raspberry Pi in the cartridge to handle the video conversion and networking, but had to change gears and make a static ROM image due to time constraints and resource availability.

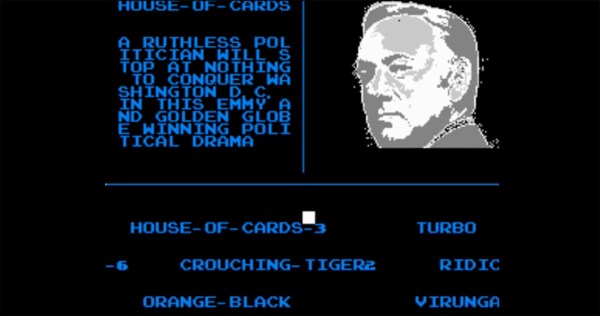
Accessing the Netflix data is just like the days of yore – load the cartridge into an unmodified NES and hit the power button (they didn’t even need to blow on it!). A bare-bones Netflix gallery appears. You can move the white cursor on the screen with the NES controller’s D-pad. House of Cards was the choice, and true to form, the next screen shows you a synopsis with a still image and gives you the option to Play. Recommend is also there, but obviously won’t work in this setup. Still, it got a chuckle out of us. [darNES] admits that due to time issues they did not optimize the color palette for the tilesets. They plan to release more of the technical info this week, but have already given us some hints on their Hacker News thread.

Check out the videos after the break to see the video they fit onto a 256K NES cartridge.

Continue reading “[darNES] Stores Cached Netflix On NES Cartridge”

BeagleSNES For Game Boy, Game Boy Advance, NES, And – Yes – SNES

By far the most common use for the Raspberry Pi is shoving a few dozen emulators on an SD card and calling it a day. Everybody’s got to start somewhere, right? There are other tiny, credit card-sized Linux boards out there, and [Andrew] is bringing the same functionality of the Raspi to the BeagleBone Black and BeagleBoard with BeagleSNES, an emulator for all the sane pre-N64 consoles.

BeagleSNES started as a class project in embedded system design, but the performance of simply porting SNES9X wasn’t very good by default. [Andrew] ended up hacking the bootloader and kernel, profiling the emulator, and slowly over the course of three years of development making this the best emulator possible.

After a few months of development, [Andrew] recently released a new version of BeagleSNES that includes OpenGL ES, native gamepad support through the BeagleBone’s PRU, and support for all the older Nintendo consoles and portables. Video demos below.

Continue reading “BeagleSNES For Game Boy, Game Boy Advance, NES, And – Yes – SNES”

Fix A Broken DS By Removing A Screen

There are apparently a lot of broken Nintendo DS Lites out and about on eBay, and [Fede] has gotten his hands on one. His idea was to essentially turn one of these DS Lites into a SS (single screen?) (.es, Google translate) by modding the case, and he’s done it with pretty spectacular results.

If you’re going to do a case mod, you should go all out. To that end, [Fede] started by taking everything out of the DS and tossing the original 1000 mAh battery in favor of a 4000 mAh battery. From there he is able to shoehorn the two PCBs into the case with the speaker in between, which he notes doesn’t sound as nice as the original but works well enough.

After reshaping the plastic case in a few subtle ways and putting a few layers of paint on it, [Fede] now has a single-screen Nintendo DS for €2 plus parts and paint. While we’ve seen similar mods before, we’d be interested to see this one in action; some DS games don’t utilize the second screen as much as others, so perhaps this wouldn’t play every DS game perfectly, but for the price it can’t be beat.

Wireless SNES Controller

SNES Controller Modified To Be Completely Wireless

[Pat] was looking for a way to wirelessly control his Fire TV unit. He could have just went with one of many possible consumer products, but he decided to take it a step further. He modified a unit to fit inside of an original SNES controller. All of the buttons are functional, and the controller even features a wireless charger.

[Pat] started out with a Bluetooth video game controller marketed more playing video games on tablets. The original controller looked sort of like an XBox controller in shape. [Pat] tore this controller open and managed to stuff the guts into an original SNES controller. He didn’t even have to remove the original SNES PCB. [Pat] mentions that it was rather tedious to rewire all of the buttons from the original controller, but in the end it wasn’t too difficult. The only externally visible modification to the original controller is a small hole that was made for a power button.

In order to make this unit completely wireless, [Pat] also installed a Qi wireless charging module. Now, placing the controller on a charging pad will charge up the small LiPo battery in just about 45 minutes. This controller would be the perfect addition to a RetroPi or other similar project. If you’re not into Bluetooth, you can try using a Logitech receiver instead. Continue reading “SNES Controller Modified To Be Completely Wireless”

Passion Project Turns BeagleBone Into Standalone Super NES

So you want to play some retro games on your BeagleBone, just load up Linux and start your favorite emulator right? Not if you’re serious about it. [Andrew Henderson] started down this path with the BeagleBoard-xM (predecessor of the BeagleBone Black) and discovered that the performance with Snes9X wasn’t quite what he had in mind. He got the itch and created a full-blown distro called BeagleSNES which includes bootloader and kernel hacks for better peformance, a custom GUI, and is in the process of developing hardware for the embedded gaming rig. Check out the documentation that goes along with the project (PDF); it’s a blueprint for how open source project guides should be presented!

The hardware he’s currently working on is a Cape (what add-on boards for the BBB are called) that adds connectors for original Nintendo and Super Nintendo controllers. It also includes an RTC which will stand in for the real-time clock features included in some cartridges (Pokemon Yellow). Also in the works is a 3D printed enclosure which would turn it into a portable, something like this other BBB portable hack.

Check out a demo of what BeagleSNES can do in the video after the break.

Continue reading “Passion Project Turns BeagleBone Into Standalone Super NES”

The Proper Use For A Gameboy Advance Carrying Case

About a decade ago, Nintendo released a Game Boy Advance carrying case in the shape of a Game Boy Advance. It was the obvious answer to the original brick Game Boy carrying case every eight year old had in 1990. This jumbo-sized Game Boy Advance case also makes a really good platform for a console mod, which is exactly what [frostefires] got when he put an N64 in one.

This isn’t the first time we’ve seen this bit of old Nintendo paraphernalia used to house an N64. A few years ago, [Hailrazer] used the same GBA carrying case as the body of an N64 build. There were a few shortcomings in that build, most importantly the removal of the D pad.  [frostedfires]’ build fixes this oversight.

Inside the GBA enclosure is a 4.3 inch screen, a replacement Gamecube joystick, an SNES D pad, and of course the entire N64 circuit board with a few modifications.

[frostedfires] entered this into a ‘Shark Tank’-ish  competition at school, and this build was so impressive he won first place. Link to the full build thread here.

NES Controller

Turning A Classic NES Controller Into A Bluetooth Controller

[Pietronet] is like many of us in that he enjoys playing some classic console video games from time to time. He usually plays them on his PC using a Wiimote as a controller. The Wiimote has most of the classic buttons in a comfortable configuration. Plus, it’s got Bluetooth built-in, which makes it easy to pair up to your PC. [Pietronet] decided to take it a step further, though. He managed to cram all of the guts from a Wiimote inside of the original NES controller for a more authentic feel.

The first step was to crack open the Wiimote and locate pads for each button. Once they were located, [Pietronet] used a Dremel to cut the board into a smaller size. He cut off part of the circuit board that contained the directional pad as well as the connector for the nunchuck. Next he had to solder very thin wires to each of the button pads he located earlier.

The original NES controller has a very limited number of buttons, and [Pietronet] wanted to modify the original controller as little as possible. Therefore, he attached a magnetic reed switch to the Wiimote’s sync button. This way if he ever needs to sync the Wiimote to a new console, he can do it by holding a magnet in the right place. This is a function that isn’t often used, so the inconvenience should be negligible.

The next step was to connect the buttons from the original NES controller up to the wires that were added to the Wiimote. [Pietronet] left the original circuit board mostly intact. He did have to cut a small chunk of it away in order to make room for two AAA batteries, but this didn’t affect the functionality of the controller.

The inside of the NES controller had to be cleaned out of various standoffs and plastic bits to make room for all of the extra components. The Wiimote has an LED to indicate that the controller is connected properly. [Pietronet] soldered a red SMD LED in its place on the end of two thin wires. This LED was then placed on the bottom left side of the directional pad. It’s visible through a translucent filter. This allows [Pietronet] to see when the NES controller is synced up properly.

The case fits back together and everything is held in place. The result is what looks and feels like a classic NES controller, only this one has Bluetooth connectivity and a vibration motor. Check out the video demonstration below to get an idea of what it looks like in use. Continue reading “Turning A Classic NES Controller Into A Bluetooth Controller”