[Adrian] had a Commodore computer to fix and decided to see how his latest tiny portable scope would work. He paid $57 for the tiny little test instrument although the current price seems higher. It claims to have 120MHz bandwidth along with 500 megasamples per second. There are several versions with different claimed specs, but we did find a similar device for under $60. You can see the unboxing and how it worked in the video below.
Of course, these kinds of instruments often overstate their specs, and [Adrian] was also suspicious. One odd feature of the device is it can echo its output to an NTSC video output so you can send the screen to an external monitor.
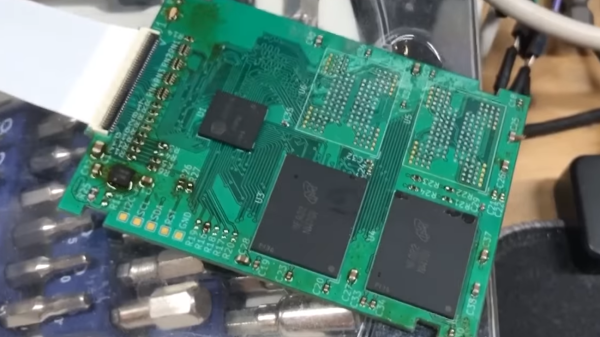
A lot of old technology runs on parts no longer produced – HDDs happen to be one such part, with IDE drives specifically being long out of vogue, and going extinct to natural causes. There’s substitutes, but quite a few of them are either wonky or require expensive storage medium. Now, [dosdude1] has turned his attention to 1.8 ZIF IDE SSDs – FFC-connected hard drives that are particularly rare and therefore expensive to replace, found in laptops like the Macbook Air 1,1 2008 model. Unsatisfied with substitutes, he’s designed an entire SSD from the ground up around an IDE SSD controller and NAND chips. Then, he made the design open-source and filmed an assembly video so that we can build our own. Take a look, we’ve put it below the break!
For an open-source design, there’s a respectable amount of work shared with us. He’s reverse-engineered some IDE SSDs based on the SM2236 controller to design the schematic, and put the full KiCad files on GitHub. In the video, he shows us how to assemble this SSD using only a hot air station and a soldering iron, talks about NAND matching and programming software intricacies, and shows the SSD working in the aforementioned Macbook Air. Certainly, assembly would have been faster and easier with a stencil, but the tools used work great for what’s a self-assembly tutorial!
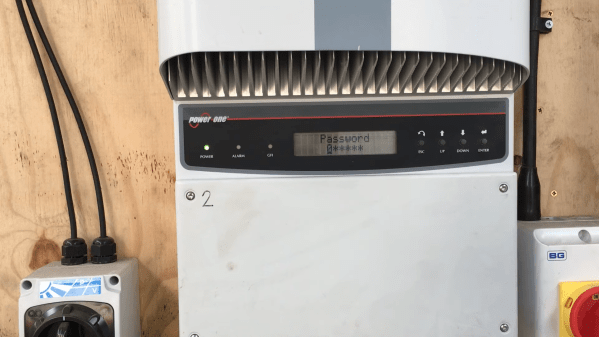
It’s a fact of life that electronic devices become obsolete after a few years. Sometimes this is because technology has moved on, but it can also happen that a perfectly functional device becomes near-useless simply because the original manufacturer no longer supports it. When [Buy It Fix It] found a pair of second-hand Power-One Aurora solar inverters, he ran into an issue for which he needed access to the service menu, which happened to be password-protected. The original manufacturer had ceased to exist, and the current owner of the brand name was unable to help, so [Buy It Fix It] had to resort to reverse engineering to find the password.
Thanks to the Wayback Machine over at the Internet Archive, [Buy It Fix It] was able to download the PC software bundle that originally came with the inverters. But in order to access all features, a password was required that could only be obtained by registering the unit with the manufacturer. That wasn’t going to happen, so [Buy It Fix It] fired up dnSpy, a decompiler and debugger for .NET programs. After a bit of searching he found the section that checked the password, and by simply copying that section into a new program he was able to make his own key generator.
With the service password now available, [Buy It Fix It] was able to set the inverter to the correct voltage setting and hook it up to his solar panels. Interestingly, the program code also had references to “PONG”, “Tetris” and “tiramisu” at various places; these turned out to be Easter eggs in the code, containing simple versions of those two games as well as a photo of the Italian dessert.
Inside the software archive was also another program that enabled the programming of low-level functions within the inverter, things that few users would ever need to touch. This program was not written in .NET but in C or something similar, so it required the use of x32dbg to look at the machine code. Again, this program was password-protected, but the master password was simply stored as the unencrypted string “91951” — the last five digits of the manufacturer’s old phone number.
The inverter was not actually working when [Buy It Fix It] first got it, and his repair video (also embedded below) is also well worth watching if you’re into power electronics repair. Hacking solar inverters to enable more features is often possible, but of course it’s much easier if the entire design is open source.
How do you build a practical tank-driving simulator in the 1970s, when 3D computer-generated graphics are still just a fantasy of the future? If you’re a European tanker school, the solution is to use a large CNC machine to drive a camera around a miniature terrain model (German, translated). In the video after the break, [Tom Scott] takes it for a test drive.
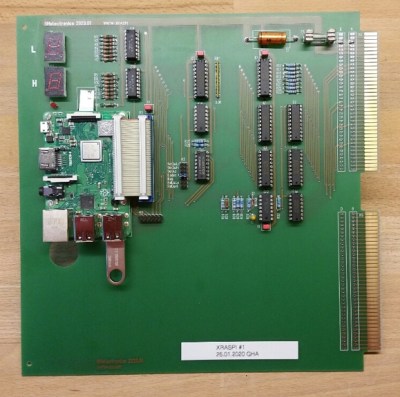
The original computer was replaced with a Raspberry Pi
Developed in France, the simulator provided a safer and more cost-effective way for teaching new trainees the basics of driving Centurion, Leopard 2, or Panzer 68 tanks. The trainee sits in a realistic “cockpit” mounted on a hydraulically-operated motion platform, with a TV screen in front of his face, which is connected to a camera mounted on a large gantry-style CNC platform.
The camera’s lens is mounted just above a pivoting metal foot which slides across the 12 m-long terrain model and sends its angle to the hydraulic system. It will even alter the tank’s handling based on its current position on the model to simulate different surfaces like dirt, snow, or asphalt.
The last of these systems remained in use until 2004 at the military training center in Thun, Switzerland, before being saved by the Swiss Military Museum from being scrapped. The original 70s computer, electronics, and hydraulics finally gave out, so the museum undertook a complete refurbishment of the system to return it to working order for museum visitors. It was kept as original as possible, but parts for the original computer could not be found, so it was replaced with a Raspberry Pi and custom interface board.
Over three decades, these simulators probably trained a few thousand tank drivers, and even with limited technology did an excellent job of preparing trainees for the real thing. Besides providing training for operators, drivers and pilots, simulators are also just plain fun. We’ve seen some impressive home built simulator including a A-10 Warthog, an F-15 sim built from an actual wreckage, and even a starship’s bridge.
DIY spot welders often use high-powered components that can be a bit frightening, given the potential for dangerous malfunctions. [Wojciech “Adalbert” J.] designed his capacitive discharge spot welder to be safe, easy to build, and forego the microcontroller.
Many projects work great with just a single Li-ion cell, but when you need more power, you’ve got to start connecting more cells together into a battery. [Wojciech]’s spot welder is designed to be just powerful enough to weld nickel tabs onto a cell without any overkill. The capacitor bank uses nineteen Nichicon UBY 7500uF/35V capacitors, all wired in parallel using solder wick saturated with solder. They sit atop on a perfboard with metallicized holes to carry the high current.
[Wojciech] has detailed every step of building the welder, including changes to the off-the-shelf relay board and adding a potentiometer to the step-up converter board. The level of detail makes this seem like a good starting place if you’re hoping to hop into the world of DIY spot welders. Safe is always a relative term when dealing with high powered devices, so be careful if you do attempt this build!
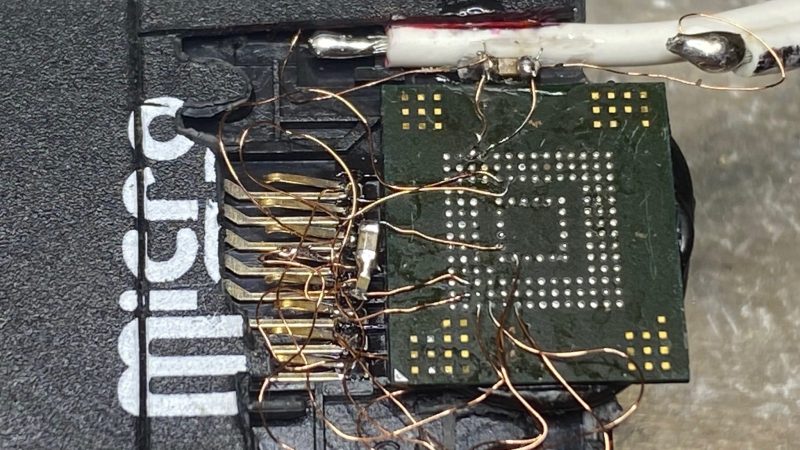
Sometimes, you know where the data you need is stored, you just don’t have a way to access it. In this case, [GetHypoxic] needed to rip data off an eMMC chip, salvaged out of a camera. With no desire to wait for an adapter to show up, it was time to bust out the bodge!
Once removed from the PCB, bodge wires were attached to the ball-grid array contacts on the bottom of the chip. Incredibly fine soldering was the order of the day to get these hooked up to the tiny pads, and we count 11 or 12 bodge wires in total. 1.8 volts was manually supplied to the eMMC chip, and it was directly wired up to the contacts of a built-in card reader out of an old laptop for reading.
Despite the rats-nest look of it all, and the yellow polyimide tape holding it together, [GetHypoxic] reported that it mounted successfully and got the job done. We’ve seen similar hacks before, too, wiring eMMC chips up to SD card adapters. It might look messy, but hey – it sure beats waiting for shipping!
[Pekka Väänänen] has a Panasonic TV with a broken backlight that creates an uneven pink/green color. While it isn’t a huge deal for most films, black-and-white films tend to show the most effect. So, by modeling the distortion as a function, [Pekka] set out to find an inverse function that corrects the distortion before it gets to the TV.
However, the backlight doesn’t emit enough light for some colors, which means the blue and green channels need to be dimmed. As mentioned earlier, the distortion isn’t even, so the distortion needs to be captured and then calculated.
He took a few pictures with his phone, corrected the perspective, and applied a blur. The camera also has some distortion but works as a first approximation, but that isn’t something he covered here. Next, he set up a webcam and pointed it at the TV, trying to find good gain and offset values with a bit of Python.
Now it just becomes a problem of minimizing the per-pixel difference. Ultimately he just went for a random approach rather than an annealing or hill-climbing approach. Now that he had a function to apply, it was just a matter of adding a custom shader to his video player, which includes a live shader editor. He had to hack in support for an external texture, but he is kind enough to include the shader code and the patch in the article.
The result is excellent, and it’s a great use for an old TV. But perhaps, in some cases, it might be worth replacing the backlight entirely.