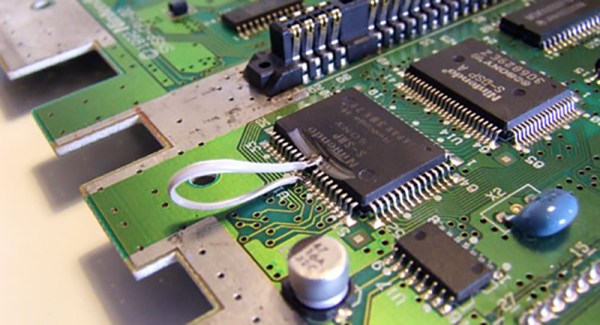
Hot Air Surgery Revives A Cheap Windows Tablet

[Jason Gin] recently wrote in to tell us about his adventures replacing the eMMC storage chip on a cheap Windows tablet, and we have to say, it’s an impressive amount of work for a device which apparently only cost him $15. Surely much better pieces of hardware have been tossed in the trash for less serious failures than what ailed his DigiLand DL801W tablet. We’d love to see the lengths this guy would go to restore something a bit higher up the food chain.

As any good hacker knows, you can’t fix the problem until you understand it. So the first step [Jason] took was to conduct some troubleshooting. The tablet would only boot to the EFI shell, which didn’t do him much good since there was no on-screen keyboard to interact with it. But he had the idea of trying to connect a USB keyboard via an OTG adapter, and sure enough that got him in. Once he was able to enter commands into the EFI shell, he attempted to read from a few different sectors of the eMMC drive, only to get the same nonsense repeating data. So far, not looking good.

But before he fully committed to replacing the eMMC drive, he wanted a second opinion. Using the same USB OTG adapter, he was able to boot the tablet into a Windows 10 environment, and from there got access to some drive diagnostic tools. The software reported that not only was the drive reporting to be half the appropriate size, but that writing to the chip was impossible.

With the fate of the tablet’s Foresee NCEMBS99-16G eMMC chip now confirmed, [Jason] decided it was time to operate. After pulling the tablet apart and masking off the PCB with Kapton tape to protect it from the heat, he slowly went in with his hot air rework station to remove the failed chip. But rather than put another low-end chip in its place, he used this opportunity to replace it with a Samsung KLMBG4GEND-B031. Not only does this chip have twice the capacity of the original, it should be noticeably faster.

With the new Samsung eMMC chip installed, [Jason] put the tablet back together and was able to successfully install Windows 10 onto it. Another piece of tech saved from the big landfill in the sky.

If the casual confidence of this particular repair wasn’t enough of a clue, this isn’t the first time he’s showed some unruly eMMC chips who’s boss.

Thermal Camera Diagnoses Thermal Issue On A Sonoff Switch

No matter what your experience level with troubleshooting, there’s always at least a little apprehension when you have to start poking through a mains powered device. A little fear is a good thing; it keeps you focused. For some, though, the aversion to playing with high voltage is too much, which can cause problems when something fails. So what do you do when you’re reluctant to even open the case? Easy — diagnose the problem with an infrared camera.

[Bald Engineer]’s electrophobia started early, with some ill-advised experiments in transcutaneous conduction. So when his new Sonoff WiFi switch failed soon after deploying it to control a lamp in his studio, popping the top while it was powered up was out of the question. The piquant aroma of hot plastic was his first clue to the problem, so he whipped out his Flir One Thermal Camera and watched the device as it powered up. The GIF nearby shows that there was clearly a problem, with a bloom of heat quickly spreading out from the center of the unit. A few IR images of the top and bottom gave him some clues as to the culprits, but probing the board in those areas once power was removed revealed no obviously damaged components.

[Bald Engineer] hasn’t yet gotten to the bottom of this, but his current thinking is that the NCP1117 regulator might be bad, since it rapidly spikes to 115°C. Still, we think this is a nifty diagnostic technique to add to our toolkit, and a great excuse to buy an IR camera. Or, we could go with an open-source thermal camera instead.

[via Dangerous Prototypes]

Resurrecting An Amiga CD32

As an editor on Amiga magazines in a previous life, this is kind of bittersweet. [RetroManCave] was donated an Amiga CD32 games system, and it is trying to resurrect it. If you’ve not heard of it, the CD32 was a 1993 games console based on the Amiga home computer system. It was the last gasp for Commodore, the beleaguered company behind the Amiga. In this first video of a series, they take the system apart, take you through what’s inside and boot it up. The system boots, but there is some sort of problem with the video sync, and they will be taking a closer look at fixing that next. We have featured a couple of similar projects from [RetroManCave] before, such as their brain transplant on a Big Trak toy and Commodore 64 fix. This video (after the break) is worth a watch if you are curious about old systems like this, want some tips on resurrecting old hardware or just want to shed a tear as your misspent youth is torn apart before your eyes.

Continue reading “Resurrecting An Amiga CD32”

Curing A Parrot’s Amnesia With BLEAH

[Dandu] recently wrote in to tell us how he managed to revive his Parrot Flower Power after the manufacturer told him it couldn’t be repaired. To save you the trouble of opening Google in another tab, the Parrot Flower Power is a Bluetooth Low Energy (BLE) “smart” device for your flower pot. Because of course that’s a thing.

A healthy Flower Power connected

When [Dandu] noticed his Flower Power was no longer being detected by his iOS devices, he contacted support who told him that sadly this was a hardware failure and that he should just throw it away. But he had his doubts about this diagnosis as other devices such as his Raspberry Pi could still communicate with it. Upon closer inspection, he realized that the Flower Power didn’t have a name, and could only be contacted by its MAC address directly. Reasoning the lack of a name might be upsetting the “It Just Works” sensibility of his iGadget, [Dandu] started researching if there was some way to get the device to take a new name remotely.

Luckily for our hero, BLE is kind of broken. Searching for a solution to his problem brought him to a blog post by the creator of BLEAH which demonstrated exactly what [Dandu] was looking to do. Following along, it took only a single command to push a new name to the Flower Power’s BLE configuration. With that, his “broken” device was brought back to life. Why the device lost its name, or how to prevent it from happening in the future are questions for another day. [Dandu] will take the win.

If you’re interested in the popular new technology that’s compromising our security in the name of convenience and improved battery life, the rabbit hole starts here.

Repairing A Wounded Mantis

While it’s true that we didn’t specifically say making Hackaday staff exceedingly jealous of your good fortune would deduct points from your entry into our ongoing “Repairs You Can Print Contest”, we feel like [Sam Perry] really should have known better. During a recent dumpster dive he found an older, slightly damaged, but still ridiculously awesome Mantis stereo inspection microscope. Seriously, who’s throwing stuff like this away?

Rendered replacement mount in Fusion 360

Apparently, the microscope itself worked fine, and beyond some scratches and dings that accumulated over the years, the only serious issue was a completely shattered mount. Luckily he still had the pieces and could get a pretty good idea of what it was supposed to look like. After what we imagine was not an insignificant amount of time in Fusion 360, he was able to model and then print a replacement.

The replacement part was printed on a Tronxy P802M in PLA. Even at 0.3mm layer height, it still took over 10 hours to print such a large and complex component. A few standard nuts and bolts later, and he had a drop-in replacement for the original mount.

Whether it’s due to how big and heavy the Mantis is, or a slight miscalculation in his model, [Sam] does mention that the scope doesn’t sit perfectly level; he estimates it’s off by about 5 degrees.

We’re somewhat suspicious that mentioning an error of only 5 degrees is a stealth-brag on the same level as telling everyone you found a Mantis in the trash. But if [Sam] gives us the GPS coordinates of the dumpster in which people are throwing away high-end lab equipment, all will be forgiven.

There’s still plenty of time to get your entry into the “Repairs You Can Print” contest! The top twenty projects will receive $100 in Tindie store credit, and the top entries in the Student and Organization categories will each receive a Prusa i3 MK3 with the Quad Material upgrade kit: arguably one of the best 3D printers currently on the market. If you were considering going back to school, or finally leaving your basement and joining a hackerspace, now would definitely be the time.

Printed Nexus 7 SIM Tray Is Good ‘Nuff

When repairing something, there are in effect two schools of thought: you can craft a repair that seamlessly blends into the original hardware and doesn’t look like a repair, or you can slap that thing together and keep it moving. A lot of variables go into this decision making process, such as the complexity of the repair, the available materials, and of course whether or not you need to keep the fact you broke the thing from your significant other.

When the SIM holder on his Nexus 7 tablet broke recently, [Alex Whittemore] did the mental arithmetic and came to the conclusion that it wasn’t worth his time trying to figure out how to model an exact replacement. But he was able to print something that works well enough for his purposes, which is all that matters in the end. A perfect entry for our ongoing “Repairs You Can Print” contest.

You must be this small to ride

Apparently the SIM holder in the 2013 Nexus 7 is notoriously poor, and of course since this is a known issue, online retailers are trying to get as much as $100 USD out of you for a tiny sliver of plastic. Sometimes it really seems like Google was determined to run the Nexus line into the ground before bailing on it.

Printing such a tiny part, especially with the little details like the channel for you to hook your fingernail into, requires a fairly well calibrated printer. If you can’t muster up a 0.1mm first layer you might as well sit this one out; and if you haven’t mastered the art of bridging, that little valley to help you get the SIM back out may end up overflowing into a river of tears.

For [Alex], the piece ended up working perfectly. It might look a little weird, but if you’ve got the tablet in a case you’ll never see it anyway. It’s also worth noting that this design may work on other devices with a similar SIM arrangement, or at the very least, might be a good starting point to work from if you’ve got to come up with your own.

Remember, there’s still plenty of time to enter your own printed fix into our “Repairs You Can Print” contest. The top 20 repairs will take home $100 in Tindie credit, and for the best repair done by a Student or Organization, there’s two Prusa i3 MK3 printers with the Quad Material upgrade kits on the line.

Repairs You Can Print: Fixing A Chewed Up Remote

What is it about remote controls? They’re like some vortex of household chaos, burrowing into couch cushions while accusations fly about who used it last. Or they land in just the right spot on the floor to be stepped on during a trip to the bathroom. And don’t get us started about the fragility of their battery case covers; it’s a rare remote in a house with kids whose batteries aren’t held in by strips of packing tape.

But [Alex Rich]’s Bose radio remote discovered another failure mode: imitating a dog chew toy. Rather than fork out $90 for a replacement, [Alex] undertook a 3D-printed case to repair the chewed remote. He put an impressive amount of reverse engineering into the replacement case, probably expending much more than $90 worth of effort. But it’s the principle of the thing, plus he wanted to support some special modifications to the stock remote. One was a hardware power switch to disconnect the batteries entirely, hidden in the bottom shell of the case. The second was the addition of a link to his thermostat to adjust the volume automatically when the AC comes on. That required a Trinket inside the remote and a few mods to make room for it.

Yes, this project dates from a few years back, but [Alex] only just brought it to our attention for the Repairs You Can Print contest. Got some special unobtanium part that you were able to print to get out of a jam? Enter and win prizes to add to the glory of fixing something yourself.