MC68k SBC with a monitor, keyboard and mouse

Motorola 68000 SBC Runs Again With A Raspberry Pi On Top

Single-board computers have been around a long time: today you might be using a Raspberry Pi, an Arduino, or an ESP32, but three decades ago you might find yourself programming a KIM-1, an Intel SDK-85, or a Motorola 68000 Educational Computer Board. These kind of boards were usually made by processor manufacturers to show off their latest chips and to train engineers who might use these chips in their designs.

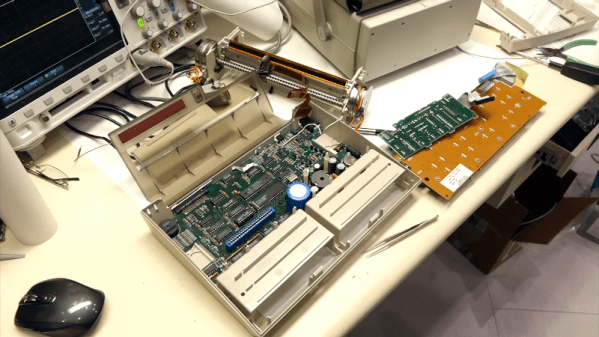
[Adam Podstawczyński] found himself trying to operate one of these Motorola ECBs from 1981. This board contains a 68000 CPU (as used in several Macintoshes and Amigas), 32 kB of RAM, and a ROM program called TUTOR. Lacking any keyboard or monitor connections, the only way to communicate with this system is a pair of serial ports. [Adam] decided to make the board more accessible by adding a Raspberry Pi extended with an RS232 Hat. This add-on board comes with two serial ports supporting the +/- 12 V signal levels used in older equipment.

It took several hours of experimenting, debugging, and reading the extensive ECB documentation to set up a reliable connection; as it turns out, the serial ports can operate in different modes depending on the state of the handshake lines. When the Pi’s serial ports were finally set up in the right mode, the old computer started to respond to commands entered in the terminal window. The audio interface, meant for recording programs on tape, proved more difficult to operate reliably, possibly due to deteriorating capacitors. This was not a great issue, because the ECB’s second serial port could also be used to save and load programs directly into its memory.

With the serial connections working, [Adam] then turned to the aesthetics of his setup and decided to make a simple case out of laser-cut acrylic and metal spacers. Custom ribbon cables for the serial ports and an ATX break-out board for power connections completed the project, and the 40-year-old educational computer is now ready to educate its new owner on all the finer points of 68000 programming. In the video (embedded after the break) he shows the whole process of getting the ECB up and running.

[Adam] made a similarly clever setup with a Commodore 64 and an Arduino earlier. [Jeff Tranter] recreated a similar 68000 development board from scratch. And a few years ago we even featured our own custom-built 68k computer.

Continue reading “Motorola 68000 SBC Runs Again With A Raspberry Pi On Top”

CRISS CP/M Provides Modern Hardware For A Classic OS

Today you might choose run Windows, Linux, MacOS or some other OS on your computer. Back in the 1980s however, you generally had little choice: a certain home computer came with a certain OS, and that was it. If yours was based on a Z80 processor, chances are it ran CP/M. While differences in hardware often made direct data exchange difficult, CP/M provided at least a basic level of software compatibility between various Z80-based computers. Although eventually supplanted by MS-DOS (which initially aimed to be compatible with CP/M), enthusiasts kept the classic OS running on old hardware throughout the 90s and even beyond.

[Igor] decided to make a 21st-century CP/M machine by designing the CRISS, a single-board computer based mainly on AVR microcontrollers. The CPU is a 20 MHz ATMEGA1284P, which imitates a 4 MHz Z80 through machine-code emulation. A pair of ATMEGA328s run the peripheral controller and a VGA output, so the CRISS can be used with modern monitors. True to its heritage however, the image is monochrome green-on-black, looking instantly familiar to users of Kaypros, Osbornes and other contemporary CP/M machines.

Software is loaded through an SD card that holds floppy images. The CRISS can directly run programs written for the Kaypro II and Robotron 1715 computers, although other platforms can be supported as well with a software upgrade. [Igor] shows it running programs ranging from the Turbo Pascal compiler to games like Xonix and Tetris.

Housed in a neat little case, the CRISS can communicate with standard PS/2 keyboards and serial printers. Even an Ethernet port is provided for those willing to experiment with network connectivity (a rare feature in the 1980s).

We love seeing modern retro builds like this; similar projects we’ve covered before include the compact ZZ80MB and the huge Z20X. Others have used different ways of running CP/M on modern hardware, such as booting it directly on a Raspberry Pi or emulating an Altair on an ESP32.

DEC microVAX with tape drive

Bake It To ReMake It: Cooking Old Magnetic Tape To Recover Data

Those of us old enough may remember the heyday of the text adventure game genre from the first time around. London-based Magnetic Scrolls was an early pioneering company producing titles for the first Amiga and Atari ST platforms. Fast-forward to 2017 and [Hugh Steers], the original co-founder and core developer for Magnetic Scrolls has formed an initiative to revive and re-release the original games on modern platforms. Since the 1980s-era DEC MicroVAX used originally for development is not particularly rare in retro computing circles, and media containing source code was found in someone’s loft space, reviving the games was not a tall order.

First, he needed to recover a copy of the original source code from the backup tapes. But there was a problem, it turns out that the decaying tapes used a unstable polyurethane-based binder to stick the oxide material (which is what stores the data) to the backing tape, and this binder can absorb water over the years.

Not much happens until you try to read the tape, then you trip over the so-called sticky-shed syndrome. Secondly you may find that a small amount of the oxide layer sheds from the tape, coating the read head, rollers and guides inside the complicated tape mechanism. This quickly results in it gumming up, and jamming, potentially chewing up the tape and destroying it permanently.

This was further exacerbated by the behaviour of the DEC TK50Z tape drive, which needed to shuttle the whole length of the tape as part of its normal operation.

A temporary solution was to bake the tape in an oven to drive out the moisture and reduce the stickiness enough to run it through the drive safely. Then only the oxide-shedding problem remained. The TK50Z drive was swapped for a TZ30 which shuttles the tape less, but also critically with a simple hack, would allow the heads to be cleaned with IPA between read passes. This was enough to keep the gumming up at bay and allow enough data to be read from the tapes to recover several games worth of code, ready for the re-releasing process.

The video after the break shows [Rob Jarratt] working through the process of the data recovery.

Continue reading “Bake It To ReMake It: Cooking Old Magnetic Tape To Recover Data”

A computer green screen image of an IRC message of the day

IRC Server For MS-DOS

The recent flurry of projects based around Internet Relay Chat (IRC) should be a fair indication that the beloved protocol is not going anywhere. Now, thanks to [Mike Chambers], you can add to the IRC ecosystem by hosting your very own MS-DOS based IRC server.

This port of ngIRCd (Next Generation IRC Daemon) has already been spun up on 8088-based PCs running at just 4.77MHz, but you’ll still need at least 640KB of RAM. If your vintage IRC server takes off, you might want to think about dropping in an 10MHz V20 for a bit of a performance boost. Even so, it’s impressive that this server can get up on the 40-year-old IBM 5150, and should absolutely scream on an AT-class system.

The limitations of the 16-bit platform means that SSL and ZLIB are unsupported, and Mike has capped total connections at 50 in his port (however, this limitation can be adjusted by rebuilding from source, should you want to find out how far 640KB of RAM can take you). You’ll also need a few other things to get your server up and running, such as a packet driver for your network card and an mTCP configuration file.

Setting up your own IRC server is arguably a right rite of passage for most hackers and tinkerers, but getting this up and running on a decades-old beige box would make for a fun weekend project. [Mike] has all the juicy details on GitHub, and you can check out a test server running the latest build over at irc.xtulator.com.

Also, don’t forget to visit the #hackaday IRC channel over on irc.libera.chat.

[Thanks Sudos for the hot tip]

Apple II computer on a workbench

Simple Fan Controller Helps Apple II To Beat The Heat

In its day, the Apple II computer didn’t typically require active cooling. However, the increasing scarcity of replacement hardware convinced [Joshua Coleman] to come up with a more robust active cooling solution for his Apple II+, increasing the likelihood that it will keep on crunching numbers for decades to come.

Joshua mentions that he recorded temperatures inside his Apple II+ peaking at 110 Fahrenheit (over 43 Celsius). This isn’t totally unexpected for a fully-loaded Apple II system, and components were built to handle this – the original datasheet for the 6500 microprocessor family reveals that the CPU can handle temperatures as high as 158 Fahrenheit (70 Celsius). Unfortunately, we’re not dealing with brand new components anymore. Decades-old microprocessors don’t necessarily have the same thermal tolerance as they once did. All components will eventually wear out, and heat can certainly accelerate the aging process.

In the interests of maintaining his system, Joshua cobbled together an Arduino-based cooling system for his Apple II+. A temperature/humidity sensor continuously monitors the heat situation inside the case – when things get too toasty, a 12V fan powers up to draw fresh air over the logic board and expansion cards. A simple cooling curve reduces wear on the fan motor and relay.

This is hardly the first active cooling system for the Apple II line – in the 1980s, Kensington produced a popular (if not stupendously ugly) ‘System Saver’ accessory, an external bolt-on fan that kept things running cool. These were often deployed in schools and by power users looking for added reliability when maxing out the Apple II expansion slots, a configuration that could increase temperatures due to the extra power requirements and reduced airflow.

Continue reading “Simple Fan Controller Helps Apple II To Beat The Heat”

Psion Organiser with a Pico memory pack.

Proto-PDA Regains Its Memory With The Help Of A Raspberry Pi Pico

Remember the Psion Organiser? If you do, chances are you were an early adopter, as the 8-bit pocket computer had its heyday in the mid-1980s. Things have come a long way since then, of course, but just how far is illustrated nicely by the fact that a Raspberry Pi Pico can stand in for the Psion’s original memory packs.

Like many of the early attempts at putting a computer in your pocket, the Psion II had removable modules, which were dubbed “Datapaks”. The earliest versions of the Datapaks were little more than an EPROM chip on a small PCB, and the technical limitations of the day plus the quirky way of addressing the memory made it possible for [Amen] to mimic a Datapak using a modern microcontroller.

The first version was a breakout board that extended out of the Datapak slot significantly, with a Pico, OLED display, SD card slot, and a bunch of pushbuttons. That prototype proved that the Pico was indeed fast enough to fool the Psion into thinking a legit Datapak was plugged in. [Amen] later refined the design by making a board that stuffs everything into the Datapak slot, with the exception of the OLED which still dangles out where it can be seen. He puts the faux memory to the test in the video below.

It’s great to see groundbreaking tech of yesteryear like the Psion being taken care of and returned to use. We’ve seen others try before; here’s a hack that uses a Pi to connect a Psion Organiser to the internet through its RS-232 serial port.

Continue reading “Proto-PDA Regains Its Memory With The Help Of A Raspberry Pi Pico”

Interactive Musical Art Installation Mixes Vintage, Modern, Lasers, And…Bubbles? Bubbles.

Acorn BBC Master. Apple IIe. Ampex 270 Terminal. Vectrex game console. You’d be hard pressed to find a more diverse hardware collection in the average hacker’s lab. When you add seven Raspberry Pi’s, five CRT monitors, an analog oscilloscope and an LED wall to the mix, one starts to wonder at the menagerie of current and retro hardware. What kind of connoisseur would have such a miscellaneous collection? That’s when you spot smoke and fog machines sitting next to an RGB Laser.

Finally, you learn that all of this disparate paraphernalia is networked together. It is then that you realize that you’re not just dealing with a multi-talented hacker- you’re dealing with a meticulous maestro who’s spent lockdown finishing a project he started nearly twenty years ago!

AUVERN comes alive in a show of light and sound whenever someone enters its view.

The machine is called AUVERN and it’s the product of the creative mind of [Owen]. Taking advantage of advances in technology (and copious amounts of free time), [Owen] laboriously put his collection of older rigs to work.

A Python script uses a Kinect sensor’s input to control a Mac Mini running Digital Audio Workstation software. The operator’s location, poses and movements are used to alter the music, lights, and multimedia experience as a whole. MIDI, Ethernet, and serial communications tie the hardware together through Raspberry Pi’s, vintage MIDI interfaces, and more. Watch the video below the break for the technical explanation, but don’t miss the videos on [Owen]’s website for a mesmerizing demonstration of AUVERN in full swing.

AUVERN makes use of the Vectrex32 upgrade which we have previously covered, and we are unavoidably reminded of another pandemic inspired bubble machine. Don’t forget to send us your hacks, projects, and creations through the Tip Line!

Continue reading “Interactive Musical Art Installation Mixes Vintage, Modern, Lasers, And…Bubbles? Bubbles.”