FPGA Rescues Scope From The Dumpster

I’m always on the lookout for a quality addition to my lab that would respect my strict budget. Recently, I’ve found myself pushing the Hertz barrier with every other project I do and hence desperately wanted a high bandwidth scope. Unfortunately, only recently have 70 MHz to 100 MHz become really affordable, whilst a new quad channel oscilloscope in the 500 MHz to 1 GHz range still costs a fortune to acquire. My only option was to find an absolute miracle in the form of an old high bandwidth scope.

It seemed the Gods of Hand Me Down electronics were smiling upon me when I found this dumpster destined HP 54542C. It appeared to be in fairy good shape and was the Top Dog in its day. But something had to be broken right? Sure enough, the screen was clearly faulty and illegible. Want to know how I fixed it? Four letters: FPGA.

Continue reading “FPGA Rescues Scope From The Dumpster”

Hijacking The Sonoff OTA Mechanism

ITEAD’s Sonoff line is a range of Internet-of-Things devices based around the ESP8266. This makes them popular for hacking due to their accessibility. Past projects have figured out how to reflash the Sonoff devices, but for [mirko], that wasn’t enough – it was time to reverse engineer the Sonoff Over-The-Air update protocol.

[mirko]’s motivation is simple enough – a desire for IoT devices that don’t need to phone home to the corporate mothership, combined with wanting to avoid the labor of cracking open every Sonoff device to reflash it with wires like a Neanderthal. The first step involved connecting the Sonoff device to WiFi and capturing the traffic. This quickly turned up an SSL connection to a remote URL. This was easily intercepted as the device doesn’t do any certificate validation – but a lack of security is sadly never a surprise on the Internet of Things.

After capturing the network traffic, [mirko] set about piecing together the protocol used to execute the OTA updates. After a basic handshake between client and server, the server can ask the client to take various actions – such as downloading an updated firmware image.  After determining the messaging format, [mirko] sought to create a webserver in Python to replicate this behaviour.

There are some pitfalls – firmware images need to be formatted slightly differently for OTA updates versus the usual serial upload method, as this process leaves the stock bootloader intact. There’s also the split-partition flash storage system to deal with, which [mirko] is still working on.

Nevertheless, it’s great to see hackers doing what they do best – taking control over hardware and software to serve their own purposes. To learn more, why not check out how to flash your Sonoff devices over serial? They’re just an ESP8266 inside, after all.

Counterfeit Hardware May Lead To Malware And Failure

Counterfeit parts are becoming increasingly hard to tell the difference from the real deal, the technology used by the counterfeiters has come on leaps and bounds, so even the experts struggle to tell the real product from a good fake. Mere fake branding isn’t the biggest problem with a counterfeit though, as ieee.com reports, counterfeit parts could contain malware or be downright dangerous.

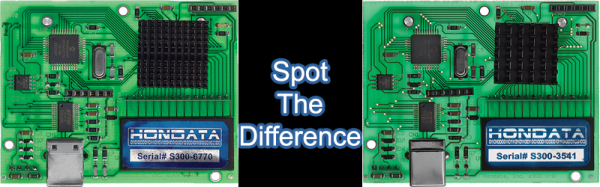
Way back in 2014 the FBI charged [Marc Heera] with selling clones of the Hondata S300, a plugin engine module for Honda cars that reads sensors, and depending on their values can change idle speed, air-fuel mixture and a plethora of other car/engine related settings. What, might you ask, is the problem, except they are obviously not genuine parts? According to Honda they had a number of issues such as random limits on engine rpm and occasionally failure to start. While the fake Hondata S300 parts where just poor clones that looked the part, anything connected to an engine control unit brings up huge safety concerns and researchers have shown that through ECU access, they could hijack a car’s steering and brakes.

It’s not just car parts being cloned, remember the fake USB-to-serial chips of FTDI-Gate? Entire routers are also being cloned, which doesn’t sound too bad until you realise that the cloners could configure your internet traffic to be redirected through their network for snooping. In 2010 Saudi citizen [Ehab Ashoor] was convicted of buying cloned Cisco Systems gigabit interface converters with the intention of selling them to the U.S Dept of Defense. While nothing sinister was afoot in [Ashoor]’s case other than greed, these routers were to be deployed in Iraq for use by the Marine Corps networks. They were then to be used for security, transmitting troop movements and relaying intelligence from field operations back to HQ.

So who are the cloners and why are they doing it? It is speculated that some of them may be state funded, as there are a lot of countries who do not trust American silicon. Circuits are reverse engineered and find their way to the international market. Then just like the FTDI-Gate case, cloners want to make profits from others intellectual property. This also brings up another question, if there is a mistrust of American silicon, nearly everything is made in China these days so why should we trust anything from there? Even analog circuits can be made to spy on you, as you can see from the piece we recently featured on compromising a processor using an analog charge pump. If you want to defend yourself from such attacks, perhaps look at previous Hackaday Prize finalist, ChipWhisperer.

PS Vita Hacked To Accept Micro SD Instead Of Costly Memory Cards

Sony loves to have control of their own media formats: Beta, DAT, Minidisc, MemoryStick, Universal Media Disc, MemoryStick Micro, and more. When they released the PS Vita they used a format that was similar in shape to SD but not compatible. The higher capacity ones can be quite costly, However [thesixthaxis] Report there is a PS Vista Micro SD hack on the way.

PS Vita hacker [Yifan Lu]’s adapter replaces the 3G modem, allowing end users to plug a MicroSD card in its place.  And this means using standard MicroSD memory cards instead of Sony’s overpriced proprietary memory. This is the coolest PS Vita hack since  PS Vita’s Final Fantasy X.

Sounds like good news all round? Well, there are a few small caveats. In order to use the hack you need a 3G-capable Vita running HENkaku which means running firmware 3.60 or under. The adapter is still in prototype stage, but it’s available from the fully-funded Indiegogo campaign if you’re interested.

How To Build Your Own Google AIY Without The Kit

Google’s voice assistant has been around for a while now and when Amazon released its Alexa API and ported the PaaS Cloud code to the Raspberry Pi 2 it was just a matter of time before everyone else jumped on the fast train to maker kingdom. Google just did it in style.

Few know that the Google Assistant API for the Raspberry Pi 3 has been out there for some time now but when they decided to give away a free kit with the May 2017 issues of MagPi magazine, they made an impression on everyone. Unfortunately the world has more makers and hackers and the number of copies of the magazine are limited.

In this writeup, I layout the DIY version of the AIY kit for everyone else who wants to talk to a cardboard box. I take a closer look at the free kit, take it apart, put it together and replace it with DIY magic. To make things more convenient, I also designed an enclosure that you can 3D print to complete the kit. Lets get started.

Continue reading “How To Build Your Own Google AIY Without The Kit”

HDMI Out On The Gameboy Advance

The Gameboy line of handheld systems from Nintendo have been wildly popular, but lack one major thing – a video output. This can be troublesome if you’d like to view the games on a bigger screen, for more comfortable gaming sessions or detail work like producing chiptunes. One option is to use the Gameboy Player for the Gamecube, however that system’s age means you’re out of luck if you want a crisp, clear picture on a modern digital display. Wouldn’t it be great if you could get HDMI output from a Gameboy Advance Instead?

A family resemblance?

When it comes to working with video signals, FPGAs can’t be beat. [Stephen] leverages an FPGA in this project to read the GBA’s video signals and convert them to the modern digital format. Unfortunately, it’s not a seamless install – limited space means the GBA’s screen must be entirely removed, replaced with the adapter in a manner resembling the terrifying Facehugger.

Packaging aside, the output from the device is nothing short of stunning – the graphics are absolutely crystal clear when displayed on a modern HDMI television. This is because the FPGA is capturing the exact digital output from the GBA, and piping it out as HDMI – there’s no analog fuzziness, conversions or noise to spoil the image. Output is a tasty 1280×720, upscaled from the GBA’s original resolution. For more details, check out the forum thread where [Stephen] runs through the build.

The only thing missing  is details – we’d love to know more about the exact hardware used, and any trials and tribulations during the build! As far as we can tell, the build doesn’t stop at just video – a SNES controller is used instead of the original buttons, and we have a feeling sound is being passed over the HDMI channel as well sound is piped to the TV from the GBA’s headphone port.

It’s great to see these projects for old hardware come out – modern hardware has the muscle to achieve things previously unthinkable on retro consoles. We’ve seen similar projects before – like adding VGA to an original Game Boy.

Continue reading “HDMI Out On The Gameboy Advance”

Sega’s Game Gear Gets A Video Output

[EvilTim] dug deep into a classic system to finally give the Game Gear a proper video output.  The Game Gear was Sega’s answer to Nintendo’s Gameboy. Rushed to market, the Game Gear reused much of the hardware from the very popular Master System Console. The hardware wasn’t quite identical though – especially the cartridge slot. You couldn’t play Game Gear games on a Master System, and the game gear lacked an AV output, which meant gamers were stuck playing on a small fluorescent backlit LCD screen.

[EvilTim] wanted to play some of those retro titles on a regular TV using the original hardware. To accomplish this he had to start digging into the signals driving the Game Gear’s LCD. The Master System lineage was immediately apparent, as Game Gear’s LCD drive signals were similar in timing to those used to drive a TV. There was even a composite sync signal, which was unused on in the Game Gear.

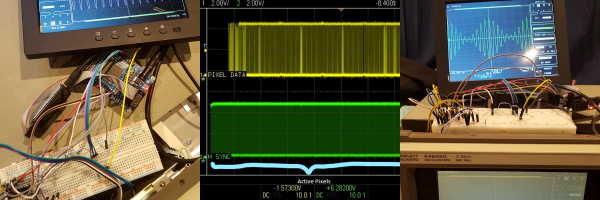
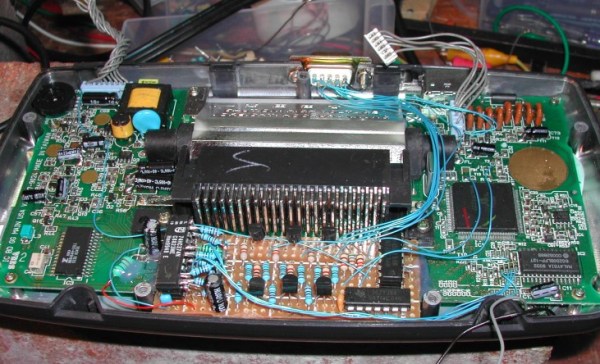
[EvilTim] first designed a circuit using discrete ’74 series logic which would convert the LCD drive signals to SCART RGB. Of note is the construction technique used in this circuit. A tower of three 74HC374 chips allows [EvilTim] to create R, G, and B outputs without the need for a complex circuit board.

As pretty as a three-story chip tower is, [EvilTim] knew there was a better way. He re-spun the circuit with a 32 macrocell CPLD. This version also has an NTSC and PAL video encoder so those without a SCART interface can play too. If you’re not up to building your own, [EvilTim] sells these boards on his website.

We’ve seen some incredible retro gaming hacks over the years. From a NES inside a cartridge to incredible RetroPi builds. Hit the search bar and check it out!