A Hydra Of A 3D Printer

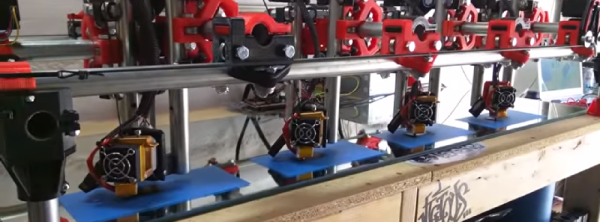
3D printers are great for producing one thing, but if you need multiple copies, the workflow quickly starts to go downhill. The solution? Build a 3D printer with multiple print heads, capable of printing four objects in the same amount of time it takes to print one.

This build is an experiment for [allted]’ Mostly Printed CNC / MultiTool. It’s a CNC machine that uses printed parts and 3/4″ electrical conduit for the frame and rails.  That last bit is the interesting part: electrical conduit is cheap, easy to acquire, available everywhere, and can be cut with a hacksaw. As far as desktop CNC machines go, it doesn’t get simpler or cheaper than this, and a few of these builds are milling wood with the same quality of a machine based on linear rails. It won the grand prize in the recent Boca Bearings contest, and is a great basis for a cheap and serviceable 2.5 or 3D CNC.

[allted] already has this cheap CNC mill cutting aluminum and engraving wood with a laser, showing off the capabilities of a remarkably cheap but highly expandable CNC machine. It’s a fantastic build, and we can’t wait to see more of these machines pop up in garages and workspaces.

Continue reading “A Hydra Of A 3D Printer”

3D Printed Zoetrope Sculpture Squashes 4 Dimensions Into 3

This fascinating project manages to be both something new and something old done in a new way. Artist [Akinori Goto] has used 3D printing to create a sort of frameless zoetrope. It consists of a short animation of a human figure, but the 3D movements of that figure through time are “smeared” across a circular zone – instead of the movements of the figure being captured as individual figures or frames, they are combined into a single object, in a way squashing 4 dimensions into 3.

zoetrope-1
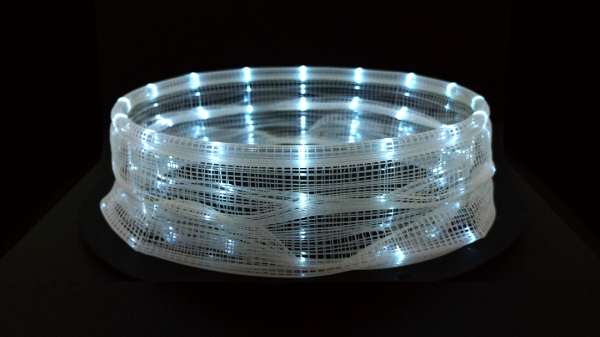
“Slices” of that object, when illuminated by a thin shaft of light, reveal the figure’s pose at a particular moment in time. When the object is spun while illuminated in this way, the figure appears to be animated in a manner very similar to a zoetrope.

There are two versions from [Akinori Goto] that we were able to find. The one shown above is a human figure walking, but there is a more recent and more ambitious version showing a dancer in motion, embedded below.

Since a thin ray of light is used to illuminate a single slice of the sculpture at a time, it’s also possible to use multiple points of illumination – or even move them – for different visual effects. Check out the videos below to see these in action.

Continue reading “3D Printed Zoetrope Sculpture Squashes 4 Dimensions Into 3”

Tools Of The Trade – Inspection

In the last episode, we put our circuit boards through the reflow process. Unfortunately, it’s not 100% accurate, and there are often problems that can occur that need to be detected and fixed. That’s what the inspection step is for. One could insert an inspection step after paste, after placement, and after reflow, but the first two are icing on the cake — the phase where most mistakes can be caught is after reflow.

There are a number of problems typical with a surface mount reflow process: Continue reading “Tools Of The Trade – Inspection”

Taming The Beast: Pro-Tips For Designing A Safe Homebrew Laser Cutter

Homebrew laser cutters are nifty devices, but scorching your pals, burning the house down, or smelling up the neighborhood isn’t anyone’s idea of a great time. Lets face it. A 60-watt laser that can cut plastics offers far more trouble than even the crankiest 3D-printers (unless, of course, our 3D printed spaghetti comes to life and decides to terrorize the neighborhood). Sure, a laser’s focused beam is usually pointed in the right direction while cutting, but even an unfocused beam that reflects off a shiny material can start fires. What’s more, since most materials burn, rather than simply melt, a host of awful fumes spew from every cut.

Despite the danger, the temptation to build one is irresistible. With tubes, power supplies, and water coolers now in abundance from overseas re-sellers, the parts are just a PayPal-push away from landing on our doorsteps. We’ve also seen a host of exciting builds come together on the dining room table. Our table could be riddled with laser parts too! After combing through countless laser build logs, I’ve yet to encounter the definitive guide that tells us how to take the proper first steps forward in keeping ourselves safe while building our own laser cutter. Perhaps that knowledge is implicit to the community, scattered on forums; or perhaps it’s learned by each brave designer on their own from one-too-many close calls. Neither of these options seems fair to the laser newb, so I decided to lay down the law here.

Continue reading “Taming The Beast: Pro-Tips For Designing A Safe Homebrew Laser Cutter”

One Man’s Journey To Build Portable Concrete 3D Printer Produces Its First Tiny House

[Alex Le Roux] want to 3D print houses.  Rather than all the trouble we go through now, the contractor would make a foundation, set-up the 3D printer, feed it concrete, and go to lunch.

It’s by no means the first concrete printer we’ve covered, but the progress he’s made is really interesting. It also doesn’t hurt that he’s claimed to make the first livable structure in the United States. We’re not qualified to verify that statement, maybe a reader can help out, but that’s pretty cool!

The printer is a very scaled gantry system. To avoid having an extremely heavy frame, the eventual design assumes that the concrete will be pumped up to the extruder; for now he is just shoveling it into a funnel as the printer needs it. The extruder appears to be auger based, pushing concrete out of a nozzle. The gantry contains the X and Z. It rides on rails pinned to the ground which function as the Y. This is a good solution that will jive well with most of the skills that construction workers already have.

Having a look inside the controls box we can see that it’s a RAMPS board with the step and direction outputs fed into larger stepper drivers, the laptop is even running pronterface. It seems like he is generating his STLs with Sketch-Up.

[Alex] is working on version three of his printer. He’s also looking for people who would like a small house printed. We assume it’s pretty hard to test the printer after you’ve filled your yard with tiny houses. If you’d like one get in touch with him via the email on his page. His next goal is to print a fully up to code house in Michigan. We’ll certainly be following [Alex]’s tumblr to see what kind of progress he makes next!

Reverse Engineering Quadcopter Protocols

Necessity is the mother of invention, but cheap crap from China is the mother of reverse engineering. [Michael] found a very, very cheap toy quadcopter in his local shop, and issued a challenge to himself. He would reverse engineer this quadcopter’s radio protocol. His four-post series of exploits covers finding the right frequency for the radio, figuring out the protocol, and building his own remote for this cheap toy.

[Michael] was already familiar with the capabilities of these cheap toys after reading a Hackaday post, and the 75-page, four language manual cleared a few things up for him. The ‘Quadro-Copter’ operated on 2.4GHz, but did not give any further information. [Michael] didn’t know what channel the toy was receiving on, what data rate, or what the header for the transmission was. SDR would be a good tool for figuring this out, but thanks to Travis Goodspeed, there’s a really neat trick that will put a 2.4GHz nRF24L01+ radio into promiscuous mode, allowing [Michael] to read the transmissions between the transmitter and quadcopter. This code is available on [Michael]’s github.

A needle in an electromagnetic haystack was found and [Michael] could listen in on the quadcopter commands. The next step was interpreting the ones and zeros, and with the help of a small breakout board and soldering directly to the SPI bus on the transmitter, [Michael] was able to do just that. By going through the nRF24 documentation, he was able to suss out the pairing protocol and read the stream of bytes that commanded the quadcopter.

What [Michael] was left with is a series of eight bytes sent in a continuous stream from the transmitter to the toy. These bytes contained the throttle, yaw, pitch, roll, and a ‘flip’ settings, along with three bytes of ‘counters’ that didn’t seem to do anything.  With that info in hand, [Michael] took an Arduino Nano, an nRF04L01+ transceiver, and a Wii nunchuck to build his own transmitter. If you’re looking for a ‘how to reverse engineer’ guide, it generally doesn’t get better than this.

You can check out a video of [Michael] flying his Wiimoted quadcopter below.

Continue reading “Reverse Engineering Quadcopter Protocols”

AVR Vs PIC, Round 223: Fight!

Get ready to rumble! [Thierry] made the exact same Hello-World-esque project with two microcontrollers (that are now technically produced by the same firm!) to see how the experience went.

It’s not just an LED-blinker, though. He added in a light-detection function so that it only switches on at night. It uses the Forest Mims trick of reverse-biasing the LED and waiting for it to discharge its internal capacitance. The point is, however, that it gives the chip something to do instead of simply sleeping.

Although he’s an AVR user by habit, [Thierry] finds in favor of the PIC because it’s got a lower power draw both when idling and when awake and doing some computation. This is largely because the PIC has an onboard low-power oscillator that lets it limp along at 32 kHz, but also because the chip has a lower power consumption in general. In the end, it’s probably a 10% advantage to the PIC on power.

If you’re competent with one of the two chips, but not the other, his two versions of the same code would be a great way to start familiarizing yourself with the other. We really like his isDarkerThan() function which makes extensive use of sleep modes on both chips during the LED’s discharge period. And honestly, at this level the code for the two is more similar than different.

(Oh, and did you notice [Thierry]’s use of a paper clip as a coin-cell holder? It’s a hack!)

Surprisingly, we’ve managed to avoid taking a stray bullet from the crossfire that occasionally breaks out between the PIC and AVR fans. We have covered a “shootout” before, and PIC won that round too, although it was similarly close. Will the Microchip purchase of Atmel calm the flames? Let’s find out in the comment section. We have our popcorn ready!