Digital Kiln

A kiln or foundry is too often seen as a piece of equipment which is only available if a hackspace is lucky enough to have one or individuals are dedicated enough to drop the cash for one of their own. [The Thought Emporium] thought that way until he sourced materials to make his own kiln which can also be seen after the break. It costs half the price of a commercial model not including a failed—and exploded—paint can version.

As described in the video, these furnaces are tools capable of more than just pottery and soft metal baubles. Sure, a clay chess set would be cool but what about carbon fiber, graphene, aerogel, and glass? Some pretty hot science happens at high temperatures.

We get a nice walk-through of each part of the furnace starting with the container, an eleven-gallon metal tub which should set the bar for the level of kiln being built. Some of the hardware arrangements could be tweaked for safety and we insist that any current-carrying screw is safely mounted inside an enclosure which can’t be opened without tools. There’s good advice about grounding the container if metal is used. The explanation of PID loops can be ignored.

What else can you do with a kiln? How about jewelry, heat treating metal, or recycle your beer cans into an engine.


Continue reading “Digital Kiln”

The Internet Of Blast Gates

There’s nothing quite like building out a shop filled with tools, but even that enviable task has a lot of boring work that goes into it. You’ve got to run power, you’ve got to build benches, and you need to build a dust collection system. That last one is usually just fitting a bunch of pipe and tubes together and adding in a few blast gates to direct the sucking of your dust collection system to various tools around the shop.

For most shops with a handful of tools and dust collection ports, manually opening and closing each blast gate is an annoying if necessary task. What if all of this was automated, though? That’s what [Bob] over on I Like To Make Stuff did. He automated his dust collection system. When a tool turns on, so does the vacuum, and the right blast gate opens up automatically.

The first part of this build is exactly what you would expect for installing a dust collection system in a shop. The main line is PVC sewer pipe tied to the rafters. Yes, this pipe is grounded, and s otherwise not very interesting at all. The real fun comes with the bits of electronics. [Bob] modified standard blast gates to be servo-actuated. Each individual tool was wired up to a current sensor at the plug, and all of this was connected to an Arduino. With a big ‘ol relay attached to the dust collection system, the only thing standing in the way of complete automation was a bit of code.

This project is a continuation of [Bob]’s earlier Arduinofication of his dust collection system where all the blast gates were controlled by servos, an Arduino, and a numeric keypad. That’s an exceptionally functional system that gets around the whole ‘leaning over a machine to open a gate’ problem, but it’s still not idiot-proof – someone has to press a button to open a gate. This new system is, for the most part, completely automatic and doesn’t really require any thought on the part of the operator. It’s neat stuff, and a great application of cheap Arduinos to make shop life a bit easier.

Continue reading “The Internet Of Blast Gates”

Curbside Mower Gets Electric Transplant

There’s few things more exciting to a hacker or maker than seeing a piece of hardware on the curb. An old computer, an appliance, maybe if you’re really lucky some power tools. So we can only imagine the rush that known lawn equipment aficionado [AmpEater] had when he saw a seemingly intact push mower in the trash. The pull start was broken on the gas engine, but where this mower was going, it wouldn’t need a gas engine.

When he got the mower back to his garage, he started on the process of converting it over to electric. Of course this means basically everything but the wheels, handle, and deck would get tossed. But starting with a trashed gas mower still sounds a lot easier compared to trying to figure out how to make or source a wheeled mower deck.

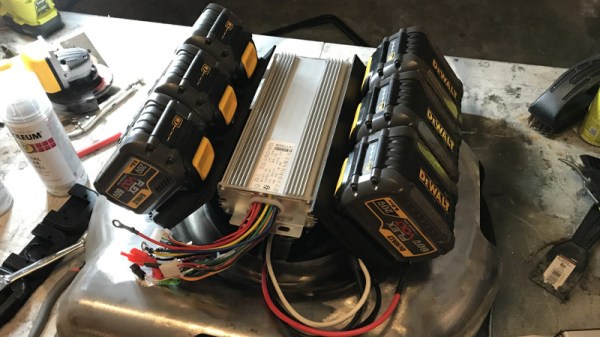
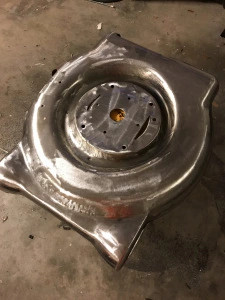
Step one in this conversion was stripping all the paint off the deck and welding a plate over where the original gas engine was. [AmpEater] then 3D printed some mounts to hold the DeWalt tool batteries he would be using as a power source, taking the extra time to align everything so it would have the look of an old flathead gasoline engine. A tongue-in-cheek reference to the mower’s old gasoline gulping days, and an awesome little detail that gives the final product a great look.

The controller is a commercial model intended for electric bikes, and the heart of this new mower is a brushless direct-drive motor capable of 3,000 RPM at 40 A. [AmpEater] reports a respectable one hour run time with the six DeWalt batteries, and more power than his store-bought Ryobi electric mower.

If the name [AmpEater] looks familiar, it’s because this isn’t the first time he’s graced us with a mower conversion: back in 2013 he impressed us with his solar-electric Cub Cadet zero-turn. This build isn’t quite as slick as the Cub Cadet, but the much lower cost and difficulty level means that you may be able to follow in his footsteps even if you don’t have his Zeus-level mastery of the electric motor.

As electric mowers have gotten more popular, we’ve seen an increasing flow of hacks and mods for them. Everything from replacing the batteries to turning them into something else completely.

Print A Plywood Bending Jig

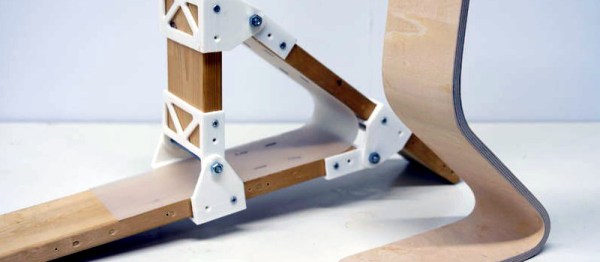
Ever wanted to bend plywood but don’t have the equipment or the space to use it? Whatever the issue, dust off those project ideas and take a look at [Ryo Kosaka]’s experimental bending jig.All you need are some boards, a couple of fasteners, and [Ryo]’s 3-D printed connectors.

This is quite the elegant solution for bending in a small space with little noise. The main departure from standard bending methods is that instead of making the bend by clamping the veneers between a pair of positive and negative mold halves, most of the clamping pressure comes from air pumped into a rubber ball. That’s not even the best part: not only is the mold reconfigurable, it’s modular. Want another bend in your thing? Just print another connector and grab another piece of wood.

[Ryo]’s pivoting connectors screw into the end of one board and move freely along the length of a second board. Once the bend angle is dialed up, he locks it in place with a bolt. For the first test, [Ryo] made a lamp base with two bends.The jig worked great except for a small gap that didn’t get enough clamping pressure from the ball. We wonder if rotating the jig during the process would have let gravity address the issue. For the second test, [Ryo] added another piece to make the jig rectangular and made a floating wall shelf. Bend your way past the break for the video version.

In making the lamp base, [Ryo] found it easier to pre-bend the veneers with a heat gun. If the project were smaller, he could have softened up the wood in a microwave.

Continue reading “Print A Plywood Bending Jig”

EasyEDA Two Years Later

Some people want everything on the cloud, while others refuse to put even the smallest scrap of data on the Internet. Most of us fall somewhere in between. A few years ago, we talked about a few cloud-based PCB layout programs including one called EasyEDA. We were impressed because it was a full package: schematic capture, simulation, and PCB layout. It was free to use, although they would give you a quote for producing your boards, though you were under no obligation to buy them. Of course things change in two years, so if you are curious how EasyEDA is doing, [Yahya Tawil] posted an in-depth review.

Some of the new features include an autorouter and the ability to order parts from a BOM directly, not just PCBs. The cloud aspect is handy, not only because you don’t have to install and update software to use it anywhere, but because it is very natural to collaborate with others on projects. We did notice, though, that the autorouter can run in the cloud, or you can download and run it local because it apparently loads the server significantly.

Continue reading “EasyEDA Two Years Later”

Upgrading A USB Soldering Iron!

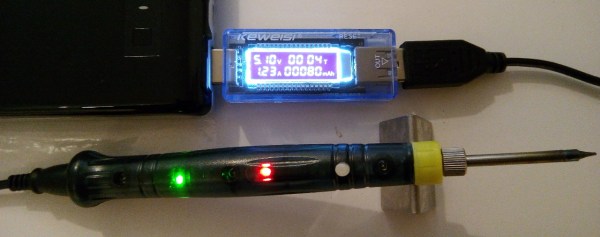
Seeing the popularity of the TS-100 soldering iron, GitHub user [ole00] found himself desirous of a few of its features, but was put off by its lack of a power supply. What is a hacker to do? Find a cheaper option, and hack it into awesomeness.

[ole00] stumbled across the inexpensive ZD-20U and — despite a handful (sorry!) of issues — saw potential: it’s compact, lightweight, and powered via a USB power cable. Wanting to use as much of the ZD-20U’s original board as possible, the modifications were restricted to a few trace cuts and component swaps. The major change was swapping out the 555 timer IC controlling the iron with am ATtiny13a MCU to give it a bit more control.

Continue reading “Upgrading A USB Soldering Iron!”

Current Measurement With Oscilloscopes

What do a Rogowski coil, a magnetic core, and a hall effect sensor have in common? They are all ways you can make oscilloscope probes that measure current. If you think of a scope as a voltage measurement device, you ought to watch the recent video from Keysight Technology (see below). It is true that Keysight would love to sell you a probe, but the video is not a sales pitch, just general technical information about making current measurements with an oscilloscope.

Of course, you can always measure the voltage across a shunt resistor — either one that is naturally in the circuit or one you’ve put inline just for measuring purposes. But if you add a resistor it will change the circuit subtly and it may have to handle a lot of power.

The Keysight video points out that there are different probes for different current measurement regimes. High current, medium current, and low current all use different probes with different technologies. The video is only about 6 minutes long and if you’ve never thought about measuring current with a scope, it is worth watching.

The video shares some high-level details of how the current probes work — that’s where the Rogowski coil comes in, for example. Of course, you can’t expect a vendor to tell you how to build your own current probes. That’s OK, though, because we will. Current probes are often expensive, but you can sometimes pick up a deal on a used one.

Continue reading “Current Measurement With Oscilloscopes”