Upgrading A USB Soldering Iron!

Seeing the popularity of the TS-100 soldering iron, GitHub user [ole00] found himself desirous of a few of its features, but was put off by its lack of a power supply. What is a hacker to do? Find a cheaper option, and hack it into awesomeness.

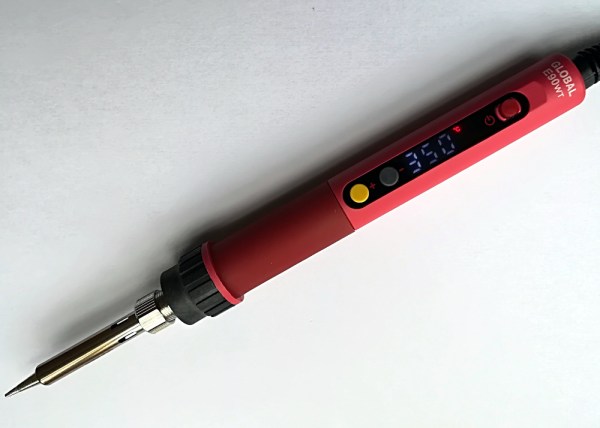
[ole00] stumbled across the inexpensive ZD-20U and — despite a handful (sorry!) of issues — saw potential: it’s compact, lightweight, and powered via a USB power cable. Wanting to use as much of the ZD-20U’s original board as possible, the modifications were restricted to a few trace cuts and component swaps. The major change was swapping out the 555 timer IC controlling the iron with am ATtiny13a MCU to give it a bit more control.

Continue reading “Upgrading A USB Soldering Iron!”

Current Measurement With Oscilloscopes

What do a Rogowski coil, a magnetic core, and a hall effect sensor have in common? They are all ways you can make oscilloscope probes that measure current. If you think of a scope as a voltage measurement device, you ought to watch the recent video from Keysight Technology (see below). It is true that Keysight would love to sell you a probe, but the video is not a sales pitch, just general technical information about making current measurements with an oscilloscope.

Of course, you can always measure the voltage across a shunt resistor — either one that is naturally in the circuit or one you’ve put inline just for measuring purposes. But if you add a resistor it will change the circuit subtly and it may have to handle a lot of power.

The Keysight video points out that there are different probes for different current measurement regimes. High current, medium current, and low current all use different probes with different technologies. The video is only about 6 minutes long and if you’ve never thought about measuring current with a scope, it is worth watching.

The video shares some high-level details of how the current probes work — that’s where the Rogowski coil comes in, for example. Of course, you can’t expect a vendor to tell you how to build your own current probes. That’s OK, though, because we will. Current probes are often expensive, but you can sometimes pick up a deal on a used one.

Continue reading “Current Measurement With Oscilloscopes”

MeatBagPnP Makes You The Automatic Pick And Place

It’s amazing how hackers are nowadays building increasingly complex hardware with SMD parts as small as grains of sand. Getting multilayer PCB’s and soldering stencils in small quantities for prototyping is easier than ever before. But Pick-and-Place — the process of taking parts and stuffing them on the PCB in preparation for soldering — is elusive, for several reasons. For one, it makes sense only if you plan to do volume production as the cost and time for just setting up the PnP machine for a small run is prohibitive. And a desktop PnP machine isn’t yet as ubiquitous as a 3D printer. Placing parts on the board is one process that still needs to be done manually. Just make sure you don’t sneeze when you’re doing it.

Of course the human is the slow part of this process. [Colin O’Flynn] wrote a python script that he calls MeatBagPnP to ease this bottleneck. It’s designed to look at a row in a parts position file generated from your EDA program and highlight on a render of the board where that part needs to be placed. The human then does what a robotic PnP would have done.

A bar code scanner is not necessary, but using one does make the process a bit quicker. When you scan a code on the part bag, the script highlights the row on the spreadsheet and puts a marker on the first instance of it on the board. After you’ve placed the part, pressing the space bar puts a marker on the next instance of the same value. The script shows it’s done after all parts of the same value are populated and you can then move on to the next part. If you don’t have a bar code scanner handy, you can highlight a row manually and it’ll tell you where to put that part. Check it out in the video below.

Of course, before you use this tool you need some prior preparation. You need a good PNG image of the board (both sides if it is double-sided) scaled so that it is the same dimensions as the target board. The parts position file generated from your EDA tool must use the lower left corner of the board as the origin. You then tell the tool the board dimensions and it scales up everything so that it can put the red markers at the designated XY positions. The script works for single and double-sided boards. For a board with just a few parts, it may not be worth the trouble of doing this, but if you are trying to manually populate a complex board with a lot of parts, using a script like this could make the process a lot less painful.

The project is still fresh and rough around the edges, so if you have comments or feedback to offer, [Colin] is listening.

[Colin]’s name ought to ring a bell — he’s the hacker who built ChipWhisperer which took 2nd Prize at The Hackaday Prize in 2014. The MeatBagPnP project is a result of having worked at building increasingly complex boards manually and trying to make the process easier. In addition to the walk-through of how the script works after the break we’ve embedded his other video from three years back when he was stuffing parts — including BGA’s — the hard way and then reflowing them in a Chinese oven with hacked firmware.

Continue reading “MeatBagPnP Makes You The Automatic Pick And Place”

Tricked-Out Tablet Becomes Workbench Tool

The workbench of the typical electronics hobbyist today would probably be largely recognizable by Heathkit builders back in the 60s and 70s. But where the techs and tinkerers of yesteryear would have had a real dead-tree SAMS Photofact schematic spread out on the bench, today you’ll get more use out of a flat-screen display for data sheets and schematics, and this handy shop Frankentablet might be just the thing to build.

Tablets like the older Nexus 9 that [enginoor] used as the basis for this build have a little bit of a form-factor problem because unlike a laptop, a tablet isn’t very good at standing up on its own. To fix that, they found a suitable silicone skin for the Nexus, and with some silicone adhesive began bedazzling the back of the tablet. A bendy tripod intended for phones was added, and with the tablet able to stand on its own they maximized the USB port with a right angle adapter and a hub. Now the tablet has a USB drive, a mouse, and a keyboard, ready for perusing data sheets online. And hackers of a certain age will appreciate the eyeball-enhancing potential of the attached USB microscope.

[enginoor]’s bench tablet is great, but we’ve seen full-fledged bench PCs before too. Take your pick — wall mounted and floating, or built right into the workbench.

Thanks to [ccvi] for the tip.

Entry-Level 3D Printer Becomes Budget PCB Machine

A funny thing happened on [Marco Rep]’s way to upgrading his 3D printer. Instead of ending up with a heated bed, his $300 3D printer can now etch 0.2-mm PCB traces. And the results are pretty impressive, all the more so since so little effort and expense were involved.

The printer in question is a Cetus3D, one of the newer generation of affordable machines. The printer has nice linear bearings but not a lot of other amenities, hence [Marco]’s desire to add a heated bed. But hiding beneath the covers was a suspicious transistor wired to a spare connector on the print head; a little sleuthing and a call to the factory revealed that the pin is intended for accessory use and can be controlled from G-code. With a few mods to the cheap UV laser module [Marco] had on hand, a printed holder for the laser, and a somewhat manual software toolchain, PCBs with 0.2-mm traces were soon being etched. The video below shows that the printer isn’t perfect for the job; despite the smooth linear bearings, the low mass of the printer results in vibration that shows up as wavy traces. But the results are more than acceptable, especially for $330.

This isn’t [Marco]’s first budget laser-etching rodeo. He recently tried the same thing using a cheap CNC laser engraver with similar results. That was a $200 dedicated engraver, this is a $300 3D printer with a $30 laser. It seems hard to lose at prices like these.

Continue reading “Entry-Level 3D Printer Becomes Budget PCB Machine”

CNC Milling Is More Manual Than You Think

I was in Pasadena CA for the Hackaday Superconference, and got to spend some quality time at the Supplyframe Design Lab. Resident Engineer Dan Hienzsch said I could have a few hours, and asked me what I wanted to make. The constraints were that it had to be small enough to fit into checked luggage, but had to be cool enough to warrant taking up Dan’s time, with bonus points for me learning some new skills. I have a decent wood shop at home, and while my 3D printer farm isn’t as pro as the Design Lab’s, I know the ropes. This left one obvious choice: something Jolly Wrencher on the industrial Tormach three-axis CNC metal mill.

A CNC mill is an awesome tool, but it’s not an omniscient metal-eating robot that you can just hand a design file to. If you thought that having a CNC mill would turn you into a no-experience-needed metal-cutting monster, you’d be sorely mistaken.

Of course the machine is able to cut arbitrary shapes with a precision that would be extremely demanding if done by hand, but the craft of the operator is no less a factor than with a manual mill in making sure that things don’t go sideways. Dan’s good judgment, experience, and input was needed every step of the way. Honestly, I was surprised by how similar the whole procedure was to manual milling. So if you want to know what it’s like to sit on the shoulder of a serious CNC mill operator, read on!

Continue reading “CNC Milling Is More Manual Than You Think”

Protect Your TS100 Soldering Iron

The TS100 is a compact temperature-controlled soldering iron that’s long on features without too eye-watering a price. One thing it lacks as shipped though is anything to protect it from the thumps and bumps of everyday life in a toolbox, save for its elegant cardboard-and-foam retail box which requires iron and element/bit to be separated.

[Jeremy S. Cook] has a TS100, and decided to do something about it with a bit of work that may be quite simple but should be something that all TS100 owners take a look at. He made a very tough carrying container for it from a length of PVC pipe lined with the foam from the iron’s retail package. His short video which we’ve placed below the break takes us through the build, which bits of the packaging foam to cut, and uses a pair of PVC end caps to terminate the container. It’s not high-tech by any means, but enough of you will have TS100 irons to appreciate it.

You can read our review of the TS100 if you are interested, or you can marvel at the additions people have done to its software. Tetris, for example, or a working digital oscilloscope. Meanwhile [Jeremy] is an old friend of Hackaday, whose many projects include this recent unholy hybrid of fidget spinner and multirotor.

Continue reading “Protect Your TS100 Soldering Iron”