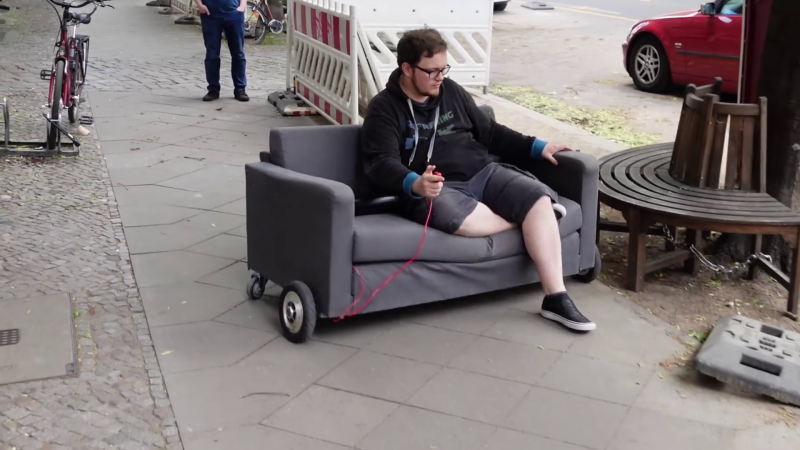
Remotely Navigate The Apocalypse In Mid-Century Style

One of the few positives to come of this pandemic is that the restrictive nature of scarcity can be a boon to creativity. Plus, the doom and gloom of it all is causing people to loosen up and do things they never felt free enough to do before in the demanding world of the before times.

For example, [ossum] makes R/C vehicles on commission to exacting standards, but took a break from perfection to build this remote control hellscape-faring van by the seat of his pants. It’s quite a resourceful build that combines pieces from previous projects with a few standard R/C parts and a handful of clever hacks.

The body is a test print of a 1957 Chevy Suburban van that [ossum] made for someone a few years back. It’s mounted on a scrap metal chassis and moves on printed tank treads designed for a different vehicle.

Since glass is a liability in an apocalypse (and because [ossum] doesn’t have a resin printer yet), the windows have fortified coverings that are printed, patina’d, and detailed with tiny rivet heads.

As far as hacks go, our favorite has to be the clothespin steering. [ossum] only had one electronic speed controller, so he used a servo to actuate a pair of spring-loaded clips, alternating between the two to move the tank-van. There’s a short video after the break that shows the rack and clothes-pinion steering, and it’s loaded up right after a brief demo of the van.

We realize that everyone’s apocalyptic needs are different, but there’s more than enough here to get you started. Don’t have access to enough R/C parts? Gear boxes and drive shafts can be printed, too.

Continue reading “Remotely Navigate The Apocalypse In Mid-Century Style”

Re-used Materials Make Tiny Offroad Track For Micro R/C

What does one do with tiny 1:35 scale remote controlled off-road vehicles? Build appropriately-tiny tracks for them to drive on, of course. That’s exactly what [David] did when he created his fantastic rock crawling track that he has dubbed the ‘4×4 Arena’, and what’s even better is that he used leftover foam inserts and acrylic paints and materials to do it, and didn’t have to spend a penny.

The original track is only just visible in the back; the new track expands it considerably.

This isn’t [David]’s first track. He originally made a smaller rock-crawling track he called Rubble Wasteland for the tiny vehicles, and he liked it so much he expanded it considerably. The new track builds on the original and is three levels deep, sports tight cave-like passages, tunnels, tricky climbs, and and realistic terrain textures.

An enormous photo gallery is right here, and other than the first and final images, it’s roughly in chronological build order. If your curiosity has been piqued about the tiny 1:35 scale remote controlled vehicles that this track is built for, around gallery page nine is where pictures of what makes these tiny things tick begins.

We have seen some amazing projects in the RC field; like this tiny 3D printed truck, and in-depth details of a micro RC plane that weighs only 2.9 grams.

Teardown: VTech Whiz Kid Luggable Computer

Back in the early 1980s, hotshot business types on the go would have used what were referred to at the time as portable computers from companies like Osborne or Kaypro. Due to the technical limitations of the era these so-called “luggables” were only slightly smaller and lighter than contemporary desktop computers, but they had integrated displays and keyboards so they were a bit easier to move around. A few years later the first generation of laptops would hit the market, and the portables predictably fell out of favor. Today they’re relatively rare collectors items; a largely forgotten first step in the steady march towards true mobile computing.

Which makes the 1984 edition of VTech’s “Whiz Kid” educational computer an especially unique specimen. The company’s later entries into the series of popular electronic toys would adopt (with some variations) the standard laptop form factor, but this version has the distinction of being what might be the most authentic luggable computer ever made for children. When this toy was being designed it would have been a reflection of the cutting edge in computer technology, but today, it’s a fascinating reminder that the latest-and-greatest doesn’t always stick around for very long.

The classic luggable hallmarks are all here. The flip down keyboard, the small and strangely offset display, there’s even lugs on the side to attach an included strap so the youngster can sling it over their shoulder. On the other hand, the fact that it’s just a toy allowed for some advantages over the real thing: it can actually run on battery power, and is quite lightweight relative to its size.

When we last took a peek inside one of VTech’s offerings, we found a surprisingly powerful Z80 machine that was more than deserving of its PreComputer moniker. But that BASIC-compatible design hailed from the late 80s, and was specifically marketed as a trainer for the next generation of computer owners. Will the 1984 Whiz Kid prove to have a similar relationship to its adult counterparts, or does the resemblance only go skin deep? Let’s find out.

Continue reading “Teardown: VTech Whiz Kid Luggable Computer”

Trampoline Bounce Counter Has Raspberry Pi Automate Away Your Parental Duties

If you have a toddler and a mini-tramp you know the rallying cry of “Mama, Count!”. If you don’t don’t have either of these things, become the hero uncle or aunt by building one for your family members who have been social distancing with a three-year-old monster bundle of joy for the last five weeks. This trampoline bounce counter uses a Raspberry Pi and a distance sensor to stream the bounce count to a nice little web GUI.

The hardware couldn’t be more simple, and there’s a good chance you already have everything on hand. The HC-SR04 ultrasonic distance sensor is a staple in beginner microcontroller kits. It simply lays on the floor pointed up at the bottom of the trampoline, connected to a Raspberry Pi via a resistor divider.

The software is where [Eric Escobar’s] project makes your life easy. He’s included a simple calibration routine that marks the low point of a bounce as you stand still on the tramp. There’s even a systemd service file included to ensure the software is always running, even after reboot. Cumulative bounce count can be seen on a webpage served from the Pi via an AJAX script.

Having a running count is a great first step, and surely a magical new feature of the trampoline that will be loved by the little ones. If that sense of wonder runs out, you could always gamify the system by adding in daily or hourly totals and a high-scores board.

It seems [Eric] is well practiced at automating his responsibilities away. We previously saw him use a Raspberry Pi to control the door of his chicken coop.

Continue reading “Trampoline Bounce Counter Has Raspberry Pi Automate Away Your Parental Duties”

Millennium Falcon Docking Bay Doubles As Table

A glass table makes a perfect display case for showing off whatever’s important to you, but if you want keep the dust off of your treasures, closing up the sides is probably a wise move. It might not be a bad idea to put some lighting in there to make sure everything is easy to see. You might as well make the lights RGB and remote controlled, so you can fiddle with the look from across the room. Of course, you could go all in and just make the thing a diorama…

It’s not hard to imagine the line of thinking that convinced [Erv Plecter] he should turn a simple glass table into a docking bay for a model of the Millennium Falcon, and looking at the final results, we think it was the right move. With an incredible attention to detail, what started out a generic looking table and rather modest toy, have been combined into an interactive display that could woo even the staunchest of Trekkies.

If you’ve ever considered lighting a model, this project is an excellent example to follow. The Hasbro toy that [Erv] started with certainly wasn’t what you’d call studio quality; the little lighting it featured wasn’t even accurate to how the ship appears in the films. But with some reference material, fiber optic cables, and enough Arduinos to drive it all, the final lighting is truly a marvel. We’d say the engine is our favorite part, but those tiny lit panels in the cockpit are hard to beat.

While the Falcon is clearly the star of the show, the docking bay itself is certainly no afterthought. The back-lit panels, with their inscrutable Imperial design aesthetic, look fantastic. The addition of small details like crates and barrels, plus the glossy black PVC sheet used for the floor, really brings the whole scene to life. It’s almost a shame that the ship itself is so big, as a smaller model would have left more room to toss in a few Stormtroopers and droids out on patrol.

This isn’t the first time we’ve seen somebody augment a “toy” grade model with additional lighting effects. While the scale miniature aficionados in the audience might turn their nose up at some of the artistic liberties taken on these low fidelity models, we think any normal person would be blown away if they saw them in person.

Continue reading Millennium Falcon Docking Bay Doubles As Table”

Huge 3D-Printed LEGO Go Kart Makes You The Minifig

The LEGO Technic line is definitely the hacker’s flavor of LEGO. It brings a treasure trove of engineering uses that make axles, gears, pulleys, and motors a thing. The only problem is that it’s the inanimate minifigures having all of the fun. But not if [Matt Denton] has something to say about it. He’s building a huge 3D-printed go-kart with pieces scaled up 8.43 times the size of their LEGO equivalents. That’s large enough for an adult to fit!

You may remember seeing [Matt’s] previous attempt at something like this about three years back, but that was only around half the size of this one. He printed a blue kart for his nephew, but it didn’t quite scale up enough even for a child to ride. This one is impressively large, but that raises some interesting fabrication issues

The long beams that make up the frame of the vehicle and the axle piece (the black rods with an X-shaped profile) used for the steering column are far too long to print in one go. So the axle was printed in two parts with a square channel down the center that hides a single run of square tubing. But the beams are much more interesting. Printed in two parts, there’s a dovetail-shaped connector piece that holds the top joint together, and a hidden bolt for the bottom. Glue is also used along the joint to bolster the holding power of the mechanical fasteners.

In general, the weight and friction on this scaled up version need many considerations. [Matt] explains where he’s made design decisions — like perpendicular axle connectors that have proper bearings — to include mostly-hidden metal parts and fasteners to ensure the plastic doesn’t fail. The thing looks awesome, but just wait until you see the assembly process. It’s sooooo satisfying to watch the modular parts snap into place. The project’s still in progress and before he’s done he plans to add an electric motor to make the kart go.

Even if you’re not scaling a model up to full size, giant is a guaranteed recipe for fun. Case in point, [Matt’s] enlarged LEGO fork lift is a delight.

Continue reading “Huge 3D-Printed LEGO Go Kart Makes You The Minifig”

The Evolution Of A 3D Printed Off-Road R/C Car

For about as long as hackers and makers have been using desktop 3D printers, there have been critics that say the plastic parts they produce aren’t good for much else than toys and decorative pieces. They claim that printed parts are far too fragile to be of any practical use, and are better suited as prototype placeholders until the real parts can be injection molded or milled. Sure. Try telling that to [Engineering Nonsense].

He recently wrote in (as did a few other people, incidentally) to share the latest version of his incredible 3D printed remote control car, and seeing it tearing around in the video after the break, “fragile” certainly isn’t a word we’d use to describe it. Though it didn’t get that way overnight. The Tarmo4 represents a year of development, and as the name suggests, is the fourth version of the design.

We know the purists out there will complain that the car isn’t entirely 3D printed, but honestly, it’s hard to imagine you could get much closer than this. Outside of the electronics, fasteners, tires, and shocks, the Tarmo4 is all plastic. That includes the gearbox and drive shafts. [Engineering Nonsense] even mentions in the video that he’s not happy with the tires he’s found on the market, and that they too will likely get replaced with printed versions in the future.

While the car is certainly an incredible technical achievement, what’s perhaps just as impressive is the community that’s developed around it in such a relatively short time. Towards the end of the video he shows off a number of custom builds based on previous iterations of the Tarmo. We’re sure that interest from the community has played a part in pushing the design forward, and it’s always good to see a one-off project become something bigger. Hopefully we’ll be seeing even more from this passionate community in the near future.

Just like the Open R/C Project, Tarmo proves that 3D printed parts are more than a novelty. If these diminutive powerhouses can run with printed gears and drive shafts, then you shouldn’t have anything to worry about when you run off the parts for your next project.

Continue reading “The Evolution Of A 3D Printed Off-Road R/C Car”