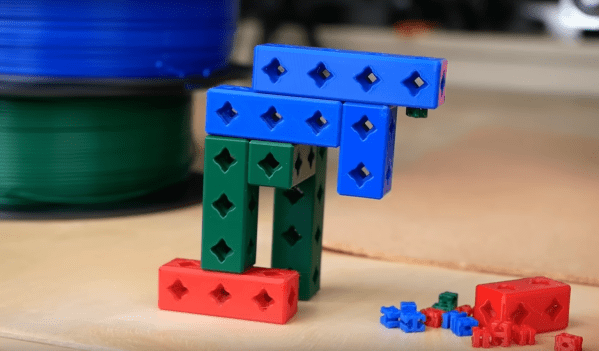
3D Printed Flexure Shows Precision In Action

Here’s an older but fantastic video that is as edifying as it is short. [Topias Korpi] demonstrates a 3D printed flexure with a dial indicator on one end, and an M3 screw on the other. As the screw is turned, the dial indicator moves steadily with roughly a 15:1 reduction between the movement of the screw and the indicator. Stable deflections of 0.01 mm are easily dialed in, and it’s neat seeing it work while the flexure itself shows no perceptible movement. A demonstration is embedded below the page break and is less than a minute long, so give it a watch and maybe get some ideas.

Flexures are fantastic designs capable of a wide variety of physical functions, and just as [Topias]’s demonstration shows, they can be a natural complement to 3D printing. In fact, flexures are an important part of the design and function of JWST’s mirror actuators, which are responsible for making astonishingly small adjustments to each of the space telescope’s 18 mirror sections.

Continue reading “3D Printed Flexure Shows Precision In Action”

3D Printed Protection Against “Under-Door” Attacks

“Under-door” style attacks are when an attacker slides a tool through the gap underneath a door, hooks the interior handle from below, and opens the door by pulling the handle downward. This kind of attack works on the sort of doors and locks commonly found in hotels, where turning the handle from the inside always results in an open door. [Michal Jirků] found himself in a hotel room with a particularly large gap underneath the door, and decided to quickly design and print a door guard to protect against just such an attack.

It’s a simple object, and twenty minutes of printing and a little double-sided tape is all it takes to deploy. Because an attacker performs an under-door attack with a sizable mechanical disadvantage, it doesn’t take much to frustrate the attempt, and that’s exactly what the object does. Physical security in hotels is especially important, after all, and crooks have been known to exploit known flaws like the face-palmingly bad Onity key card lock exploit.

If you’re having trouble picturing how it all works, this video demonstrates an under-door attack in action, so you can see how blocking the space by the handle would easily prevent the tool from getting where it needs to go.

3D Printing A Water-Cooled Jet Engine?

Everybody knows the trick to holding a candle flame to a balloon without it bursting — that of adding a little water before the air to absorb the heat from the relatively cool flame. So [Integza], in his quest to 3D print a jet engine wondered if the same principle could applied to a 3D printed combustion chamber. First things first, the little puddle of water was replaced with a pumped flow, from an external reservoir, giving the thin plastic inner surface at least a vague chance of survival. Whilst this whole plan might seem pretty bonkers (although we admit, not so much if you’ve seen any of other videos in the channel lately) the idea has some merit. Liquid cooling the combustion jacket is used in a great many rocket engine designs, we note, the German WWII V2 rocket used this idea with great success, along with many others. After all, some materials will only soften and become structurally weak if they get hot enough in any spot, so if it is sufficiently conductive, then the excess heat can be removed from the outer surface and keep the surface temperature within sensible bounds. Since resin is a thermoset plastic, and will burn, rather than melt, this behaviour will be different, but not necessarily better for this application.

The combustion chamber itself didn’t burn

The issue we can see, is balancing the thermal conductivity of the resin wall, with the rate of cooling from the water flow, whilst making it thick enough to withstand the pressure of combustion, and any shock components. Quite a complicated task if you ask us. Is resin the right material for the job? Probably not, but it’s fun finding out anyway! In the end [Integza] managed to come up with a design, that with the help of a metal injector separator plate, survived long enough to maintain some sort of combustion, until the plate overheated and burned the resin around its support. Better luck next time!

This isn’t the first time attempting to use 3D printed resin for such an application, here’s an attempt to use the air-multiplier type setup with a combustion chamber. Of course making a combustion chamber from a toilet roll holder is far more sensible, just as [colinfurze] will attest, don’t try this at home folks!

Continue reading “3D Printing A Water-Cooled Jet Engine?”

A boy looking at a small wind turbine

Hackaday Prize 2022: A 3D Printed Portable Wind Turbine For Hikers

If you’re out in the wilderness and off the grid, but still need to charge your phone, the most obvious way to do that is by using a solar panel. Light, flat and without moving parts, they’re easy to store and carry on a hike. But they obviously don’t work in the dark, so what’s a hiker to do if they want to charge their devices at night? If you happen to be in a windy place, then [adriancubas] has the solution for you: a portable wind turbine that folds up to the size of a 2 L soda bottle.

[adrian] designed the turbine to be light and compact enough to take with him on multi-day camping trips. Nearly all parts are 3D printed in PLA, and although ABS or PETG would have been stronger, the current design seems to hold up well in a moderate breeze. The generator core is made from a stepper motor with a bridge rectifier and a capacitor to create a DC output. [adrian] estimates the maximum power output to be around 12 W, which should be more than enough to charge a few beefy power banks overnight.

All parts are available as STL files on [adrian]’s project page, so if you’re looking for some wind power to charge your gadgets on your next camping trip you can go ahead and build one yourself. While we’ve seen large 3D printed wind turbines before, and portable ones for hikers, [adrian]’s clever folding design is a neat step up towards making wind power almost as easy to use as solar power.

Continue reading “Hackaday Prize 2022: A 3D Printed Portable Wind Turbine For Hikers”

A lock picking robot

This 3D Printed Robot Can Actually Pick Locks

Lockpicking is more of an art than a science: it’s probably 10% knowledge and 90% feeling. Only practice will teach you how much torque to apply to the cylinder, how to sense when you’ve pushed a pin far enough, or what it feels like when a pin springs back. Surely a robot would never be able to replicate such a delicate process, wouldn’t it?

Well, not according to [Lance] over at [Sparks and Code], who thought that building a lock picking robot would be an interesting challenge. He started out with a frame to hold a padlock and a servo motor to apply torque. A load cell measures the amount of force applied. This helps to keep the lock under a constant amount of tension as each pin is picked in succession. Although slow, this method seemed to work when moving the pick manually.

The difficult part was automating the pick movement. [Lance] built a clever system driven by two motors that would keep the pick perfectly straight while moving it horizontally and vertically. This was hard enough to get working correctly, but after adding a few additional clamps to remove wobble in the leadscrew, the robot was able to start picking. A second load cell inside the pick arm would detect the amount of force on each pin and work its way across the lock, pin by pin.

At least, that was the idea: as it turned out, simply dragging the pick across all pins in one go was enough to open the lock. A much simpler design could have achieved that, but no matter: designing a robot for all these intricate motions was a great learning experience anyway. It also gave [Lance] a good platform to start working on a more advanced robot that can pick higher-quality locks in which the dragging technique doesn’t work.

We haven’t come across lockpicking robots before; perhaps the closest equivalent would be this 3D-printed Snap Gun. If you’re interested in all aspects of locks and how to apply them, check out our Physical Security Hack Chat with Deviant Ollam.

Continue reading “This 3D Printed Robot Can Actually Pick Locks”

The eurorack rail piece, just printed in white plastic, not yet folded, with a folded example in the upper right corner

Bend Your Prints To Eliminate Supports

When designing even a reasonably simple 3D-printable part, you need to account for all the supports it will require to print well. Strategic offsetting, chamfering, and filleting are firmly in our toolkits. Over time we’ve learned to dial our settings in so that, hopefully, we don’t have to fumble around with a xacto knife after the bed has cooled down. On Twitter, Chris shows off his foldable 3D print experiments (nitter) that work around the support problem by printing the part as a single piece able to fold into a block as soon as you pop it off the bed.

The main components of this trick seem to be the shape of the place where the print will fold, and the alignment of bottom layer lines perpendicular to the direction of the fold lines. [Chris] shows a cross-section of his FreeCad design, sharing the dimensions he has found to work best.

Of course, this is Twitter, so other hackers are making suggestions to improve the design — like this sketch of a captive wedge likely to improve alignment. As for layer line direction alignment, [Chris] admits to winging it by rotating the part in the slicer until the layer lines are oriented just right. People have been experimenting with this for some time now, and tricks like these are always a welcome addition to our toolkits. You might be wondering – what kinds of projects are such hinges useful for?

The example Chris provides is a Eurorack rail segment — due to the kind of overhangs required, you’d be inclined to print it vertically, taking a hit to the print time and introducing structural weaknesses. With this trick, you absolutely don’t have to! You can also go way further and 3D print a single-piece foldable Raspberry Pi Zero case, available on Printables, with only two extra endcaps somewhat required to hold it together.

Foldable 3D prints aren’t new, though we typically see them done with print-in-place hinges that are technically separate pieces. This trick is a radical solution to avoiding supports and any piece separation altogether. In laser cutting, we’ve known about similar techniques for a while, called a “living hinge”, but we generally haven’t extended this technique into 3D printing, save for a few manufacturing-grade techniques. Hinges like these aren’t generally meant to bend many times before they break. It’s possible to work around that, too — last time we talked about this, it was an extensive journey that combined plastic and fabric to produce incredibly small 3D printed robots!

We thank [Chaos] for sharing this with us!

An oscilloscope with its probes stored in drawers below it

Clever Scope Probe Drawers Keep Your Workbench Tidy

Probes are an essential component of a good oscilloscope system, but they have the nasty habit of cluttering up your workbench. If you have a four-channel scope, it’s not just several meters of cable that get in the way everywhere, but also four sets of all those little clips, springs, cable markers, and adjustment screwdrivers that need to be stored safely.

[Matt Mets] came up with a clever solution to this problem: a 3D printed cable organizer that neatly fits below your scope. It has four drawers, each of which has enough space to store a complete probe and a little compartment for all its accessories. A cable cutout at the front allows you to keep the probes plugged in even when they’re not in use.

It’s a beautifully simple solution to a common problem, and with the STL files available on Printables anyone with a cluttered workbench can build one for themselves. If, however, you’d like to keep those probes even closer at hand, have a look at these probe caddies. Continue reading “Clever Scope Probe Drawers Keep Your Workbench Tidy”