Magnetic jack version of the bit-bang ethernet peripheral for Raspberry Pi Pico

Bit-Banging Bidirectional Ethernet On A Pi Pico

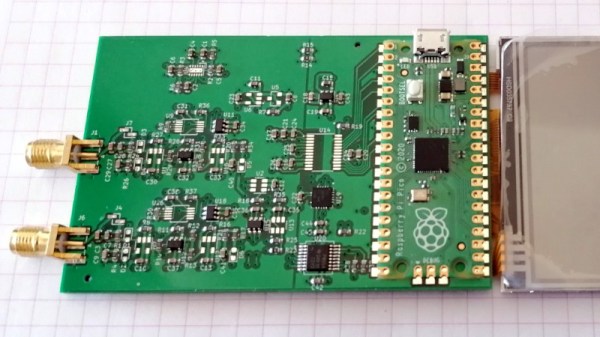
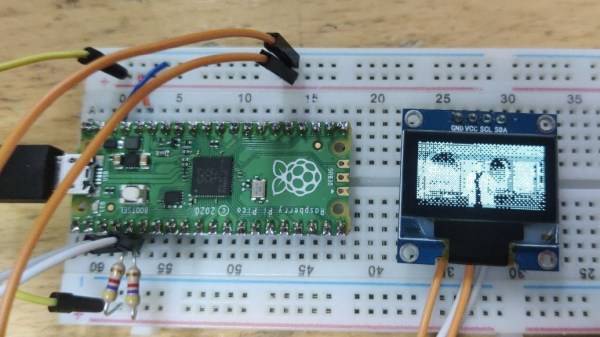
These days, even really cheap microcontroller boards have options that will give you Ethernet or WiFi access. But what if you have a Raspberry Pi Pico board and you really want to MacGyver yourself a network connection? You could do worse than check out this project by [holysnippet] that gives you a bit-banged bidirectional Ethernet port using only scrap passive components and software.

This project is similar to one we shared back in August by [kingyo], but differs in that what [holysnippet] has achieved is a fully-functional (albeit only around 7 Mbps) Ethernet port, rather than a simple UDP transmit device. The Ethernet connection itself is handled by the lwip stack. Connection to the RJ45 socket can be made from any of the Pi Pico pins, provided TX_NEG is followed directly by TX_POS, but the really hacky part is in the hardware.

schematic of Pi Pico bit-banged ethernet peripheral
Schematic showing the empirically-determined passive component values required.

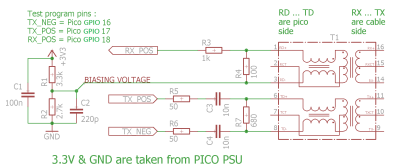
Rather than developing hardware that would protect the Pico, this design admits that it “shamefully relies on the Pico’s input protection devices” to limit the Ethernet voltages to 3.3 V.

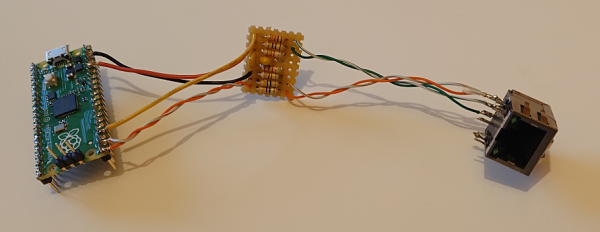
You’ll need an isolation transformer from some old Ethernet-enabled gear (either standalone or as part of a magnetic jack), but then it’s only resistors and capacitors from there. There are warnings not to connect this to PoE networks for obvious reasons, and the component layout needs to keep in mind the ~20 MHz frequencies involved, but to get this working at all feels like quite a feat.

Normally, there’d be no reason to go to these lengths, but it’s always educational to see if it can be done and, with the current component shortages, this is another trick to keep up your sleeve for emergencies!

Putting ports where they shouldn’t belong is not a new idea, of course.  Back in the day we even shared an inadvisable ATTINY implementation of bit-banged Ethernet with no protection at all.

Thanks to [biemster] for the tip-off

A two picture montage of the blackout logger, the left picture being the front e-ink display of the data logger in a black case and the second picture of the back of the data logger, with the raspberry pi pico show attached to an e-ink display, both sitting on a wooden table.

Blackout Logger Keeps Track Of Power Outages

[Dmytro Panin] lives in Kyiv, Ukraine where there have been rolling blackouts to stabilize the power grid. To help keep track of when the blackouts might happen, be they planned or emergency, and to get more information on how long the blackouts last, [Dmytro] has created a blackout logger.

The build consists of a Raspberry Pi Pico that connects to a DS3231 real time clock (RTC) with a Waveshare 3.7 inch eInk display which [Dmytro] puts into a custom 3D printed case. The RTC has it’s own small power supply, often times from a coin cell battery attached to the module, allowing it to keep time when the module and other devices attached to it are powered off.

The Raspberry Pi Pico is programmed to “poll” every 30 seconds, writing the current time to a file. Should the unit lose power, the last time, within a 30 second window, is available when power is restored and the unit wakes up again. Since the RTC has kept the current time, there is enough information to display the duration of the blackout. The eInk screen ensures that the information is readily available, even when there is no power.

War is not the only reason blackouts can occur and we’ve covered some issues with blackouts in Texas and California in the US.

Sprig Is An Open Source Handheld Game Console

[Hack Club] is a group that aims to teach teenagers about tech by involving them in open-source projects. One of the group’s latest efforts is Sprig, an open-source handheld game console, and [Hack Club] has even been giving them away!

The console is based around a Raspberry Pi Pico, paired up with a TFT7735 screen. There’s also a MAX98357A audio amp on board to provide sound. Other than that, there’s a full ten buttons for control, some LEDs for feedback, and it’s all assembled on a custom PCB designed for easy soldering.

Plenty of work has been done to make Sprig an accessible platform for first-time developers. Games can be created for Sprig and run either on the device, or in an online web-based editor. [Hack Club] is even running a program that will give Sprig hardware away to kids and teens worldwide who write a game for the platform and submit it to the online gallery.

If you’re eager to get into game development while understanding both the hardware and software side of things, Sprig might be just what you’re looking for. With today’s microcontrollers being so cheap and so powerful, we’ve seen some other great handheld designs recently, too!

A Pi Pico Oscilloscope

At the budget end of the oscilloscope range lie the so-called pocket ‘scopes. About the size of a deck of cards, they combine a microcontroller and an LCD screen to make an instrument with a bandwidth in the tens of kilohertz and a not-too-sparkling performance. They’re something of a toy, but then again, if all that’s needed is a simple ‘scope for audio frequencies, they make a passable choice in a small package. Now [jgpeiro] has made one which is light years ahead of the toy kits, using a Raspberry Pi Pico, a 100 MHz ADC, and an effort to design a better input circuit.

At its simplest this could be a straightforward op-amp and ADC circuit feeding the Pico, but instead it has multiple stages carefully designed to offer the full bandwidth, and with gain, offset, and trigger settings being set by a series of DAC chips under software control. This and the decent bandwidth make this a much more viable oscilloscope, and one we’d like to see further developed.

By comparison, we took a look at the best of the competition a few years ago.

A Pi Pico plugged into a breadboard, with an I2C OLED display connected to it

Need An USB-I2C Adapter? Use Your Pico!

Given its abundance and simplicity, the RP2040 has no doubt become a favourite for USB peripheral building – in particular, USB-connected tools for electronics experiments. Today, we see one more addition to our Pico-based tool arsenal – a USB-I2C adapter firmware for RP2040 by [Renze Nicolai]. This is a reimplementation of the ATTiny-based I2C-Tiny-USB project and complies to the same protocol – thus, it’s compatible with the i2c-tiny-usb driver that’s been in the Linux kernel for ages. Just drag&drop the .uf2, run a script on your Linux system, and you will get a /dev/i2c-X device you can work with from userspace code, or attach other kernel drivers to.

The software will work with any RP2040 devboard – just connect your I2C devices to the defined pins and you’ll have them show up in i2cdetect output on your Linux workstation. As a demo, [Renze] has written a userspace Python driver for one of these SSD1306 128×64 OLEDs, and gives us a commandline that has the driver accept output of an ffmpeg command capturing your main display’s contents, duplicating your screen on the OLED – in a similar fashion that we’ve seen with the “HDMI” I2C-driven display a few months back. Everything you might need is available on the GitHub page, including usage instructions and examples, and the few scripts you can use if you want to add an udev rule or change the I2C clock frequency.

Just to name a few purposes, you can use a Pi Pico as a tool for SWD, JTAG, CAN, a logic analyser with both digital and analog channels, or even as a small EMP-driven chip glitching tool. The now-omnipresent $3 Pi Pico boards, it seems, are a serious contender to fondly remembered hacker tools of the past, such as the legendary BusPirate.

Continue reading “Need An USB-I2C Adapter? Use Your Pico!”

An ortholinear keyboard with predominantly blank white keycaps. There are two red keycaps on the bottom outside corners. The center of the keyboard houses a large LCD in portrait orientation on a red PCB.

2022 Cyberdeck Contest: Keezyboost40 Is A Cyberdeck Masquerading As A Keyboard

There’s something to be said for über-powerful cyberdecks, but there’s also a certain appeal to less powerful decks squeezed into a tiny form factor. [Christian Lo] has designed a cyberdeck that looks like a simple ortholinear keyboard but is running a more flexible environment.

There are games and animations you can play on QMK, but [Lo] felt that a different framework would give him more flexibility to really stretch the limits of what this Raspberry Pi Pico-powered deck could do. He decided to go with a Rust-based firmware with the keyberon library and says, “it felt like I was in control of the firmware.” While the board is using Rust for now, [Lo] says he’s open to conversations about other firmware options to achieve his goals, like a virtual pet game for the board.

The PCB is described as “bog standard” with the possible exception of placing the Pi in a cutout on the board to keep things as low profile as possible. The trade-off comes in the form of reduced board rigidity and potentially increased strain on the connections to the microcontroller.

Looking for more cool cyberdecks? Check out the Winners of the 2022 Cyberdeck Contest or go see all the entries on the Contest Page.
Continue reading “2022 Cyberdeck Contest: Keezyboost40 Is A Cyberdeck Masquerading As A Keyboard”

A left-hand side unit of a split keyboard. The keys are black with RGB lighting and the key legends are displayed on small OLED screens in each key.

Poly Keyboard Has Screens In Every Key

Aspiring polyglots can be stymied by differing keyboard layouts and character sets when switching between languages. [Thomas Pollak]’s Poly Keyboard circumvents this problem by putting a screen in every key of the keyboard.

In his extensive build logs, [Pollak] details the different challenges he’s faced while bringing this amazing keyboard to life. For example, the OLED screens need glyph rendering to handle the legends on the keys. Since the goal is true universal language support, he used the Adafruit-GFX Library as a beginning and was able to extend support to Japanese, Korean, and Arabic so far in his custom fork of QMK.

The attention to detail on this build is really impressive. Beside the dedication to full glyph support, [Pollak] has measured the amount of extra force the flex cables from the OLEDs add to the actuation of the keyswitches. For the Gateron yellow switch he tested, the difference was about 62.2 g versus the initial 49.7 g.

In case you’re thinking you’ve seen other screen keyboard projects, [Pollak] includes a roundup of similar projects in his logs as well. This isn’t the first keyboard we’ve seen here at Hackaday with an OLED on top of a keyswitch, although [Voidstar Lab]’s MiRage only has three screen keys that were removed in a later iteration. If you’d like a more conventional fixed display in your keyboard, check out [Peng Zhihui]’s modular board with an e-ink display and haptic feedback knob.

Continue reading “Poly Keyboard Has Screens In Every Key”