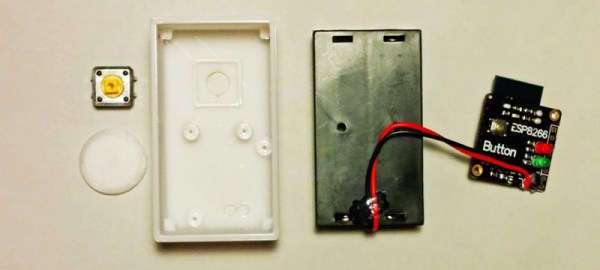
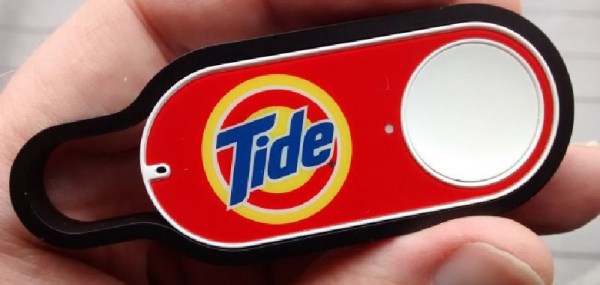
Amazon’s AI Escapes Its Hardware Prison

It’s the 21st century, and we’re still a long way from the voice-controlled computers we were all promised in the 60s, 70s, 80s, and 90s. The state of voice interaction has improved, though, and Amazon’s release of the Alexa Skills Kit (ASK) is another sure step towards a future of computers that will pay attention to you. This allows any hardware to become Alexa, your personal voice assistant with the ability to do just about anything you command.

amazon_echo
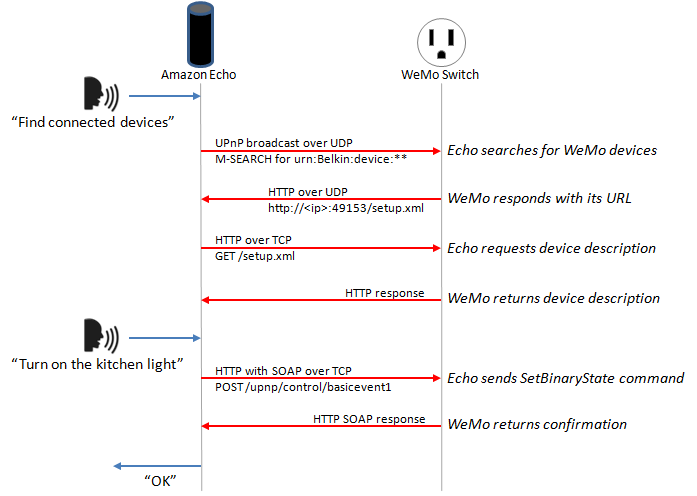
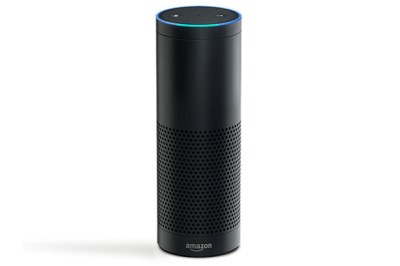
Up to this point, Alexa was locked away inside the Amazon Echo, the ‘smart’ cylinder that sits in your living room and does most of what you tell it to do. Since the Amazon Echo was released, we’ve seen the Echo and the Alexa SDK used for turning lights on and off, controlling a Nest thermostat, and other home automation tasks. It’s not Google Now, Microsoft’s Cortana, or Apple’s Siri that is behind all these builds; it’s Amazon’s Alexa that is bringing us into a world where Star Trek’s [Scotty] talking into an old Mac is seen as normal.

Right now, the Getting Started guide for the Alexa Skills Kit is focused more on web services than turning lights on and air conditioning off. Sample code for ASK is provided in JavaScript and Java, although we would expect 3rd party libraries for Python to start popping up any day now. If you want to run ASK on a Raspberry Pi or other small Linux computer, you’ll need a way to do voice capture; the Jasper project is currently the front-runner in this space.

We hope this changes the home automation game in a couple of different ways. First, the ASK processes everything in the cloud so very low power devices are now ready for some seriously cool voice interaction. Second, Amazon’s move to open up what you can do with the software backend means a community developing for the hardware could eventually exert pressure on Amazon to do things like making the system more open and transparent.

Already working on some hacks with the Echo or ASK? Send in a tip to your write-up and tells us about it in the comments below.

Amazon Echo Orders The Roku About

You can add the Roku media player to the list of devices that can be bossed about by the Amazon Echo and its built-in AI: Alexa. [Julian Hartline] has figured out how to use Amazon’s voice-controlled Echo device with a Roku media player. He did this by using the Alexa Skills Kit, the SDK that provides a programmer’s interface into the functions of the device. That allows you to add functions to the Alexa and the AWS Lambda cloud service that processes the voice commands (Amazon calls this an Alexa Skill).

Rather than have the cloud service talk directly to the Roku, though, he decided to have a local node.js server act as an intermediary. The Alexa sends the voice command to the AWS Lambda service, which processes it, sends the command to the node.js service, which finally sends the command to the Roku. It works, but it seems a little slow to respond: see the video after the break. In the example shown, Alexa actually causes the Roku to launch Netflix and input a search string for the requested show. Pretty slick!

Continue reading “Amazon Echo Orders The Roku About”

Control Nest Devices With Amazon Echo

[ZPriddy] was looking for a way to control his Nest thermostats with Amazon Echo. He didn’t want to settle for using AWS or some other hosted service. [ZPriddy] wanted something that he could host and manage completely on his own. The end result is what he calls EchoNestPy.

[ZPriddy] started by learning how to use the Alexa Skills Kit (ASK). ASK is the official SDK that allows enthusiasts to add functionality to their Amazon Echo. Unfortunately for [ZPriddy], most of the example code he found was designed to be used on Amazon Lambda, but that didn’t stop him. After finding a few examples of Amazon Echo requests and responses, he was on his way.

[ZPriddy] chose to implement a simple web server using Flask. The web server listens for the Amazon requests and responds appropriately. It also Oauth2 authentication to ensure some level of security. The server is capable of synchronizing the temperature of multiple Nest devices in the same home, but it can also increment or increment the temperature across the board. This is accomplished with some simple voice commands such as “Tell Nest that I’m a little bit chilly”. If you like Amazon Echo hacks, be sure to check out this other one for controlling WeMo devices. Continue reading “Control Nest Devices With Amazon Echo”

How To Make Amazon Echo Control Fake WeMo Devices

[Chris] has been playing with the Amazon Echo. It’s sort of like having Siri or Google Now available as part of your home, but with built-in support for certain other home automation appliances like those from Belkin WeMo and Philips. The problem was [Chris] didn’t want to be limited to only those brands. He had other home automation gear that he felt should work with Amazon Echo, but didn’t. That’s when he came up with the clever idea to just emulate one of the supported platforms.

The WeMo devices use UPnP to perform certain functions over the network. [Chris] wanted to see how these communications actually worked, so he fired up his laptop and put his WiFi adapter into monitor mode. Then he used Wireshark to start collecting packets. He found that the device detection function starts out with the Echo searching for WeMo devices using UPnP. The device then responds to the Echo with the device’s URL using HTTP over UDP. The Echo then requests the device’s description using that HTTP URL. The description is then returned as an HTTP response.

The actual “on/off” functionality of the WeMo devices is simpler since the Echo already knows about the device. The Echo simply connects to the WeMo over the HTTP interface and issues a “SetBinaryState” command. The WeMo then obliges and returns a confirmation via HTTP.

WeMo Echo
How Echo Communicates with WeMo Devices

[Steve] was able to use this information to set up his own WeMo “virtual cloud”. Each virtual device would have its own IP address. They would also need to have a listener for UDP broadcasts as well as an HTTP listener running on the WeMo port 49153. Each virtual device would also need to be able to respond to the UPnP discovery requests and the “on/off” commands.

[Chris] used a Linux server, creating a new virtual Ethernet interface for each virtual WeMo switch. A single Python script runs the WeMo emulation, listening for the UPnP broadcast and sending a different response for each virtual device. Part of the response includes the device’s “friendly name”, which is what the Echo listens for when the user says voice commands. Since the virtual WeMo devices are free, this allows [Chris] to make multiple phrases for each device. So rather than be limited to “television”, he can also make a separate device for “TV” that performs the same function. [Chris] is also no longer limited to only specific brands of home automation gear.

There’s still a long way to go in hacking this device. There’s a lot of hardware under the hood to work with. Has anyone else gotten their hands (and bench tools) on one of these?

An Amazon Dash-Like Button For The ESP8266

The Amazon Dash Button is a tiny piece of hardware that contains a single pushbutton, a WiFi module, and a nice, shiny corporate logo. Press the button, and products with that logo will be delivered to your house. An impressive bit of marketing, at least. With small, cheap WiFi modules like the ESP8266, it was only a matter of time until something an Amazon Dash clone was developed.

[deqing] created an ESP8266 Dash Button using the ESP-12 module, a button, a 3D printed case, and a pair of AA batteries. Electronically, it’s extremely simple; press the button, the ESP will wake up, request a URL, and put itself back to sleep. That’s all you need to do when you’re replicating the functionality of the Amazon Dash Button – the server will take care of the rest.

To configure the ESP8266, [dequng] is using the ESP-TOUCH app for Android, and setting up new functionality in this ESP button is as simple as putting a URL in the button’s Flash.

Not only is this a great build that has literally hundreds of different uses, it’s also not a breakout board for the ESP8266. It’s great that we’re finally seeing some builds using this cheap WiFi chip in the real world.

Obviously the actual Dash buttons include authentication that this one does not. We recently saw a teardown of the original hardware. We’re still waiting for in-depth analysis of the data squirted to the internet when an order is placed with it, though.

Inside The Amazon Dash Button

The Amazon Dash Button is a tiny WiFi-enabled device that’s a simple button with a logo on the front. If you get the Tide-branded version, simply press the button and a bottle of laundry detergent will show up at your door in a few days. Get the Huggies-branded version, and a box of diapers will show up. Get the sugar-free Haribo gummi bear-branded version, and horrible evil will be at your doorstep shortly.

[Matt] picked up one of these Dash Buttons for 99 cents, and since a button completely dedicated to buying detergent wasn’t a priority, he decided to tear it apart.

The FCC ID reveals the Amazon Dash Button is a WiFi device, despite rumors of it having a Bluetooth radio. It’s powered by a single AA battery, and [Matt] posted pictures of the entire board.

Since this piece of Amazon electronics is being sold for 99 cents, whatever WiFi radio chip is inside the Dash Button could be used for some very interesting applications. If you have an idea of what chips are being used in [Matt]’s pictures, leave a note in the comments.

Kindle Hack

Unlock Your Demo Kindle Paperwhite

If you’ve been holding off on upgrading your kindle, this project might inspire you to finally bite the bullet. [WarriorRocker] recently saved quite a few dollars on his Kindle upgrade by using a demo unit. Of course, it’s not as simple as just finding a demo unit and booting it up. There’s some hacking involved.

[WarriorRocker] found his Kindle Paperwhite demo unit on an online auction site for just $20. Kindles are great for reading but also make popular displays for your own projects. This used display model was much less expensive than a new unit, which makes sense considering it had probably received its share of abuse from the consumers of some retail store. The problem with a demo unit is that the firmware that comes with it is very limited, and can’t be used to sync up with your Amazon account. That’s where the hacking comes in.

pwdu-01The first step was to crack open the case and locate the serial port. [WarriorRocker] soldered a small three pin header to the pads to make it easier to work on his device as needed. He then connected the Kindle to his PC using a small serial to USB adapter. Pulling up the command prompt was as simple as running Putty and connecting to the correct COM port. If the wires are hooked up correctly, then it just takes a press of the enter key to pull up the login prompt.

The next step requires root access. The root password for each unit is related to the unit’s serial number. [WarriorRocker] obtained the serial number by rebooting the Kindle while the Serial connection was still open. The boot sequence will spit out the number. This number can then be entered in to an online tool to generate possible root passwords. The tool is available on [WarriorRocker’s] project page linked above.

Next, the Kindle needs to be rebooted into diagnostic mode. This is because root logins are not allowed while the device is booted to the system partition. To enter diagnostic mode, [WarriorRocker] had to press enter over and over during the boot sequence in order to kill the automatic boot process. Then he checked some environment variables to locate the memory address where the diagnostic mode is stored. One more command tells the system to boot to that address and into diagnostic mode.

The last step of the process begins by mounting the Kindle as a USB storage device and copying over the stock Kindle firmware image. Next [WarriorRocker] had to exit the diagnostic menu and return to a root command prompt. Finally, he used the dd command to copy the image to the Kindle’s partition bit by bit. Fifteen minutes and one reboot later and the Kindle was working just as it should. [WarriorRocker] even notes that the 3G connection still works. Not bad for $20 and an hour or two of work.