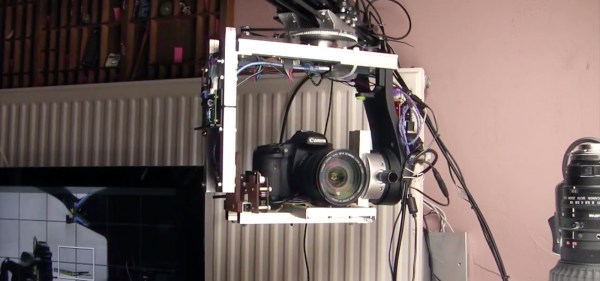
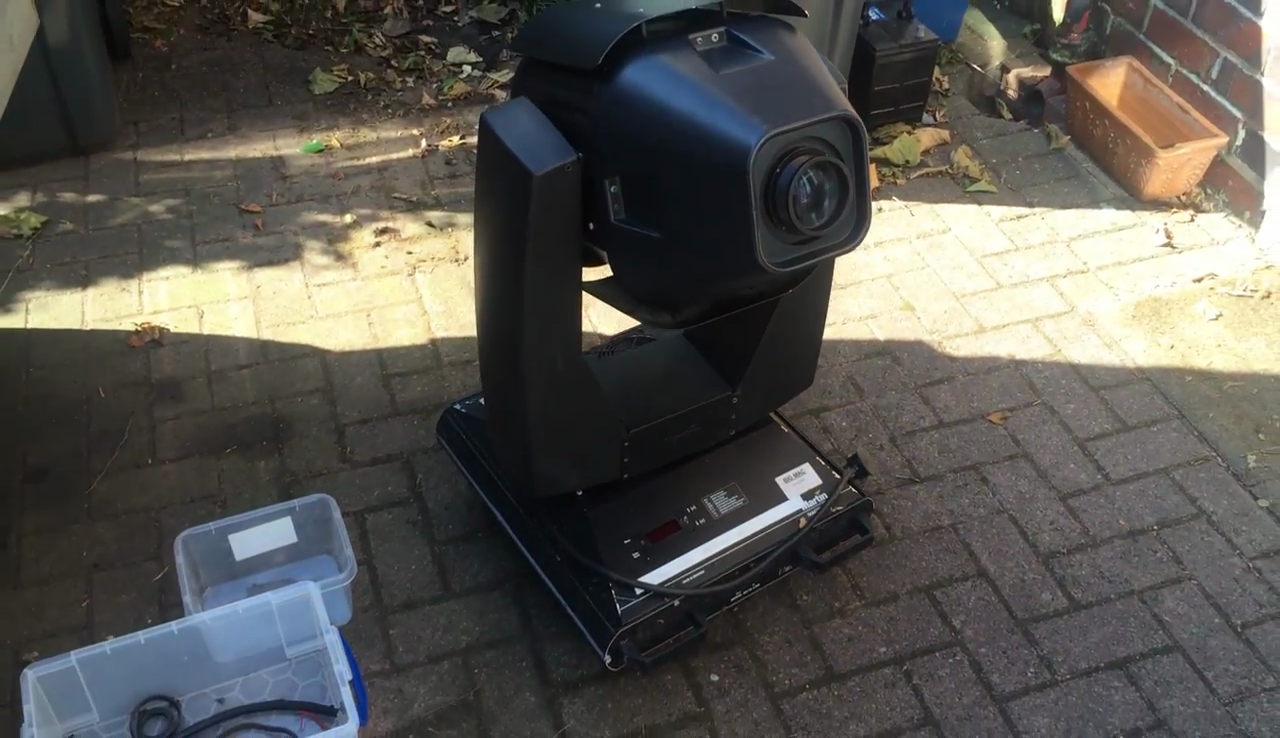
[Howard] started this project about a year ago by carrying out some targeted experiments. These would not only assess the suitability of components he gathered together from all directions, but also his own capacity in picking up enough knowledge on mechatronics to make the whole thing work. After making himself accustomed to stepper motors, Teensies and Arduinos, he converted an old moving-head disco light into a pan and tilt mount for the camera. A linear axis was added, and with more degrees of freedom, more sophisticated means of control became necessary.
Sometimes the journey is as interesting as the destination, and that’s certainly the case with [Marc]’s pursuit of measuring his sleep apnea (PDF, talk slides. Video embedded below.). Sleep apnea involves periods of time when you don’t breathe or breathe shallowly for as long as a few minutes and affects 5-10% of middle-aged men (half that for women.) [Marc]’s efforts are still a work-in-progress but along the way he’s tried a multitude of things, all involving different technology and bugs to work out. It’s surprising how many ways there are to monitor breathing.
Debugging the Eeonyx conductive fabric approach
His attempts started out using a MobSenDat Kit, which includes an Arduino compatible board, and an accelerometer to see just what his sleeping positions were. That was followed by measuring blood O2 saturation using a cheap SPO2 sensor that didn’t work out, and one with Bluetooth that did work but gave results as a graph and not raw data.
Next came measuring breathing by detecting airflow from his nose using a Wind Sensor, but the tubes for getting the “wind” from his nose to the sensor were problematic, though the approach was workable. In parallel with the Wind Sensor he also tried the Zeo bedside sleep manager which involves wearing a headband that uses electrical signals from your brain to tell you what sleep state you’re in. He particularly liked this one as it gave access to the data and even offered some code.
And his last approach we know of was to monitor breathing by putting some form of band around his chest/belly to measure expansion and contraction. He tried a few bands and an Eeonyx conductive textile/yarn turned out to be the best. He did run into noise issues with the Xbee, as well as voltage regulator problems, and a diode that had to be bypassed.
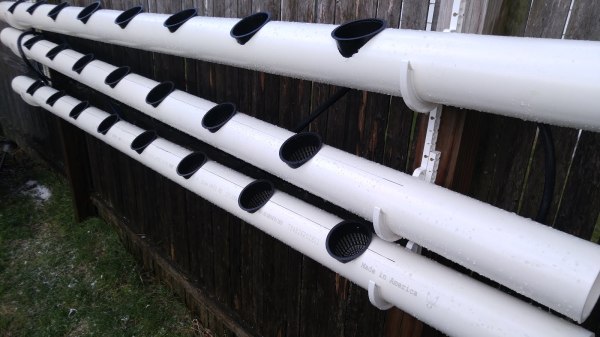
[Dan Bowen] describes the construction of a backyard hydroponics set-up in an angry third person tirade. While his friends assume more nefarious, breaking, and bad purposes behind [Dan]’s interest in hydroponics; he’d just like some herbs to mix into the occasional pasta sauce.
Feel particularly inspired one day after work, he stopped by the local hardware store and hydroponics supply. He purchases some PVC piping, hoses, fittings, pumps, accessories, and most importantly, a deck box to hide all the ugly stuff from his wife.
The design is pretty neat. He has an open vertical spot that gets a lot of light on his fence. So he placed three lengths of PVC on a slant. This way the water flows quickly and aerates as it goes. The top of the pipes have holes cut in them to accept net baskets.
The deck box contains a practically industrial array of sensors and equipment. The standard procedure for small-scale hydroponics is just to throw the water out on your garden and replace the nutrient solution every week or so. The hacker’s solution is to make a rubbermaid tote bristle with more sensors than the ISS.
We hope his hydroponics set-up approaches Hanging Gardens of Babylon soon.
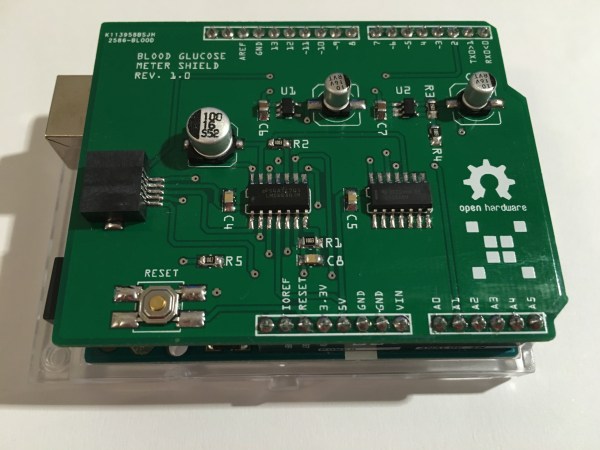
Blood glucose monitors are pretty ubiquitous today. For most people with diabetes, these cheap and reliable sensors are their primary means of managing their blood sugar. But what is the enterprising diabetic hacker to do if he wakes up and realizes, with horror, that a primary aspect of his daily routine doesn’t involve an Arduino?
Rather than succumb to an Arduino-less reality, he can hopefully use the shield [M. Bindhammer] is working on to take his glucose measurement into his own hands.
[Bindhammer]’s initial work is based around the popular one-touch brand of strips. These are the cheapest, use very little blood, and the included needle is not as bad as it could be. His first challenge was just getting the connector for the strips. Naturally he could cannibalize a monitor from the pharmacy, but for someone making a shield that needs a supply line, this isn’t the best option. Surprisingly, the connectors used aren’t patented, so the companies are instead just more rigorous about who they sell them to. After a bit of work, he managed to find a source.
The next challenge is reverse engineering the actual algorithm used by the commercial sensor. It’s challenging. A simple mixture of water and glucose, for example, made the sensor throw an error. He’ll get it eventually, though, making this a great entry for the Hackaday Prize.
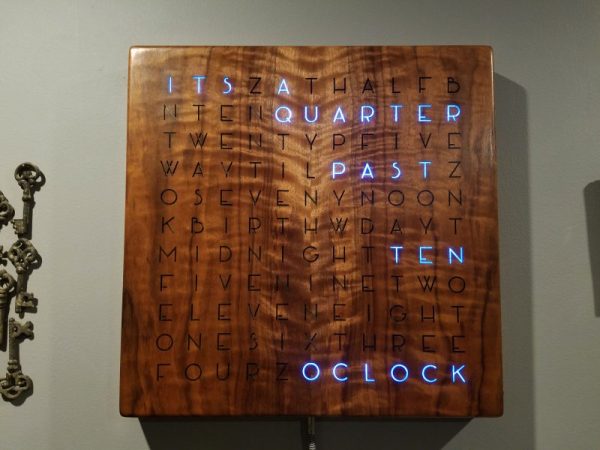
Word clocks are cool, but getting them to function correctly and look good is all about paying attention to the details. One look at this elegant walnut-veneered word clock shows what you can accomplish when you think a project through.
Most word clocks that use laser-cut characters like [grahamvinyl]’s effort suffer from the dreaded “stencil effect” – the font has bridges to support the islands in the middle of characters like “A” and “Q”. While that can be an aesthetic choice and work perfectly well, like in this word clock we featured a few months back, [grahamvinyl] was going for a different look. The clock’s book-matched walnut guitar back was covered in tape before being laser cut; the tape held the letters and islands in place. After painstakingly picking out the cutouts and tweaking the islands, he used clear epoxy resin to hold everything in place. The result is a fantastic Art Deco font and a clean, sleek-looking panel to sit on top of an MDF light box for the RGB LED strips.
The braided cloth cable adds a vintage look to the power cord, and [grahamvinyl] mentions some potential upgrades, like auto-dimming and color shifting. This is very much a work in progress, but even at this point we think it looks fabulous.
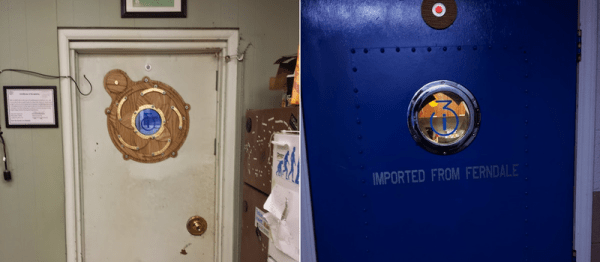
In order to resolve the problem of congestion at the entrance to their hackerspace, the minds at i3Detroit installed a motion-activated mechanical iris in their door’s porthole.
Grabbing the design online (which they are now hosting on their site here), the parts were laser cut out of wood, gold leaf was added for effect, and it was relatively easy to assemble. PIR sensors detect movement on both sides of the door and an FET resistor connected to an orange LED add some old-school science fiction flair. The iris is actuated by a 12V car window motor — which works just fine on the 5V power that it’s supplied with — and an Arduino filling in as a controller. Start and stop positioning required some limit switches that seem to do the trick.
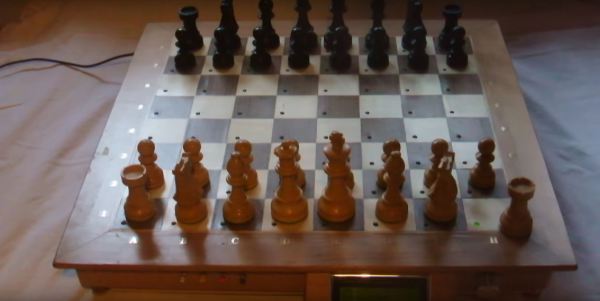
Unsatisfied with the present options for chess computers and preferring the feel of a real board and pieces, [Max Dobres] decided that his best option would be to build his own.
Light and dark wood veneer on 8mm MDF board created a board that was thin enough for adding LEDs to display moves and for the 10mm x 1mm neodymium magnets in the pieces to trip the reed switches under each space. The LEDs were wired in a matrix and connected to an Arduino Uno by a MAX7219 LED driver, while the reed switches were connected via a Centipede card. [Dobres] notes that you’ll want to test that the reed switches are positioned correctly — otherwise they might not detect the pieces!
 [Howard] started this project about a year ago by carrying out some targeted experiments. These would not only assess the suitability of components he gathered together from all directions, but also his own capacity in picking up enough knowledge on mechatronics to make the whole thing work. After making himself accustomed to stepper motors, Teensies and Arduinos, he converted an old moving-head disco light into a pan and tilt mount for the camera. A linear axis was added, and with more degrees of freedom, more sophisticated means of control became necessary.