Custom Circuit Makes For Better Battery Level Display

Isn’t it always the way? There’s a circuit right out of the textbooks, or even a chip designed to do exactly what you want — almost exactly. It’s 80% perfect for your application, and rather than accept that 20%, you decide to start from scratch and design your own solution.

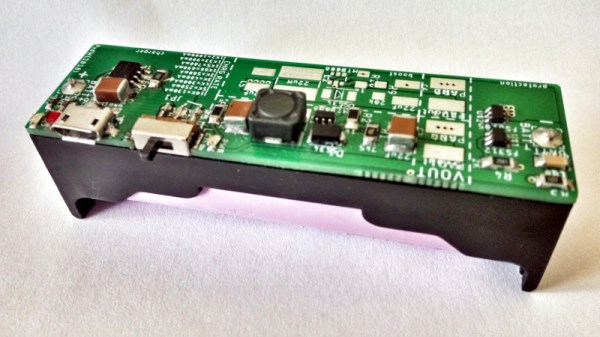
That’s the position [Great Scott!] found himself in with this custom LED battery level indicator. As the video below unfolds we learn that he didn’t start exactly from scratch, though. His first pass was the entirely sensible use of the LM3914 10-LED bar graph driver chip, a device that’s been running VU meters and the like for the better part of four decades. With an internal ladder of comparators and 1-kilohm resistors, the chip lights up the 10 LEDs according to an input voltage relative to an upper and lower limit set by external resistors. Unfortunately, the fixed internal resistors make that a linear scale, which does not match the discharge curve of the battery pack he’s monitoring. So, taking design elements from the LM3914 datasheet, [Great Scott!] rolled his own six-LED display from LM324 quad-op amps. Rather than a fixed resistance for each stage, trimmers let him tweak the curve to match the battery, and now he knows the remaining battery life with greater confidence.

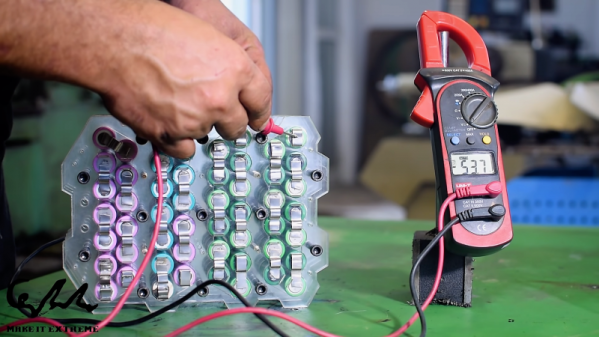
Perhaps the 18650 battery pack [Great Scott!] is building is for the e-bike he has been working on lately. If it is, we’re glad to see that he spot-welded the terminals, unlike a recent e-bike battery pack build that may have some problems down the road.

Continue reading “Custom Circuit Makes For Better Battery Level Display”

Amiga 2000 Emergency Repair

Big companies spend small fortunes on making sure their computers stay running and that they can be repaired quickly in an emergency. You wouldn’t expect an emergency repair on an Amiga 2000, though. [RETR-O-MAT] bought an Amiga 2000 that did boot, but was known to have a leaky battery on the motherboard. He wanted to rush to replace the battery before the leakage caused serious damage. You can see all this in the video below.

The computer looked lightly used over its 32-year lifespan, even when the case came off. The battery corrosion was evident, though. Even the bolt holding down the motherboard was clearly corroded from the leaking battery, causing it to be very difficult to remove.

The battery leakage also made unsoldering the battery a challenge. Several chips and sockets — including the CPU — were affected, so they had to come out. You can see a nice demonstration of the “old screwdriver trick” which might be eye-opening if you’ve only worked with SMD chips.

Even if you don’t care much about the Amiga 2000, it is interesting to see inside an old computer like this and note the differences — and similarities — to modern designs. The video is as much a tear down as it is a repair story. It also might be useful if you ever face having to tear out a leaky battery on any piece of gear. Continue reading “Amiga 2000 Emergency Repair”

Smart pill with stomach acid _battery

This Smart Pill Uses A Stomach Acid Battery

[Curt White] is working on a smart pill whose copper-zinc battery will use his own stomach acid as the electrolyte. It’s not that unusual of an idea, MIT tested a similar approach in a pig. It’s also better than using lithium ion batteries, something we covered in this PSA.

Smartpill circuit diagram

His starting point is a small, hacked activity tracker with its Nordic nRF51822 ARM Cortex-M0 and Bluetooth LE SoC. Most everything else is removed. The battery electrodes are sewn onto a plastic mesh cut to the activity tracker’s dimensions. Three coin type super capacitors and a boost converter sit between the battery and the SoC.

He uses the Bluetooth LE for communication, sort of. BLE devices constantly transmit information about themselves and it’s this which you see when scanning for available devices. Included in that transmission is a UUID (Universally Unique Identifier) and a name (e.g. “smartpillxyz”). He has the pill transmit data by putting it in that name. This saves power by minimizing the time which the pill’s Bluetooth radio is turned on. The smartphone app extracts the data from these transmissions without ever connecting.

His goal is to monitor the voltage and the maximum current. This will tell him if his stomach acid battery works and what can be powered by it. First tests will use regurgitated gastric fluid and then later he’ll swallow the pill himself. As he puts it, why not, “people swallow and pass all kinds of weird stuff without a problem.” Thay may sound cavalier but judging by his hackaday.io page, he’s doing his homework.

An E-Bike Battery Pack Without Spot Welding

In somewhat of a departure from their normal fare of heavy metal mods, [Make It Extreme] is working on a battery pack for an e-bike that has some interesting design features.

The guts of the pack are pretty much what you’d expect – recovered 18650 lithium-ion cells. They don’t go into details, but we assume the 52 cells were tested and any duds rejected. The arrangement is 13S4P, and the cells are held in place with laser-cut acrylic frames. Rather than spot weld the terminals, [Make It Extreme] used a series of strategically positioned slots to make contacts from folded bits of nickel strip. Solid contact is maintained by cap screws passing between the upper and lower contact frames. A forest of wires connects each cell to one of four BMS boards, and the whole thing is wrapped in a snappy acrylic frame. The build and a simple test are in the video below.

While we like the simplicity of a weld-less design, we wonder how the pack will stand up to vibration with just friction holding the cells in contact. Given their previous electric transportation builds, like this off-road hoverbike, we expect the pack will be put to the test soon, and in extreme fashion.

Continue reading “An E-Bike Battery Pack Without Spot Welding”

Tesla Model 3 Battery Pack Teardown

The Tesla Model 3 has been available for almost a year now, and hackers and tinkerers all over the world are eager to dig into Elon’s latest ride to see what makes it tick. But while it’s considerably cheaper than the Model S that came before it, the $35,000+ USD price tag on the new Tesla is still a bit too high to buy one just to take it apart. So for budget conscious grease monkeys, the only thing to do is wait until somebody with more money than you crashes one and then buy the wreckage cheaply.

Tesla Model 3 battery monitor board

Which is exactly what electric vehicle connoisseur [Jack Rickard] did. He bought the first wrecked Model 3 he could get his hands on, and proceeded to do a lengthy teardown on what’s arguably the heart and soul of the machine: its 75 kWh battery pack. Along the way he made some interesting discoveries, and gained some insight on to how Tesla has been able to drop the cost of the Model 3 so low compared to their previous vehicles.

On a Tesla, the battery pack is a large flat panel which takes up effectively the entire underside of the vehicle. To remove it, [Jack] and his assistant raise the wreck of the Model 3 up on a standard lift and then drop the battery down with a small lift table. Here the first differences are observed: while the Model S battery was made for rapid swapping (a feature apparently rarely utilized in practice), the battery in the Model 3 battery is obviously intended to be a permanent piece of the car; removing it required taking out a good portion of the interior.

With the battery out of the car and opened up, the biggest change for the Model 3 becomes apparent. The battery pack actually contains the charger, DC-DC converter, and battery management system in one integrated unit. Whereas on the Model S these components were installed in the vehicle itself, on the Model 3, most of the primary electronics are stored in this single module.

That greatly reduces the wiring and complexity of the car, and [Jack] mentions the only significant hardware left inside the Model 3 (beyond the motors) would be the user interface computer in the dashboard. When the communication protocol for this electronics module is reverse engineered, it may end up being exceptionally useful for not only electric vehicle conversions but things like off-grid energy storage.

A little over a year ago we featured a similar teardown for the battery back in the Tesla Model S, as well as the incredible project that built a working car from multiple wrecks.

[Thanks to DarksideDave for the tip.]

Continue reading “Tesla Model 3 Battery Pack Teardown”

A Li-Ion Booster Pack, Done Right

We’re all used to battery booster packs containing a Li-ion or Li-poly cell and a little inverter circuit, they are a standard part of 21st century daily survival for those moments when smartphone battery lives don’t perform as advertised. But how many of us have considered what goes into them, and further how many of us have sought to produce the best one possible rather than a unit built at the lowest price?

It’s a course [Peter6960] has followed, producing a PCB that sits on the back of an 18650 cell holder. It follows the work of [GreatScott] in particular in its use of the TP4056 charger, MT3608 boost converter, and FS312F protection ICs. Many commercial modules omit any protection circuit, and the FS312F is of particular interest because it has a low 2.9V cut-off voltage that should lengthen the life of the cell. Files for the PCB can be found in a zip file hosted on Google Drive.

You might think that there was nothing new that could be learned about a Li-ion battery booster, but it’s always worth a look at a well-executed piece of work. We noticed he refers to Li-poly cells while using what appears to be a Li-ion 18650 cell. Most likely this is merely an oversight.

There is a lot to know about the characteristics and safety of the lithium-chemistry rechargeables, you may find [Sean Boyce]’s article on the subject to be an interesting read.

Hybrid Bench Power Supply Can Also Hit The Road

Everyone needs a bench power supply, and rolling your own has almost become a rite of passage for hackers. For a long time, the platform of choice for such builds seemed to be the ATX power supply from a computer. While we certainly still see those builds, a lot of the action has switched to those cheap eBay programmable DC-DC converters, with their particolored digital displays.

This hybrid bench and portable power supply is a good example of what can be accomplished with these modules, and looks like it might turn out to be a handy tool. [Luke] centered his build around the DPS3003, a constant current and constant voltage buck converter that can take up to 40-VDC input and outputs up to 32 volts at 3 amps. In bench mode, the programmable module is fed from a mains-powered 24-volt switching supply. For portable work, an 18-volt battery from a Makita drill slips into a 3D-printed adapter on the top of the case. The printed part contains a commercial terminal [Luke] scored on eBay, but we’d bet the entire thing could be 3D printed. And no problem if you change power tool brands — just print another adapter.

Those little eBay power supply modules have proven to be an enabling technology, at least judging by the number of clever ways we’ve seen them used lately. From this combination bench PSU and soldering iron supply to a portable PSU perched atop a battery, these things are everywhere. Heck, you can even reflash the firmware and make them do your bidding.

[via Dangerous Prototypes]