Wire race bearing

Adding Wire Races Improves 3D-Printed Bearings

Like a lot of power transmission components, bearings have become far easier to source than they once were. It used to be hard to find exactly what you need, but now quality bearings are just a few clicks away. They’re not always cheap though, especially when you get to the larger sizes, so knowing how to print your own bearings can be a handy skill.

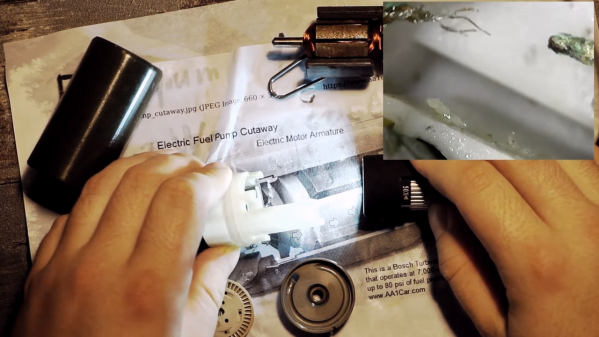
Of course, 3D-printed bearings aren’t going to work in every application, but [Eros Nicolau] has a plan for that. Rather than risk damage from frictional heating by running plastic or metal balls in a plastic race, he uses wire rings as wear surfaces. The first video below shows an early version of the bearing, where a pair of steel wire rings lines the 3D-printed inner and outer races. These worked OK, but suffered from occasional sticky spots and were a bit on the noisy side.

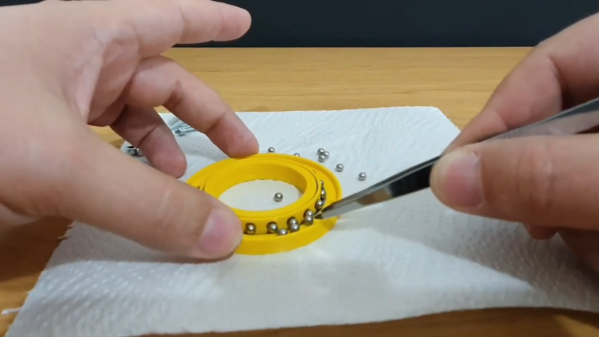
The second video shows version two, which uses the same wire-ring race arrangement but adds a printed ball cage to restrain the balls. This keeps things quieter and eliminates binding, making the bearing run smoother. [Eros] also added a bit of lube to the bearing, in the form of liquid PTFE, better known as Teflon. It certainly seemed to smooth things out. We’d imagine PTFE would be more compatible with most printed plastics than, say, petroleum-based greases, but we’d be keen to see how the bearings hold up in the long term.

Maybe you recall seeing big 3D-printed bearings around here before? You’d be right. And we’ve got you covered if you need to learn more about how bearings work — or lubricants, for that matter.

Continue reading “Adding Wire Races Improves 3D-Printed Bearings”

Magnetic Bearings Put The Spin On This Flywheel Battery

[Tom Stanton] is right about one thing: flywheels make excellent playthings. Whether watching a spinning top that never seems to slow down, or feeling the weird forces a gyroscope exerts, spinning things are oddly satisfying. And putting a flywheel to work as a battery makes it even cooler.

Of course, using a flywheel to store energy isn’t even close to being a new concept. But the principles [Tom] demonstrates in the video below, including the advantages of magnetically levitated bearings, are pretty cool to see all in one place. The flywheel itself is just a heavy aluminum disc on a shaft, with a pair of bearings on each side made of stacks of neodymium magnets. An additional low-friction thrust bearing at the end of the shaft keeps the systems suitably constrained, and allows the flywheel to spin for twelve minutes or more.

[Tom]’s next step was to harness some of the flywheel’s angular momentum to make electricity. He built a pair of rotors carrying more magnets, with a stator of custom-wound coils sandwiched between. A full-wave bridge rectifier and a capacitor complete the circuit and allow the flywheel to power a bunch of LEDs or even a small motor. The whole thing is nicely built and looks like a fun desk toy.

This is far from [Tom]’s first flywheel rodeo; his last foray into storing mechanical energy wasn’t terribly successful, but he has succeeded in making flywheels fly, one way or another.

Continue reading “Magnetic Bearings Put The Spin On This Flywheel Battery”

Roll Your Own Heelys

Remember Heelys, the shoes with wheels in the heels? Just lift up your toes, and away you go. We were at least ten or fifteen years older than the target demographic, but got a pair anyway just to please our inner child and have some fun. Young kids would wear them everywhere and zip around inside stores to the annoyance of everyone but other young kids. We imagine some shopkeepers got to the point where they could spot the things as they walked in the door and nipped the skating party in the bud.

[DevNerd] has conceived of the ultimate plan: if you make your own Heelys, no one necessarily has to know unless you start rolling around. [DevNerd] started by cutting some large, 20mm-deep holes in the bottoms of a pair of Air Jordans and printed a sturdy wheel and a box frame for support.

Each wheel has a bearing on both ends that spin on a threaded rod. We’re not sure why [DevNerd] went with threaded rod, because it seems like that would prematurely wear out the frame box.

Don’t want to cut up your shoes, but want some sweet roller kicks for the daily commute down the hall? You could always make them out of pallet wood.

Anything Becomes A Clock

Clocks are a popular project around here, and with good reason. There’s a ton of options, and there’s always a new take on ways to tell time. Clocks using lasers, words, or even ball bearings are all atypical ways of displaying time, but like a mathematician looking for a general proof of a long-understood idea this clock from [Julldozer] shows us a way to turn any object into a clock.

His build uses AA-powered clock movements that you would find on any typical wall clock, rather than reaching for his go-to solution of an Arduino and a stepper motor. The motors that drive the hands in these movements are extremely low-torque and low-power which is what allows them to last for so long with such a small power source. He uses two of them, one for hours and one for minutes, to which he attaches a custom-built lazy Suzan. The turntable needs to be extremely low-friction so as to avoid a situation where he has to change batteries every day, so after some 3D printing he has two rotating plates which can hold any object in order to tell him the current time.

While he didn’t design a clock from scratch or reinvent any other wheels, the part of this project that shines is the way he was able to utilize such a low-power motor to turn something so much heavier. This could have uses well outside the realm of timekeeping, and reminds us of this 3D-printed gear set from last year’s Hackaday prize.

Continue reading “Anything Becomes A Clock”

Take Pottery For A Spin With A Pocket-Sized Wheel

If 2020 can be remembered in any positive light, it would be that this has been the year of the hobby tryouts. Why not pottery? Sure, throwing pots won’t fill your belly like homemade bread. But we would bet you can see the value in having a bunch of expendable objects that are easily (and quite satisfyingly) smashed to smithereens. The best part is that between the workbench, junk box, and recycle bin, you can probably build [Jadem52]’s pottery wheel for ants with stuff you already have. Bonus!

Pottery wheels aren’t that complicated. They’re honestly kind of expensive for what they are — a motor and a belt driving a rotating platter. It’s like a record player, but less fussy. Where they really get you on expense is the kiln to heat-treat those pots into sturdy vessels. But you could always use air-dry clay, especially if you’re making these things just to smash them whenever you need to let off some steam.

So anyway, you don’t need much more than a motor, a jar lid for a wheel to throw on, and a bearing to make it spin smoothly. Store-bought pottery wheels have a foot feed to control the motor speed, but this pocket version is either spinning on nine volts or it isn’t. The great thing about a project like this is that once you have the general principle down and use the thing, you can iterate and upgrade to your heart’s content. Take it for a little spin after the break.

If you want to hack together a more conventionally-sized wheel, an old ceiling fan motor should be more than sufficient.

Continue reading “Take Pottery For A Spin With A Pocket-Sized Wheel”

Fail Of The Week: How Not To Watercool A PC

To those who choose to overclock their PCs, it’s often a “no expense spared” deal. Fancy heat sinks, complicated liquid cooling setups, and cool clear cases to show off all the expensive guts are all part of the charm. But not everyone’s pockets are deep enough for off-the-shelf parts, so experimentation with cheaper, alternatives, like using an automotive fuel pump to move the cooling liquid, seems like a good idea. In practice — not so much.

The first thing we thought of when we saw the title of [BoltzBrain]’s video was a long-ago warning from a mechanic to never run out of gas in a fuel-injected car. It turns out that the gasoline acts as a coolant and lubricant for the electric pump, and running the tank dry with the power still applied to the pump quickly burns it out. So while [BoltzBrain] expected to see corrosion on the brushes from his use of water as a working fluid, we expected to see seized bearings as the root cause failure. Looks like we were wrong: at about the 6:30 mark, you can see clear signs of corrosion on the copper wires connecting to the brushes. It almost looks like the Dremel tool cut the wire, but that green copper oxide is the giveaway. We suspect the bearings aren’t in great shape, either, but that’s probably secondary to the wires corroding.

Whatever the root cause, it’s an interesting tour inside a common part, and the level of engineering needed to build a brushed motor that runs bathed in a highly flammable fluid is pretty impressive. We liked the axial arrangement of the brushes and commutator especially. We wonder if fuel pumps could still serve as a PC cooler — perhaps changing to a dielectric fluid would do the trick.

Continue reading “Fail Of The Week: How Not To Watercool A PC”

Giant Bearing Is At The Heart Of A Camera Mount

We bet you have all some cool part in your bin that is just gnawing at you to build something cool. That doodad, possibly from a garage sale, surplus store, or clearance rack deserves a project fitting of its near-infinite potential. [isaac879] finally marries a giant ball bearing with his passion for photography in the form of a pan-tilt camera mount for his Canon DSLR. The problem with tossing your golden-ticket part into a project is that not everyone has a MacGuffin, or a brand new one might be bank-breakingly expensive, so he does us a favor and makes a drop-in replacement that you can print and fill with 6mm brass bbs. This sort of thing is why we love hackers.

The camera mount has the features we expect to see in a robust stepper mount, such as infinite spinning, time delay, and an Xbox controller interface. Inside the base is the industrial bearing or its plastic replica, and that wide base won’t be tipping over anytime soon. Gearing all around is of the herringbone style, of the type you find in classroom pencil sharpeners because they transfer power smoothly. Speaking of things going smoothly, we enjoyed his assembly montage where every part fits together perfectly and there is not a naughty word to be uttered. Just like real life.

If you like homemade bearings, check out this slew bearing that looks like it was made with Perler beads, and we have a self-aligning camera tripod mount for the photography buffs.

Continue reading “Giant Bearing Is At The Heart Of A Camera Mount”