90s PC With Modern Parts Throws Many Off Track

When building a desktop computer, usually the budget is the limiting factor. Making sacrifices on one part in order to improve another without breaking the bank is part of the delicate balance of putting together a capable PC. If you’re lucky enough to have the sponsors that [Shank] has though, caution can be thrown to the wind with regards to price for some blisteringly fast parts. Putting them in a ’90s Hot Wheels case to build the ultimate sleeper PC, though, is just icing on the top.

This isn’t quite as simple as replacing a motherboard in a modern PC case, though. The Hot Wheels PC used a mini-ITX standard and is quite a bit smaller than most modern computers outside of something like a Mac Mini. To get the RTX 3060 GPU into the computer the shrouds needed to be removed to save space, plus an unusual 92mm form factor liquid CPU cooler needed to be installed. An equally obscure power supply was included to round out the Ryzen 9 build and after a lot of tinkering eventually all the parts were fitted into this retro case including the original, working floppy disk drive. After that some additional case modding was installed such as RGB lighting, wheels with spinning rims, a spoiler, and an exhaust pipe.

The main issue with this build was temperatures, and both the CPU and GPU were topping out at dangerously high temperatures until [Shank] installed a terrifying 11,000 RPM case fan. With a series of original CRT monitors to go along with this sleeper PC he can have up to 9 displays with surprisingly high video quality thanks to the fundamental properties of CRTs. The video is definitely worth a watch and falls right in line with some of [Shank]’s other console mods that he is famous for such as this handheld Virtual Boy.

Thanks to [Fast Rock Productions] for the tip!

Continue reading “90s PC With Modern Parts Throws Many Off Track”

Extensive Modification Of DSLR Includes High Quality Audio

Modern DSLR cameras are incredible pieces of technology that can take excellent high-quality photos as well as record video and audio. However, as they become jacks of all trades they risk being masters of none, and the audio quality in modern DSLRs certainly reflects that old cliche. To get true high-quality audio while recording with a camera like this Canon 80d, you’ll either need a secondary audio recording device or you’ll need to interface one directly into the camera itself.

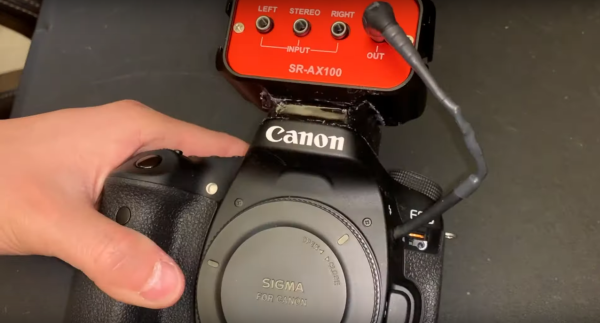
This build from [Tony] aka [Carnivore] goes into the inner workings of the camera to add an audio mixer to the camera’s audio input, allowing for multiple audio streams to be recorded at once. First, he removed the plastic around the microphone port and attached a wire to it that extends out of the camera to a 1/8″ plug. While he had the case open he also wired a second shutter, added a record button to a custom location on the front of the camera, and bypassed a switch which prevents the camera from operating if the battery door isn’t closed.

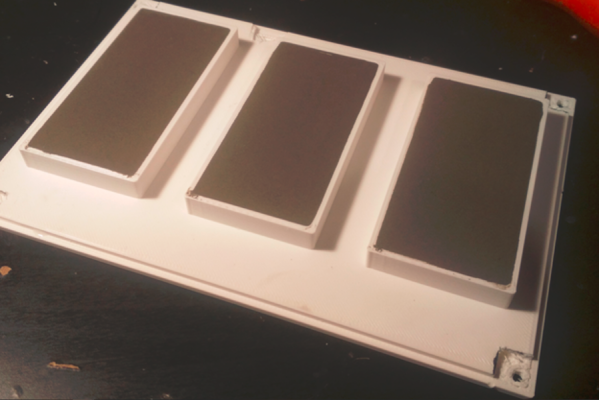
With those modifications in place, he removed the internal flash from the camera before closing the body. A custom 3D printed mount was placed in the vacant space which now houses the audio mixer, a SR-AX100 from Saramonic. This plugs in to the new microphone wire from earlier in the build, allowing the camera to have an expanded capacity for recording audio.

While [Tony] has a fairly unique use case for all of these modifications to an already $1000 camera, getting into the inner workings of DSLRs isn’t something to shy away from if you need something similar done. We’ve even seen modifications to cameras like these to allow for watercooling during video recording.

Continue reading “Extensive Modification Of DSLR Includes High Quality Audio”

Current Sensor Makes Intriguing Use Of Concrete

Getting a product to market isn’t all about making sure that the product does what it’s supposed to. Granted, most of us will spend most of our time focusing on the functionality of our projects and less on the form, fit, or finish of the final product, especially for one-off builds that won’t get replicated. For those builds that do eventually leave the prototyping phase, though, a lot more effort goes into the final design and “feel” of the product than we might otherwise think. For example, this current sensor improves its feel by making use of cast concrete in its case.

The current sensor in this build is not too much out of the ordinary. [kevarek] built the sensor around the MCA1101-50-3 chip and added some extra features to improve its electrostatic discharge resistance and also to improve its electromagnetic compatibility over and above the recommended datasheet specifications. The custom case is where this one small detail popped out at us that we haven’t really seen much of before, though. [kevarek] mixed up a small batch of concrete to pour into the case simply because it feels better to have a weightier final product.

While he doesn’t mention building this current sensor to sell to a wider audience, this is exactly something that a final marketable product might have within itself to improve the way the device feels. Heavier things are associated, perhaps subconsciously, with higher quality, and since PCBs and plastic casings don’t weigh much on their own many manufacturers will add dummy weights to improve the relationship between weight and quality. Even though this modification is entirely separate from the function of the product, it’s not uncommon for small changes in design to have a measurable impact on performance, even when the original product remains unmodified.

Thanks to [Saabman] for the tip!

Antique Oscilloscope Gets New Home And Purpose

As the pace of technology charges blindly forward, a lot of older tools or products get left in the dust, forgotten to most but those left with them. This doesn’t mean they’re useless, though. In fact, old technology that continues to survive in the present tends to be more robust and sturdy than most modern, cheap replacements. While this might be survivorship bias, this is certainly true in particular of oscilloscopes. Rugged CRTs in large metal housings with discrete through-hole components in simple layouts made them reliable, but they’re heavy, bulky, and lack features of modern instruments. With some modifications, though, you can give them a new home and keep their vintage aesthetic.

[BuildComics] had just such an oscilloscope on hand and set out to make it into something useful but aesthetically pleasing as well. With a small circuit board, formerly available as a kit from Sparkfun/Dutchtronix but now only available if you can build them yourself, the cathode ray tube can be modified to output not waveforms but rather a working clock face. The donor oscilloscope was a Heathkit IO-102 which was fine for its time but is now lacking, so the CRT was removed from its housing and placed in a custom-built enclosure with a 40s radio style that suits its new purpose well.

Seeing old hardware that is past its prime being put to work in a new way is great, both from a technical standpoint and also because that’s usable hardware that’s being kept out of the landfill. Oscilloscopes are popular for projects like these too since they are relatively easy to understand and modify. Besides being used as clocks, we’ve also seen them modified to play video games such as Pac-Man.

Broken Smartphones: Laptops In Disguise

Modern smartphones are a dizzying treatise on planned obsolescence. Whether it’s batteries that can’t be removed without four hours and an array of tiny specialized tools, screens that shatter with the lightest shock, or (worst of all) software that gets borked purposefully to make the phone seem older and slower than it really is, around every corner is some excuse to go buy a new device. The truly tragic thing is that there’s often a lot of life left in these old, sometimes slightly broken, devices.

This video shows us how to turn an old smartphone into a perfectly usable laptop. The build starts with a screen and control board that has USB-C inputs, which most phones can use to output video. It’s built into a custom aluminum case with some hinges, and then attached to a battery bank and keyboard in the base of the laptop. From there, a keyboard is installed and then the old phone is fixed to the back of the screen so that the aluminum body doesn’t interfere with the WiFi signal.

If all you need is internet browsing, messaging, and basic word processing, most phones are actually capable enough to do all of this once they are free of their limited mobile UI. The genius of this build is that since the phone isn’t entombed in the laptop body, this build could easily be used to expand the capabilities of a modern, working phone as well. That’s not the only way to get a functioning laptop with parts from the junk drawer, either,  if you’d prefer to swap out the phone for something else like a Raspberry Pi.

Thanks to [NoxiousPluK] for the tip!

Continue reading “Broken Smartphones: Laptops In Disguise”

Magnets Make This Panda Move

A single board computer on a desk is fine for quick demos but for taking it into the wild (or even the rest of the house) you’re going to want a little more safety from debris, ESD, and drops. As SBCs get more useful this becomes an increasingly relevant problem to solve, plus a slick enclosure can be the difference between a nice benchtop hack and something that looks ready to sell as a product. [Chris] (as ProjectSBC) has been working on a series of adaptable cases called the MagClick Case System for the LattePanda Alpha SBC which are definitely worth a look.

The LattePanda Alpha isn’t a run-of-the-mill SBC; it’s essentially the mainboard from a low power ultrabook and contains up to an Intel Core M series processor, 8GB RAM, and 64GB of eMMC. Not to mention an onboard Atmega32u4, WiFi, Gigabit Ethernet, and more. It has more than enough horsepower to be used as an everyday desktop computer or even a light gaming system if you break PCIe out of one the m.2 card slots. But [Chris] realized that such adaptability was becoming a pain as he had to move it from case-to-case as his use needs changed. Thus the MagClick Case System was born.

Continue reading “Magnets Make This Panda Move”

Repurposed Plastic Protects PCBs

An errant wire snipping across the wrong electrical pins spells the release of your magic smoke. Even if you are lucky, stray parts are the root of boundless malfunctions from disruptive to deadly. [TheRainHarvester] shares his trick for covering an Arduino Nano with some scrap plastic most of us have sitting in the recycling bin. The video is also after the break. He calls this potting, but we would argue it is a custom-made cover.

The hack is to cut a bit of plastic from food container lids, often HDPE or plastic #2. Trim a piece of it a tad larger than your unprotected board, and find a way to hold it in place so you can blast it with a heat gun. When we try this at one of our Hackaday remote labs and apply a dab of hot glue between the board and some green plastic it works well. The video suggests a metal jig which would be logical when making more than one. YouTube commenter and tip submitter [Keith o] suggests a vacuum former for a tighter fit, and we wouldn’t mind seeing custom window cutouts for access to critical board segments such as DIP switches or trimmers.

We understand why shorted wires are a problem, especially when you daisy-chain three power supplies as happened in one of [TheRainHarvester]’s previous videos.

Continue reading “Repurposed Plastic Protects PCBs”