Custom Hat Gives Vintage Mitutoyo Calipers A New Lease On Life

Metrology fans are usually at least a little bit in love with Mitutoyo, and rightfully so. The Japanese company has been making precision measuring instruments for the better part of 100 years, and users appreciate their precision almost as much as the silky smooth feel of their tools. If you can afford it, a Mitutoyo caliper is quite an addition to your toolbox.

As good as they are, though, they’re not perfect, which is what led to this clever Mitutoyo digital caliper hack by [turbanedengineer]. The calipers in question, a digital set from the early 1980s, happen to have a unique history with a tangential Hackaday angle — they belonged to [Dhaval], mechanical engineer and avid motorcyclist who happens to be the late elder brother of our own [Anool Mahidharia].

The tool, in need of a little TLC, made its way to [turbanedengineer] who first restored the broken battery contacts. Once powered up again, it became apparent that while the caliper’s native metric measurements were spot on, the internal conversion to inches was considerably off. This led [turbanedengineer] to the data port on the tool, which is intended to send serial data to an external computer for logging measurements. After a little experimentation to nail down the data format, he prototyped a tiny circuit using an ATtiny85 and an OLED display that reads the caliper data, converts metric to inches, and displays both measurements on the screen. The prototype led to a more permanent version, which cleverly sits over the original display and taps into the data port without any free wires. The video below shows the very slick results.

Our hearts go out to [Anool] and his family for their loss, and we tip our hats to [turbanedengineer] for his thoughtful and respectful hack of a storied tool. We know that anthropomorphizing tools makes no rational sense, but we think it’s safe to say that a tool like this has a soul, and it’s probably happy to be back in the game.

Continue reading “Custom Hat Gives Vintage Mitutoyo Calipers A New Lease On Life”

A Super-Simple Standalone WSPR Beacon

We’ve said it before and we’ll say it again: being able to build your own radios is the best thing about being an amateur radio operator. Especially low-power transmitters; there’s just something about having the know-how to put something on the air that’ll reach across the planet on a power budget measured in milliwatts.

This standalone WSPR beacon is a perfect example. If you haven’t been following along, WSPR stands for “weak-signal propagation reporter,” and it’s a digital mode geared for exploring propagation that uses special DSP algorithms to decode signals that are far, far down into the weeds; signal-to-noise ratios of -28 dBm are possible with WSPR.

Because of the digital nature of WSPR encoding and the low-power nature of the mode, [IgrikXD] chose to build a standalone WSPR beacon around an ATMega328. The indispensable Si5351 programmable clock generator forms the RF oscillator, the output of which is amplified by a single JFET transistor. Because timing is everything in the WSPR protocol, the beacon also sports a GPS receiver, ensuring that signals are sent only and exactly on the even-numbered minutes. This is a nice touch and one that our similar but simpler WSPR beacon lacked.

This beacon had us beat on performance, too. [IgrikXD] managed to hit Texas and Colorado from the edge of the North Sea on several bands, which isn’t too shabby at all with a fraction of a watt.

Thanks to [STR-Alorman] for the tip.

[via r/amateurradio]

Clock Mixes Analog, Digital, Retrograde Displays

Unique clocks are a mainstay around here, and while plenty are “human readable” without any instruction, there are a few that take a bit of practice before someone can glean the current time from them. Word clocks are perhaps on the easier side of non-traditional displays but at the other end are binary clocks or even things like QR code clocks. To get the best of both worlds, though, multiple clock faces can be combined into one large display like this clock build from [imitche3].

The clock is actually three clocks in one. The first was inspired by a binary clock originally found in a kit, which has separate binary “digits” for hour, minute, and second and retains the MAX 7219 LED controller driving the display. A standard analog clock rests at the top, and a third clock called a retrograde clock sits at the bottom with three voltmeters that read out the time in steps. Everything is controlled by an Arduino Nano with the reliable DS3231 keeping track of time. The case can be laser-cut or 3D printed and [imitche3] has provided schematics for both options.

As far as clocks builds go, we always appreciate something which can be used to tell the time without needing any legends, codes, or specialized knowledge. Of course, if you want to take a more complex or difficult clock face some of the ones we’re partial to are this QR code clock which needs a piece of hardware to tell the time that probably already has its own clock on it.

Solar Panel Keeps Cheap Digital Calipers Powered Up

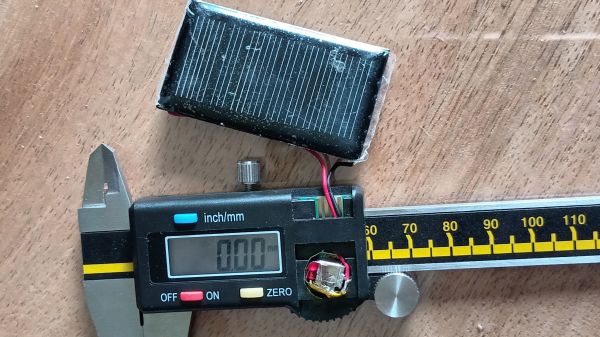
There’s no doubt that cheap digital calipers are useful, especially when designing 3D-printed parts. Unfortunately, cheap digital calipers are also cheap, and tend to burn through batteries quickly. Sure, you can remove the battery when you’re done using them, but that’s for suckers — winners turn to solar power to keep their calipers always at the ready.

[Johan]’s solar upgrade begins with, unsurprisingly, a solar cell, one that just fits on the back of his digital calipers. Like most of these cheap calipers, this one is powered by a single 1.5 V LR44 button cell, while the polycrystalline solar cell is rated for 5 V, so [Johan] used a red LED as a crude voltage regulator. He also added a stack of fourteen 100 μF SMD capacitors soldered together in parallel. The 1206 devices form a 1,400 μF block that’s smaller than the original button cell so that everything fits in the vacated battery compartment. It’s pretty slick.

Given their agreeable price point, digital calipers are a tempting target for hacking. We’ve seen a ton of them, from accessibility add-ons to WiFi connectivity and even repurposing them for use as DROs. Ever wonder how these things work? We’ve looked at that, too.

Emails Over Radio

The modern cellular network is a marvel of technological advancement that we often take for granted now. With 5G service it’s easy to do plenty of things on-the-go that would have been difficult or impossible even with a broadband connection to a home computer two decades ago. But it’s still reliant on being close to cell towers, which isn’t true for all locations. If you’re traveling off-grid and want to communicate with others, this guide to using Winlink can help you send emails using a ham radio.

While there are a number of ways to access the Winlink email service, this guide looks at a compact, low-power setup using a simple VHF/UHF handheld FM radio with a small sound card called a Digirig. The Digirig acts as a modem for the radio, allowing it to listen to digital signals and pass them to the computer to decode. It can also activate the transmitter on the radio and send the data from the computer out over the airwaves. When an email is posted to the Winlink outbox, the software will automatically send it out to any stations in the area set up as a gateway to the email service.

Like the cellular network, the does rely on having an infrastructure of receiving stations that can send the emails out to the Winlink service on the Internet; since VHF and UHF are much more limited in range than HF this specific setup could be a bit limiting unless there are other ham radio operators within a few miles. This guide also uses VARA, a proprietary protocol, whereas the HF bands have an open source protocol called ARDOP that can be used instead. This isn’t the only thing these Digirig modules can be used for in VHF/UHF, though. They can also be used for other digital modes like JS8Call, FT8, and APRS.

Continue reading “Emails Over Radio”

Raspinamp: It Really Replicates Questionable Activities Involving Llamas

In the late 90s as MP3s and various file sharing platforms became more common, most of us were looking for better players than the default media players that came with our operating systems, if they were included at all. To avoid tragedies like Windows Media Center, plenty of us switched to Winamp instead, a much more customizable piece of software that helped pave the way for the digital music revolution of that era. Although there are new, official versions of Winamp currently available, nothing really tops the nostalgia of the original few releases of the software which this project faithfully replicates in handheld form.

The handheld music player uses a standard Raspberry Pi (in this case, a 3B) and a 3.5″ TFT touchscreen display, all enclosed in a clear plastic case. With all of the Pi configuration out of the way, including getting the touchscreen working properly, the software can be set up. It uses QMMP as a media player with a Winamp skin since QMMP works well on Linux systems with limited resources. After getting it installed there’s still some configuration to do to get the Pi to start it at boot and also to fit the player perfectly into the confines of the screen without any of the desktop showing around the edges.

Although it doesn’t use the original Winamp software directly, as that would involve a number of compatibility layers and/or legacy hardware at this point, we still think it’s a faithful recreation of how the original looked and felt on our Windows 98 machines. With a battery and a sizable SD card, this could have been the portable MP3 player many of us never knew we wanted until the iPod came out in the early 00s, and would certainly still work today for those of us not chained to a streaming service. A Raspberry Pi is not the only platform that can replicate the Winamp experience, though. This player does a similar job with the PyPortal instead.

Continue reading “Raspinamp: It Really Replicates Questionable Activities Involving Llamas”

Pi 5 And SDR Team Up For A Digital Scanner You Can Actually Afford

Listening to police and fire calls used to be a pretty simple proposition: buy a scanner, punch in some frequencies — or if you’re old enough, buy the right crystals — and you’re off to the races. It was a pretty cheap and easy hobby, all things considered. But progress marches on, and with it came things like trunking radio and digital modulation, requiring ever more sophisticated scanners, often commanding eye-watering prices.

Having had enough of that, [Top DNG] decided to roll his own digital trunking scanner on the cheap. The first video below is a brief intro to the receiver based on the combination of an RTL-SDR dongle and a Raspberry Pi 5. The Pi is set up in headless mode and runs sdrtrunk, which monitors the control channels and frequency channels of trunking radio systems, as well as decoding the P25 digital modulation — as long as it’s not encrypted; don’t even get us started on that pet peeve. The receiver also sports a small HDMI touchscreen display, and everything can be powered over USB, so it should be pretty portable. The best part? Everything can be had for about $250, considerably cheaper than the $600 or so needed to get into a purpose-built digital trunking scanner — we’re looking at our Bearcat BCD996P2 right now and shedding a few tears.

The second video below has complete details and a walkthrough of a build, from start to finish. [Top DNG] notes that sdrtrunk runs the Pi pretty hard, so a heat sink and fan are a must. We’d probably go with an enclosure too, just to keep the SBC safe. A better antenna is a good idea, too, although it seems like [Top DNG] is in the thick of things in Los Angeles, where LAPD radio towers abound. The setup could probably support multiple SDR dongles, opening up a host of possibilities. It might even be nice to team this up with a Boondock Echo. We’ve had deep dives into trunking before if you want more details.

Continue reading “Pi 5 And SDR Team Up For A Digital Scanner You Can Actually Afford”