Date Clock Requires (Almost) No Interaction

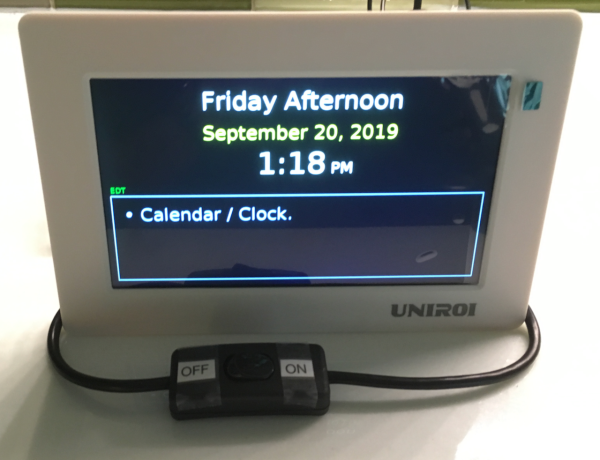
A lot of commercial offerings of technology aimed at helping the elderly seem to do a good job on the surface, but anything other than superficial interaction with them tends to be next to impossible for its intended users. Complicated user interfaces and poor design consideration reign in this space. [7402] noticed this and was able to design a better solution for an elderly relative’s digital day planner after a commercial offering he tried couldn’t automatically adjust for Daylight Savings.

Of course, the clock/day planner has a lot going on under the surface that the elderly relative may not be able to use, but the solution to all of that was to make it update over the network. This task [7402] plans to do remotely since the relative does not live anywhere nearby. It is based on a Raspberry Pi connected to a Uniroi screen which automatically dims but can be switched off by means of a large button in the front. The UI shows the date, time, and a number of messages or reminders in large font in order to improve [7402]’s relative’s life.

This is a great idea for anyone with their own elderly relative which might need something like this but won’t want to interact with the technology other than the cursory glance, but the project is also a great illustration of proper design for the intended users. Commercial offerings often had hidden buttons and complicated menus, but this has none of that, much like this well-designed walker for an elderly Swede.

RTFM: ADCs And DACs

It’s tough to find a project these days that doesn’t use an analog-to-digital converter (ADC) or digital-to-analog converter (DAC) for something. Whether these converters come as built-in peripherals on a microcontroller, or as separate devices connected over SPI, I2C, or parallel buses, all these converters share some common attributes, and knowing how to read the specs on them can save you a lot of headaches when it comes to getting things working properly.

There are some key things to know about these devices, and the first time you try to navigate a datasheet on one, you may find yourself a bit confused. Let’s take a deep dive into the static (DC) properties of these converters — the AC performance is complex enough to warrant its own follow-up article.

Continue reading “RTFM: ADCs And DACs”

High-Speed PCB Design Hack Chat With Bil Herd

Join us on Wednesday, September 25 at noon Pacific for the High-Speed PCB Design Hack Chat with Bil Herd!

Printed circuits have become so commoditized that we seldom think much about design details. EDA software makes it easy to forget about the subtleties and nuances that make themselves painfully obvious once your design comes back from the fab and doesn’t work quite the way you thought it would.

PCB design only gets more difficult the faster your circuit needs to go, and that’s where a depth of practical design experience can come in handy. Bil Herd, the legendary design engineer who worked on the Commodore C128 and Plus4/264 computers and many designs since then, knows a thing or two in this space, and he’s going to stop by the Hack Chat to talk about it. This is your chance to pick the brain of someone with a wealth of real-world experience in high-speed PCB design. Come along to find out what kind of design mistakes are waiting to make your day miserable, and which ones can be safely ignored. Spoiler alert: square corners probably don’t matter.

join-hack-chatOur Hack Chats are live community events in the Hackaday.io Hack Chat group messaging. This week we’ll be sitting down on Wednesday, September 25 at 12:00 PM Pacific time. If time zones have got you down, we have a handy time zone converter.

Click that speech bubble to the right, and you’ll be taken directly to the Hack Chat group on Hackaday.io. You don’t have to wait until Wednesday; join whenever you want and you can see what the community is talking about. Continue reading “High-Speed PCB Design Hack Chat With Bil Herd”

Minivac 601 Replica Gets A Custom Motorized Rotary Switch

One of the joys of electronics as a hobby is how easy it is to get parts. Literally millions of parts are available from thousands of suppliers and hundreds of distributors, and everyone competes with each other to make it as easy as possible to put together an order from a BoM. If you need it, somebody probably has it.

But what do you do when you need a part that doesn’t exist anymore, and even when it did was only produced in small numbers? Easy – you create it yourself. That’s just what [Mike Gardi] did with this unique motorized rotary switch he needed to complete his replica of a 1960s computer trainer. We covered his build of the Minivac 601, a trainer from the early computer age that let experimenters learn the ropes of basic digital logic. It used mostly relays, lamps, and switches connected by jumpers, but it had one critical component – a rotary control that was used for input and, with the help of a motor, as an output indicator.

[Mike]’s version of the switch is as faithful to the original as possible, at least in terms of looks. The parts are mostly 3D-printed, with 16 reed switches embedded in the walls and magnets placed in the rotor. The motor to operate the rotor is a simple gear motor mounted to a hinged bracket; when the rotor needs to move, a solenoid pulls the motor’s friction drive wheel up against the rotor.

The unique control slots right into the Minivac replica and really completes the look and feel. Hats off to [Mike] for a delightful replica of a lost bit of computer history and the dedication to see it through to completion.

Continue reading “Minivac 601 Replica Gets A Custom Motorized Rotary Switch”

Hacked Calipers Make Automated Measurements A Breeze

Now, digital calipers with wired interfaces to capture the current reading are nothing new. But the good ones are expensive, and really, where’s the fun in plugging a $75 cable into a computer? So when [Max Holliday] was asked to trick out some calipers for automating data capture, he had to get creative.

[Max] found that cheap Harbor Freight digital calipers have the telltale door that covers a serial connector, making them a perfect target for hacking. A little Internet sleuthing revealed the pinout for the connector as well as some details on the serial protocol used by most digital calipers: 24-bit packets is six four-bit words. [Max] used his SAM32, a neat open-source board with both a SAMD51 and an ESP32 that can run CircuitPython. An inverting buffer interfaces the serial lines to the board, which is just the right size to mount on the back of the caliper head. It’s hard to tell how [Max] is triggering readings, but the SAM32 is mounted as a USB device and sends keystrokes directly to a spreadsheet – yes, with the ESP32 it could have been wireless, but his client specifically requested a wired setup. Taking multiple readings is easy now that the user never has to swap calipers for a pen.

Cheap calipers like these are pretty hackable – you can add Bluetooth, turn them into DROs for a milling machine, or even make them talk.

An HDMI Input For A Laptop Screen, Minus Laptop

The lack of HDMI inputs on almost all laptops is a huge drawback for anyone who wants to easily play a video game on the road, for example. As to why no manufacturers offer this piece of convenience when we all have easy access to a working screen of this size, perhaps no one can say. On the other hand, if you want to ditch the rest of the computer, you can make use of the laptop screen for whatever you want.

This project from [Avner] comes to us in a few parts. In the first section, the teardown of the laptop begins and a datasheet for the screen is discovered, which allows [Avner] to prepare an FPGA to drive the screen. The second part involves building an HDMI sink, which is a device which decodes the signal from an HDMI source into its constituent parts so it can be sent to the FPGA. The final section of the project involves actually sending a video to this impressive collection of hardware in order to get a video to appear on the old laptop screen.

This build is worth checking out if you’ve ever dealt with anything involving digital video. It goes into great depth on a lot of the technical details involving HDMI, video devices, and hardware timing issues. This is a great build and, even though we’ve seen similar projects, definitely worth diving into if you have some time on your hands and a spare laptop screen.

Simple Timer Evolves Into Custom Kid’s Watch

Sporting a new wristwatch to school for the first time is a great moment in a kid’s life. When it’s a custom digital-analog watch made by your dad, it’s another thing altogether.

As [Chris O’Riley] relates, the watch he built for his son [Vlad] started out as a simple timer for daily toothbrushing, a chore to which any busy lad pays short shrift unless given the proper incentive. That morphed into an idea for a general purpose analog timepiece with LEDs taking the place of hands. [Chris] decided that five-minute resolution was enough for a nine-year-old, which greatly reduced the number of LEDs needed. An ATtiny841 tells a 28-channel I2C driver which LEDs to light up, and an RTC chip keeps [Vlad] on schedule. The beautiful PCB lives inside a CNC machined aluminum case; we actually commented to [Chris] that the acrylic prototype looked great by itself, but [Vlad] wanted metal. The watch has no external buttons; rather, the slightly flexible polycarbonate crystal bears against a PCB-mounted pushbutton to control functions.

With a snappy wristband, [Vlad] will be rolling fancy on the schoolyard. It’s a great looking piece that needed a wide range of skills to execute, as all watches do. Check out some other watch builds, like this lovely pure analog, another digital-analog hybrid, or this pocket watch that packs an Enigma machine inside.

Continue reading “Simple Timer Evolves Into Custom Kid’s Watch”