Thermal Camera Diagnoses Thermal Issue On A Sonoff Switch

No matter what your experience level with troubleshooting, there’s always at least a little apprehension when you have to start poking through a mains powered device. A little fear is a good thing; it keeps you focused. For some, though, the aversion to playing with high voltage is too much, which can cause problems when something fails. So what do you do when you’re reluctant to even open the case? Easy — diagnose the problem with an infrared camera.

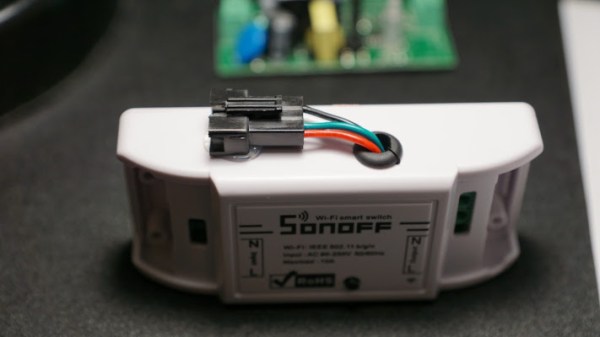
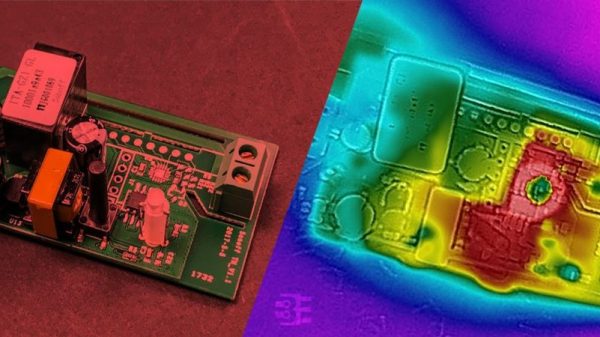
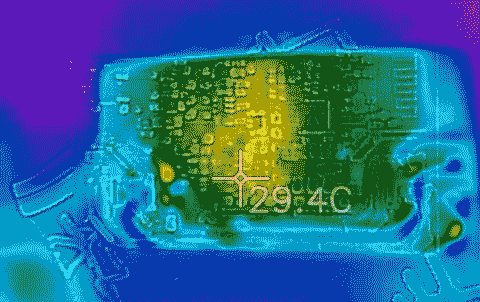
[Bald Engineer]’s electrophobia started early, with some ill-advised experiments in transcutaneous conduction. So when his new Sonoff WiFi switch failed soon after deploying it to control a lamp in his studio, popping the top while it was powered up was out of the question. The piquant aroma of hot plastic was his first clue to the problem, so he whipped out his Flir One Thermal Camera and watched the device as it powered up. The GIF nearby shows that there was clearly a problem, with a bloom of heat quickly spreading out from the center of the unit. A few IR images of the top and bottom gave him some clues as to the culprits, but probing the board in those areas once power was removed revealed no obviously damaged components.

[Bald Engineer] hasn’t yet gotten to the bottom of this, but his current thinking is that the NCP1117 regulator might be bad, since it rapidly spikes to 115°C. Still, we think this is a nifty diagnostic technique to add to our toolkit, and a great excuse to buy an IR camera. Or, we could go with an open-source thermal camera instead.

[via Dangerous Prototypes]

Monitor Power Consumption Of Low-Power Devices

Perhaps the most important consideration to make when designing a battery-operated device of any kind is the power consumption. Keeping it running for longer between battery changes is often a key design point. To that end, if you need to know how small programming changes will impact the power consumption of your device then [Daniel] has a great tool that you might find helpful: an ESP8266-based live power meter.

The power meter itself is battery-powered via a 600 mAh battery and monitors an e-paper module, which also displays information about power consumption. It runs using a NodeMCU and measures voltage and current across a 100-ohm resistor to calculate the power use, although the resolution does start to get noisy when the device is in standby/sleep mode. One presumes this could be solved by changing the value of the resistor in order to get more accurate measurements at the expense of losing accuracy during moments of high power consumption.

While this power monitor was built specifically to monitor power consumption on this particular e-paper display project, it should be easily portable into other battery-based systems that need fine tuning in order to maximize battery life. As a bonus, the display is already included in the project. There are ways of getting even more information about your battery usage, although if power consumption is important than you may want to stick with a more straightforward tool like this one.

Building A Portable Solar Powered Spot Welder: Charging Supercapacitors

Before Lunar New Year, I had ordered two 3000 F, 2.7 V supercapacitors from China for about $4 each. I don’t actually remember why, but they arrived (unexpectedly) just before the holiday.

Supercapacitors (often called ultracapacitors) fill a niche somewhere between rechargeable lithium cells and ordinary capacitors. Ordinary capacitors have a low energy density, but a high power density: they can store and release energy very quickly. Lithium cells store a lot of energy, but charge and discharge at a comparatively low rate. By weight, supercapacitors store on the order of ten times less energy than lithium cells, and can deliver something like ten times lower power than capacitors.

Overall they’re an odd technology. Despite enthusiastic news coverage, they are a poor replacement for batteries or capacitors, but their long lifespan and moderate energy and power density make them suitable for some neat applications in their own right. Notably, they’re used in energy harvesting, regenerative braking, to extend the life of or replace automotive lead-acid batteries, and to retain data in some types of memory. You’re not likely to power your laptop with supercapacitors.

Anyway, I had a week-long holiday, and two large capacitors of dubious origin. Sometimes we live in the best of all possible worlds. Continue reading “Building A Portable Solar Powered Spot Welder: Charging Supercapacitors”

x86 emulation running DOS on ESP8266

PC-XT Emulator On ESP8266

Do you remember the simpler times when you had a DOS command line, a handful of commands, and you talked to the hardware through a few BIOS and DOS interrupts? Okay, maybe it was a little limited, but nostalgia doesn’t care. Now [mcuhacker] is working on bringing some of those memories back by getting a PC-XT emulator running on an ESP8266.

For the x86 CPU emulator, he ported Fake86 which is written in C, and created an Arduino IDE environment for it. The MS-DOS 3.3 bootdisk image is stored in flash and is accessed as the A: drive. There’s no keyboard yet but he has 640×200 CGA working with 80×25 characters on a 3.5″ TFT display with the help of a low pass filter circuit. In the video below he shows it booting to the point where it asks for the date.

Continue reading “PC-XT Emulator On ESP8266”

ESP8266 Broadcasts Memorial WiFi Spam

John Perry Barlow, founding member of the Electronic Frontier Foundation and Freedom of the Press Foundation, died on February 7th, 2018. To say that he left his mark on the Internet, and by extension modern culture, is something of an understatement. He may not be a household name, but between this activism (online and off), lectures, written work, and various entrepreneurial projects, his 70 years of life were surely not wasted. Barlow was once quoted as saying “I want to be a good ancestor”, and by pretty much any metric it would seem he made good on that goal.

To mark his passing, [Moritz Metz] came up with a rather unusual memorial. Using a bit of code on an ESP8266 board, he created a device that would broadcast out Barlow’s “A Declaration of the Independence of Cyberspaceline-by-line in the form of 228 WiFi SSIDs. Perhaps not the most effective way to get Barlow’s words out to the people, but we’ll give him extra points for style.

The code itself is based on FakeBeaconESP8266, which as the name implies, allows the user to create fake WiFi networks. to broadcast the manifesto of your choosing, you need only add in the appropriate sendBeacon() lines at the bottom of the code. It would appear that prefixing each line with a number is required to make devices scanning for networks show the lines of text in proper sequence. At least on the devices demoed, anyway.

Just to be clear: you should definitely not do this. Jamming up the local environment with a bunch of fake networks is a pretty terrible idea. But as a memorial for a man who occasionally claimed to be an anarchist, you could do worse. Plus we have to admit “Giants of Flesh and Steel” is an awesome name for a network.

Continue reading “ESP8266 Broadcasts Memorial WiFi Spam”

Count Your Fans With This Stylish ESP8266 Display

Continuous self-affirmation is a vital component to the modern lifestyle. Of course you know the world loves you, but exactly how much do they love you? Checking your phone every few minutes to see if you’ve gained any followers is gauche, and perhaps more to the point, doesn’t let you show off when you’ve got visitors over. In the modern era, the up-and-coming social media star needs a stylish way to display just how popular they are for the world to see.

That’s the idea behind this very slick social media counter created by [Becky Stern]. Built into a standard shadow box frame and using LED displays glowing through a printed piece of paper, the finished product looks more like modern art than the usual hacker fare.

The counter is powered by a NodeMCU, but you could drop in your favorite variant of the ESP8266 and things would work more or less the same. For the displays, [Becky] is using four Adafruit 7-Segment LED modules, which are easily controlled via I2C which keeps the wiring to a minimum.

It’s interesting to note that since her follower count on Twitter has already hit five digits, two of the display modules are used next to each other for that particular service. Her Instructables and Instagram counters only have one display each however, limiting her counts on those services to 9,999 each. There’s probably something to be learned here in terms of the relative follower counts you can expect on the different social networks if you’re targeting your content to the hacker and maker crowd, but we’ll leave the analysis to those with a better handle on such matters.

Hardware aside, [Becky] spends a lot of time in the video talking about the code she’s come up with to pull her stats from the various services and push them out to the LED displays at a regular interval. It’s nice to see so much attention and explanation given to the software side of a project like this, as more often than not you’re left to your own to figure out what the source code is doing.

This project is quite similar to the YouTube Play Button hack we covered a few months back, but the addition of multiple social networks in one device is a nice improvement over the basic concept.

Continue reading “Count Your Fans With This Stylish ESP8266 Display”

Hacking A Sonoff WiFi Switch

The ESP8266 platform has become so popular that it isn’t just being used in hobby and one-off projects anymore. Companies like Sonoff are basing entire home automation product lines around the inexpensive WiFi card. What this means for most of us is that there’s now an easily hackable and readily available product on the market that’s easily reprogrammed and used with tools that we’ve known about for years now, as [Dan] shows in his latest project.

[Dan] has an aquaponics setup in his home, and needs some automation to run the lights. Reaching for a Sonoff was an easy way to get this done, but the out-of-the-box device can only be programmed in the simplest of ways. To get more control over the unit, he wired a USB-to-Serial UART to the female headers on the board and got to programming it.

The upgraded devices are fully programmable and customizable now, and this would be a great hack for anyone looking to get more out of a Sonoff switch. A lot of the work is already done, like building a safe enclosure, wiring it, and getting it to look halfway decent. All that needs to be done is a little bit of programming. Of course, if you’d like to roll out your own home automation setup from scratch that can do everything from opening the garage door to alerting you when your dog barks, that’s doable too. You’ll just need a little more hardware.