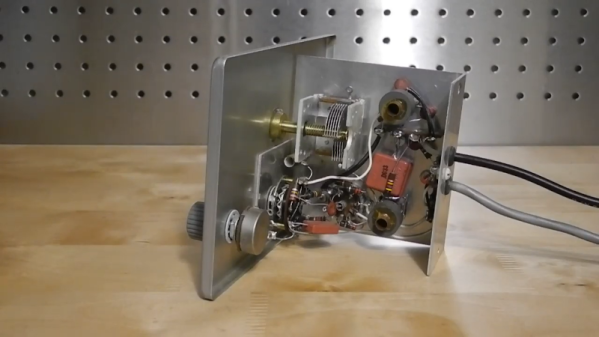
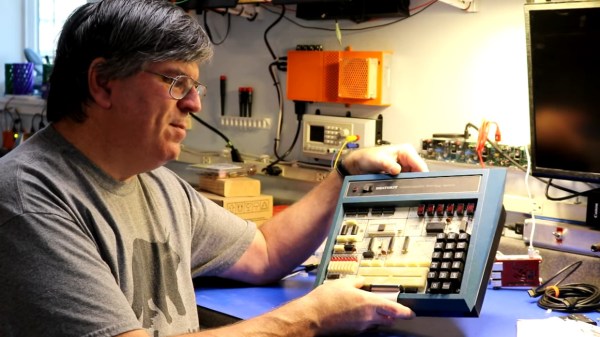
Raspberry Pi Hitches Ride Inside Vintage Terminal

When a dumpster dive yielded a vintage video display terminal, [dennis1a4] knew just what to do — bring the Heathkit H19 back to life and stuff a Raspberry Pi inside.

The early days of the personal computer era were a time of great market diversity. Everyone was making stuff needed to cobble together your perfect computer, and terminals were among the most important pieces of gear. Lear Siegler, DEC, Wyse — everyone was in on the game. Even Heathkit competed with its H19 serial terminal, which would have set you back a thousand or so early-1980s dollars.

The terminal [dennis1a4] found was DOA, but he quickly determined that a bad cap was shorting out the -12VDC rail. A little extra detective work was needed to get the terminal to both echo characters locally and output them over the RS-232 port, and bam, working terminal. But then what? Raspberry Pi to the rescue! But those old school +/-12 volts swings would give a Pi a bad case of Blue Smoke Disease. After a little voltmeter poking, and through the magic of socketed driver chips, the Pi was talking right to the terminal at a screaming 9600 baud and accessing the Hackaday Retro site on the 80-by-24 mono display.

All in all, a nice hack on a piece of computer history. But just one question: Can it play Doom Flappy Bird?

Decimal Oscilloclock Harks Back To 1927 Movie

Metropolis is a classic, silent film produced in 1927 and was one of the very first full length feature films of the science fiction genre, and very influential. (C-3PO was inspired by Maria, the “Machine human” in Metropolis.) Within the first couple of minutes in the film, we get to see two clocks — one with a 24-hour dial and another larger one with a 10-hour dial. The human overlords of Metropolis lived a utopian 24 hour day, while the worker scum who were forced to live and work underground, were subjected to work in two ten-hour shifts during the same period.

[Aaron]’s client was setting up a Metropolis themed man-cave and commissioned him to build a Metropolis Oscilloclock which would not only show the 24 hour and 10 hour clocks from the film, but also accurately reproduce the clock movements and its fonts. [Aaron]’s Oscilloclock is his latest project in the series of bespoke CRT clocks which he has been building since he was a teen.

The clock is built around a Toshiba ST-1248D vintage oscilloscope that has been beautifully restored. There are some modern additions – such as LED glow indicators for the various valves and an external X-Y input to allow rendering Lissajous figures on the CRT. He’s also added some animations derived from the original poster of the film. Doing a project of this magnitude is not trivial and its taken him almost eight months to bring it from concept to reality. We recommend looking through some of his other blog posts too, where he describes how oscilloclocks work, how he builds the HV power supplies needed to drive the CRT’s, and how he ensures vibration and noise damping for the cooling fans used for the HV power supplies. It’s this attention to detail which results in such well-built clocks. Check out some of [Aaron]’s other awesome Oscilloclock builds that we have featured over the years.

The film itself has undergone several restoration attempts, with most of it being recovered from prints which were discovered in old archives. If you wish to go down that rabbit hole, check out Wikipedia for more details and then head over to YouTube where several versions appear to be hosted.

Continue reading “Decimal Oscilloclock Harks Back To 1927 Movie”

Heathkit: Getting Closer This Time?

We’ve been following the Heathkit reboot for a while now, and it looks like the storied brand is finally getting a little closer to its glory days. I was thumbing through the new issue of QST magazine while I was listening in on a teleconference for the day job – hey, a guy can multitask, can’t he? – when I spied an ad for the Heathkit GC-1006 digital clock, which they brand the “Most Reliable Clock”. As soon as the meeting was over, I headed over to the Heathkit website to check out this latest offering.

I had cautiously high hopes. After the ridiculous, feature-poor, no-solder AM radio kit (although they sensibly followed up with a solder version of that kit) and an overpriced 2-meter ham antenna, I figured there was nowhere for Heathkit to go but up. And the fact that the new kit was a clock was encouraging. I have fond memories of Heathkit clocks from the 80s when I worked in a public service dispatch center; Heathkit clocks were about the only clocks you could get that would display 24-hour time. Could this actually be a kit worth building?

Alas, the advertisement was another one of those wall-of-text things that the new Heathkit seems so enamored of. And like the previous two kits offered, the ad copy is full of superlatives and cutesy little phrases that really turn me off. Then again, most advertising turns me off, so I’m probably not a good gauge of such things. Nor am I sure I’m in the target demographic for this product – in fact, I’m not even sure to whom this product is being marketed. Is it the younger crowd of the maker movement? Or is it the old-timers who want to relive the glory days of Heathkit builds? Given the $100 price, I’d have to say the nostalgia market is the most likely buyer of this one.

To be fair, $100 might not be that much to spend on a decent clock. I’m a bit of a clock snob, and I’ve gotten to the point where I can almost tell which chip is in a clock just by looking at the controls. The feature set of a modern digital clock has converged to a point where every clock has almost exactly the same deficiencies. The GC-1006 claims to address a few of my hot button issues, like not being able to set the time to the exact second – I hate that! An auto-dimming display is nice, as is a 12- or 24-hour display, a 10-minute timer (nice for hams, who are required to ID their station every 10 minutes), and a battery backup that claims to last for 4 weeks.

Is this worth buying? At this point, I’m on the fence. Looking at an unboxing video, it appears to be a high-quality kit, and it would be fun to build. But spending $100 on a clock might be a tough sell to my loan officer.

Still, I think I might take one for the team here so we have a first-hand report of what the new Heathkit is all about. And it would be nice to build another Heathkit product. I’ll let you know how it goes.

Continue reading “Heathkit: Getting Closer This Time?”

Building Better Tube Amps With Heathkit Parts

[Justin] had been trying to find a good tube amp for years, but all the best examples were either expensive or a complete basket case. Instead of buying a vintage stereo tube amp, he decided to build his own using the guts of a Heathkit AA-100, a popular tube amp from the 60s and 70s that doesn’t have a great reputation for sound quality.

This project was based on an earlier project from a decade ago that replicated the very popular Dynaco ST-70 tube amp from parts taken from the Heathkit AA-100. The schematic for this conversion was readily available on the usual tube head message boards, and a few PCBs were available for the input stage.

With the schematic in hand, the next thing for [Justin] to do was get a nice enclosure. High quality tube amps are valued as much for their appearance as they are for their sound quality, and after giving his father-in-law a few sketches, a cherry hardwood chassis stained in a beautiful golden brown appeared on [Justin]’s workbench.

The big iron for this new tube amp was taken directly from the old Heathkit, and a few hours in front of a mill netted [Justin] a chassis panel drilled out for the transformers and tube sockets. The rest of the project was a bit of assembly, point-to-point wiring, and wire management giving [Justin] a fantastic amplifier that will last for another fifty years until someone decides to reuse the transformers.

Retrotechtacular: Old Transistors

1024px-Regency_transistor_radio
Regency TR-1

Transistors have come a long way. Like everything else electronic, they’ve become both better and cheaper. According to a recent IEEE article, a transistor cost about $8 in today’s money back in the 1960’s. Consider the Regency TR-1, the first transistor radio from TI and IDEA. In late 1954, the four-transistor device went on sale for $49.95. That doesn’t sound like much until you realize that in 1954, this was equivalent to about $441 (a new car cost about $1,700 and a copy of life magazine cost 20 cents). Even at that price, they sold about 150,000 radios.

Part of the reason the transistors cost so much was that production costs were high. But another reason is that yields were poor. In some cases, 4 out of 5 of the devices were not usable. The transistors were not that good even when they did work. The first transistors were germanium which has high leakage and worse thermal properties than silicon.

socketEarly transistors were subject to damage from soldering, so it was common to use an alligator clip or a specific heat sink clip to prevent heat from reaching the transistor during construction. Some gear even used sockets which also allowed the quick substitution of devices, just like the tubes they replaced.

When the economics of transistors changed, it made a lot of things practical. For example, a common piece of gear used to be a transistor tester, like the Heathkit IT-121 in the video below. If you pulled an $8 part out of a socket, you’d want to test it before you spent more money on a replacement. Of course, if you had a curve tracer, that was even better because you could measure the device parameters which were probably more subject to change than a modern device.

Of course, germanium to silicon is only one improvement made over the years. The FET is a fundamentally different kind of transistor that has many desirable properties and, of course, integrating hundreds or even thousands of transistors on one integrated circuit revolutionized electronics of all types. Transistors got better. Parameters become less variable and yields increased. Maximum frequency rises and power handling capacity increases. Devices just keep getting better. And cheaper.

A Brief History of Transistors

The path from vacuum tube to the Regency TR-1 was a twisted one. Everyone knew the disadvantages of tubes: fragile, power hungry, and physically large, although smaller and lower-power tubes would start to appear towards the end of their reign. In 1925 a Canadian physicist patented a FET but failed to publicize it. Beyond that, mass production of semiconductor material was unknown at the time. A German inventor patented a similar device in 1934 that didn’t take off, either.

Replica-of-first-transistor
Replica of the First Transistor

Bell labs researchers worked with germanium and actually understood how to make “point contact” transistors and FETs in 1947. However, Bell’s lawyers found the earlier patents and elected to pursue the conventional transistor patent that would lead to the inventors (John Bardeen, Walter Brattain, and William Shockley) winning the Nobel prize in 1956.

Two Germans working for a Westinghouse subsidiary in Paris independently developed a point contact transistor in 1948. It would be 1954 before silicon transistors became practical. The MOSFET didn’t appear until 1959.

Of course, even these major milestones are subject to incremental improvements. The V channel for MOSFETs, for example, opened the door for FETs to be true power devices, able to switch currents required for motors and other high current devices.

Continue reading “Retrotechtacular: Old Transistors”

Hackaday Links: March 13, 2016

Way back in 2014, Heathkit was a mystery. We knew someone was trying to revive the brand, but that was about it. Adafruit pulled out all the stops to solve this mystery and came up with nothing. The only clue to the existence of Heathkit was a random person who found a geocache in Brooklyn Bridge Park. Since then, Heathkit has released an odd AM radio kit and $150 antenna. These offerings only present more mysteries, but at least [Paul] was finally rewarded for finding the Heathkit geocache. Heathkit sent [Paul] the AM radio kit. He says it’s neat and well documented.

[David] is doing his masters thesis on, “The motivation of the maker community”. That means empirical data, and that (usually) means surveymonkey. You can take his survey on the motivations of the maker community here.

America’s best loved companies, Verizon and Makerbot, together at last.

The BeagleBone Black was launched in 2013. The BeagleBone Green – a Seeed joint – showed up last August. The BeagleBone Blue, released just a few months ago, is a collaboration between the UCSD engineering department and TI. Now there’s the BeagleBone Enhanced. Yes, they should have picked another color. Perhaps ecru. The BB Enhanced sports one Gigabyte of RAM, Gigabit Ethernet, two USB ports and two USBs via an expansion header, optional serial NOR Flash for a bootloader, optional six-axis gyro, and optional barometer.

Atmel is changing a few AVRs. There is a new die for the ATMega 44, 88, 168, and the ‘Arduino chip’, the ATMega328. Most of the changes are relatively inconsequential – slightly higher current consumption in power save mode – but one of these changes is going to trip up a lot of people. The Device ID, also known as the source of the avrdude: initialization failed, rc=-1 error, has changed on a lot of chips.

Makeit Labs in Nashua, New Hampshire has a problem. They were awarded $250,000 in tax credits to help them move and renovate. Sounds like a very good problem, right? Not so: they need to sell these tax credits before the end of the month, or they lose them. They’re looking for a few businesses in New Hampshire to buy these tax credits. From [Peter Walsh]: “Under the credit program, a typical business donating $10,000 would save $9,000 on their state and federal taxes! That $10,000 donation would cost them only $1006!” Does that make sense? No, it’s taxes, of course not. If you’re a business in New Hampshire and are looking to reduce your tax burden, this is the solution.

So I mentioned MRRF, right? You should go to MRRF. It’s next weekend.

Hackaday Links: March 6, 2016

There’s the R2 Builders Club, hundreds of people are building BB-8, but there are a few robots that don’t get enough love from the amateur propsmiths. [Kenneth] just finished up his build of Crow from MST3K. He built Tom Servo a year or so ago and K-9 from Doctor Who. The beautiful thing about building MST3K robots and Doctor Who props is that you’re probably working with a larger budget than the prop department had.

Heathkit’s new website is up. The two products we know about so far – an AM radio kit and a slim jim antenna – can only be described as, ‘meh.’ Still, there are a few upgrades for old kits available and the requisite amount of nostalgia.

On today’s issue of, ‘should not be attempted by anyone, ever, under any circumstance’ here’s how to build a table saw at home. Yes, it’s a table saw built from a piece of aluminum, styrofoam, hot glue, and a shoe box. The guy really botched it by not going for the zero clearance insert here, but at least the fence is only a few dozen degrees off parallel with the blade.

[Mathieu] is working on a Mooltipass Mini. It’s tiny and the scroll wheel thingy makes things fun.

March 18th through March 20th is the Midwest RepRap Festival in Goshen, Indiana. This is, by far, the best conference, meetup, or festival we go to year after year. We’ll have a few members of the Hackaday crew at the event, and rumor has it the Internet has made it to Indiana this year.

Adafruit got a writeup in the New Yorker. The article is technically about the art of PCB design, but as with most general interest pieces on electronics it is awash in non sequiturs and simply defining the terminology.

[Oscar] built a miniature replica of a blinkenlight computer last year for the Hackaday Prize. This was the PiDP-8/I. While it looks awesome, the PDP-8/I is inherently limited. [Oscar] has his design methodology down, and now he’s working on a miniature replica of the king of the PDPs. It’s the PiDP-11/27. It’s just a prototype and render now, but the finished project will have custom switches, a handsome bezel, and will be much more capable.

MAME is now FOSS. That’s great news, but think about the amount of work that went into making this happen. MAME is 19 years old, and  that means everyone who has contributed to the project over the years needed to sign off on this initiative.