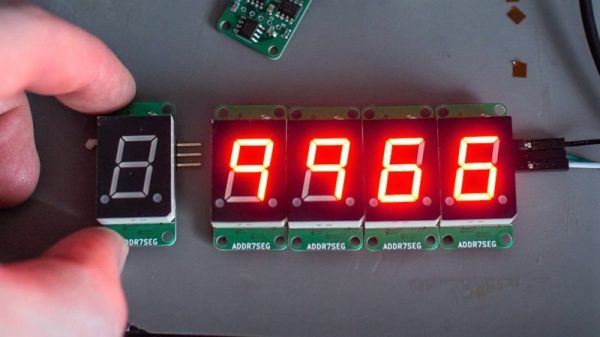
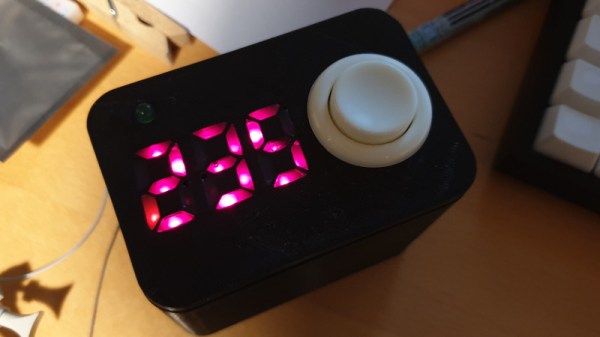
Visual Airplane Tracker Runs On Pi

As no doubt is the case with many readers, there is a Raspberry Pi running in the yard near where this is being written that tracks airplanes, listening into the ADS-B radio broadcasts that they send and uploading the data to a sharing service. This device lacks the blinky LEDs that hacking custom states it should have, though. This project from [xy72y5e] would be a great way to deal with that problem: they used a Unicorn hat to create a simple map of local airplanes. This shows the location and track of aircraft in the area on the 8 by 8 RGB LED matrix of the Unicorn Hat.

While the device here maps local planes from their radio fixes, the code that [xy72y5e] published works with the api of ADSBExchange, a site that shares flight data. This means that the map can be easily set to show air traffic at a different location to the device itself. And it wouldn’t be that difficult to alter this to show the locally detected planes, as [xy72y5e] has published the full Python code that creates the map. This would also go well with some of the other airplane tracking hacks that we’ve seen recently, such as the planespotter destination tracker or tracking airplanes by radar reflections

[Via Reddit]

WiFi Remote Control Those Cheap LED Strips With An ESP8266 Passthrough

The explosion of cheap LED lighting products has given a never-ending array of opportunities for the resourceful hacker. A few dollars can secure strings of colourful illumination, but without further expenditure they lack the extra utility of electronic control. This is something that [Albert David has addressed] with his simple ESP8266-based WiFi switcher that he’s added to a string of USB-powered LEDs, and he’s neatly mounted the ESP-12 module it used atop a USB plug.

The circuitry is pretty straightforward, with only a couple of I/O lines being used. A transistor takes care of the heavy lifting, and the software comes courtesy of the Tasmota firmware for Sonoff (and similar) devices. We suspect with this economy of connection, the same task could be achieved even with the limited resources provided by the lesser ESP-01 module.

There was a time not so long ago when performing a task such as controlling a light over a wireless network involved significant cost, power, and complexity. In the nearly five years since we reported on the arrival of the ESP8266 we have progressed to the point at which that task is a simple project using commodity components, and that represents something of a miracle.

A Foggy Lightsaber Build

Lightsabers have enchanted audiences since their appearance in the very first Star Wars film in 1977. Unfortunately, George Lucas hasn’t shared the technology in the years since then with the broader public, so we’re left to subsist on pale imitations. This is just such a build.

The closest human analog to Jedi technology is the laser, and this build uses 8 of them in combination with two LEDs. They’re aimed to coincide at a fixed distance above the hilt. A CO2 bicycle inflater is then used to blow through an e-cigarette to create a fog. This makes the red lasers readily visible to the human eye.

This ersatz lightsaber does have its limitations – fast motion tends to scatter the fog, making it once again invisible, and it’s really at its best held in a vertical orientation. There’s also some divergence beyond the focused point. With that said, it does look somewhat impressive when held still, smouldering away.

Until we gain a better mastery of plasma physics, perhaps you can make do with this fire-based build? Video after the break.

[Thanks to qrp-gaijin for the tip!]

Continue reading “A Foggy Lightsaber Build”

Fail Of The Week: EPROMs, Rats’ Nests, Tanning Lamps, And Cardboard On Fire

It all started when I bought a late-1990s synthesizer that needed a firmware upgrade. One could simply pull the ROM chip, ship it off to Yamaha for a free replacement, and swap in the new one — in 2003. Lacking a time machine, a sensible option is to buy a pre-programmed aftermarket EPROM on eBay for $10, and if you just want a single pre-flashed EPROM that’s probably the right way to go. But I wanted an adventure.

Spoiler alert: I did manage to flash a few EPROMs and the RM1X is happily running OS 1.13 and pumping out the jams. That’s not the adventure. The adventure is trying to erase UV-erasable EPROMS.

And that’s how I ended up with a small cardboard fire and a scorched tanning lamp, and why I bought a $5 LED, and why I left EPROMs out in the sun for four days. And why, in the end, I gave up and ordered a $15 EPROM eraser from China. Along the way, I learned a ton about old-school UV-erasable EPROMs, and now I have a stack of obsolete silicon that’s looking for a new project like a hammer looks for a nail — just as soon as that UV eraser arrives in the mail.

Continue reading “Fail Of The Week: EPROMs, Rats’ Nests, Tanning Lamps, And Cardboard On Fire”

Infinity Cube Is Gorgeous Yet Simple

Typically when we hear the words “LED” and “Cube”, we think of small blinking devices on protoboard designed to flex one’s programming and soldering skills. However, while [Heliox]’s Cube Infini could be described as “a cube of LEDs”, it’s rather a different beast (video in French, subtitles available).

The cube starts with a 3D printed frame, designed in Fusion 360. The devil really is in the details — [Heliox] puts in nice touches, such as the artistic cube relief on the base, and the smart integrated cable management in the edges. The faces of the cube are plexiglass sheets, covered with a one-way reflective film that is applied in a similar manner to automotive window tint. For lighting, a high-density LED strip is fitted to the inside edges, chosen for maximum visual effect. It’s controlled by an IR remote and a cheap control module from Amazon.

While the build contains no particularly advanced tools, materials, or techniques, the final result is absolutely stunning. It’s a piece we’d love to have as a lamp in a stylish loungeroom or study. [Heliox] does a great job of explaining how the cube is designed and fits together, and it’s a testament to just what can be achieved with a little ingenuity and hard work.

Once you’re done here, check out this ping-pong based build.

Continue reading “Infinity Cube Is Gorgeous Yet Simple”

Freeforming The Atari Punk Console

This stunning piece of art is [Emily Velasco’s] take on the Atari Punk Console. It’s a freeform circuit that synthesizes sound using 555 timers. The circuit has been around for a long time, but her fabrication is completely new and simply incredible!

This isn’t [Emily’s] first rodeo. She previously built the mini CRT sculpture project seen to the left in the image above. Its centerpiece is a tiny CRT from an old video camera viewfinder, and it is fairly common for the driver circuit to understand composite video. And unlike CRTs, small video cameras with composite video output are easily available today for not much money. Together they bring a piece of 1980s-era video equipment into the modern selfie age. The cubic frame holding everything together is also the ground plane, but its main purpose is to give us an unimpeded view. We can admire the detail on this CRT and its accompanying circuitry representing 1982 state of the art in miniaturized consumer electronics. (And yes, high voltage components are safely insulated. Just don’t poke your finger under anything.)

With the experience gained from building that electrically simple brass frame, [Emily] then stepped up the difficulty for her follow-up project. It started with a sound synthesizer circuit built around a pair of 555 timers, popularized in the 1980s and nicknamed the Atari Punk Console. Since APC is a popular circuit found in several other Hackaday-featured projects, [Emily] decided she needed to add something else to stand out. Thus in addition to building her circuit in three-dimensional brass, two photocells were incorporated to give it rudimentary vision into its environment. Stimulus for this now light-sensitive APC were provided in the form of a RGB LED. One with a self-contained circuit to cycle through various colors and blinking patterns.

These two projects neatly bookend the range of roles brass rods can take in your own creations. From a simple frame that stays out of the way to being the central nervous system. While our Circuit Sculpture Contest judges may put emphasis the latter, both are equally valid ways to present something that is aesthetic in addition to being functional. Brass, copper, and wood are a refreshing change of pace from our standard materials of 3D-printed plastic and FR4 PCB. Go forth and explore what you can do!

Continue reading “Freeforming The Atari Punk Console”

An IoT Christmas Tree You’re Invited To Control

We love IoT gadgets, but are occasionally concerned that they might allow access to the wrong kind of hacker. In this case, [Kevin] has created an IoT tree that allows anyone to control the pattern of lights, and he’s invited you to do so!

We played with the tree a bit, and the web interface is fairly powerful. For each LED, you can select either a random color or a keyframe-defined pattern. For the keyframe LEDs, you can create a number of “keyframes”, each of which is defined by a color and a transition, which can be either linear, quarter sine wave, or instantaneous (“wall”). Additional keyframes can be added for each LED, and if don’t specify a pattern for all the LEDs, the system repeats those you have defined to fill the entire string. There are also a few preset patterns you can choose if you prefer. If you, too, want to play with the tree, don’t delay: it’s only available through the first week of 2019!

Behind the scenes, an aging Raspberry Pi provides the local brains driving the LED controller and streaming the video, while a cloud server running a Redis instance allows communication with the web. The interface to the string of WS2811 LEDs uses [Kevin]’s Kinetis LK26 breakout board, which he managed to get working despite the state of tools and documentation for the Kinetis ARM family. You can read a good discussion of the system on his blog; there are a surprisingly large number of pieces that need to work together. As usual, he provides all the source code for this project on GitHub.

We’ve seen [Kevin]’s work before, including his 73-LED wristwatch, and adventures developing on an STM32 from scratch.

But, if it’s IoT Christmas trees that have got you thinking, you can check out this one from last year.