Much More Than A Desktop Mill: The DIY VMC Build

A VMC (vertical machining center) is essentially a CNC vertical milling machine on steroids. Many CNC mills are just manual milling machines that have been converted to CNC control. They work nicely, but have a number of drawbacks when it comes to real world CNC milling: manual tool changes, lack of chip collection, lack of coolant containment, and backlash issues (which a manual machinist normally compensates for).

These problems are solved with a VMC, which will usually have an automatic tool changer, and an enclosure to contain coolant and wash chips down into a collection pan. They are, however, very expensive, very big, and very heavy. Building one from scratch is a massive undertaking, but one which [Chris DePrisco] was brave enough to take on.

Continue reading “Much More Than A Desktop Mill: The DIY VMC Build”

Tips For Buying Your First Milling Machine

If you’re interested in making things (and since you’re reading this, we’re going to assume you are), you’ve almost certainly felt a desire to make metal parts. 3D printers are great, but have a lot of drawbacks: limited material options, lack of precision, and long printing times. If you want metal parts that adhere to even moderately tight tolerances, a milling machine is your only practical option. There is, after all, a very good reason that they’re essential to manufacturing.

However, it can be difficult to know where to start for the hobbyist who doesn’t have machining experience. What kind of milling machine should you get? Should you buy new or used? What the heck is 3-phase power, and can you get it? These questions, among many others, can be positively overwhelming to the uninitiated. Luckily, we — your friends at Hackaday — are here to help give you some direction. So, if you’re ready to learn, then read on! Already an expert? Leave some tips of your own in the comments!

Continue reading “Tips For Buying Your First Milling Machine”

Machine Tool Build Is Anything But Boring

“So just like every other great story in history, ours is going to start at the lathe.” Truer words were never spoken, and thus begins the saga of turning a bar of chrome-moly steel into a shop-built boring head.

You may have a few questions regarding [ThisOldTony]’s effort. First, unless you’re familiar with machine tooling, you may wonder what exactly a boring head is. The video below makes it plain, but the short answer is that it’s a tool to make holes. A boring head spins a boring bar with a cutting tool, and the head can be offset to spin the bar through an adjustable diameter. They’re great for making large holes of precise diameters – skip to around 25:30 to see it in action.

The other question might be: why does he spend so much time and effort building something he can just buy off the shelf? If you have to ask that question, we think you may be missing the point. [Tony] seems mainly interested in building tools; using them to make non-tool things is merely a happy accident. We totally respect that, and besides, just look at the quality of the tool he makes. We find his videos very entertaining, too – he’s got a great sense of humor and the video production quality is top-notch. Just watch out for banana peels and space-time continuum issues.

We love tools, and we really love tools that are custom made with this level of craftsmanship. For more quality toolmaking, check out this guitar-fretting jig or this belt grinder.

Continue reading “Machine Tool Build Is Anything But Boring”

Custom Machined Triple Threat Slingshot

Time was when a lad in need of a ranged weapon would hack a slingshot together out of a forked tree branch and a strip of inner tube. Slingshot design has progressed considerably since [Dennis the Menace]’s day, but few commercially available slingshots can match up to the beauty and functionality of this magnificently machined multipurpose handheld weapon system.

Making it clear in his very detailed build log that this is but a prototype for a design he’s working on, [Gord] has spared little effort to come up with a unique form factor that’s not only functional as a slingshot, but also provides a few surprises: a magazine that holds nine rounds of ammo with magnets; knuckle protection on the hand grip that would deal a devastating left hook; and an interchangeable base that provides a hang loop or allows mounting a viciously sharp broadhead hunting arrow tip for somewhat mysterious purposes. There’s plenty to admire in the build process as well – lots and lots of 6061 billet aluminum chips from milling machine and lathe alike. All told, a nice piece of craftsmanship.

For a more traditional slingshot design with a twist, check out this USB-equipped slingshot that talks to Angry Birds. And when your taste in slingshots run more toward the ridiculously lethal, [Jörg Sprave]’s machete launcher never disappoints.

[Thanks Leslie!]

Remote Tester

A Simple Circuit For Testing Infrared Remote Controls

Every now and then a remote control acts up. Maybe you are trying to change the channel on your television and it’s just not working. A quick way to determine if the remote control is still working is by using a cell phone camera to try to see if the IR LED is still lighting up. That can work sometimes but not always. [Rui] had this problem and he decided to build his own circuit to make it easier to tell if a remote control was having problems.

The circuit uses a Vishay V34836 infrared receiver to pick up the invisible signals that are sent from a remote control. A Microchip 12F683 processes the data and has two main output modes. If the remote control is receiving data continuously, then a green LED lights up to indicate that the remote is functioning properly. If some data is received but not in a continuous stream, then a yellow LED lights up instead. This indicates that the batteries on the remote need to be replaced.

The circuit also includes a red LED as a power indicator as well as RS232 output of the actual received data. The PCB was cut using a milling machine. It’s glued to the top of a dual AAA battery holder, which provides plenty of current to run the circuit.

DIY Surface Grinder For Making Precision Parts At Home

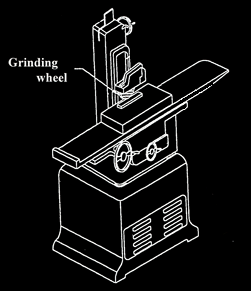
Surface Grinders are machines that can make a surface of a part very flat, very smooth and very parallel to the face of the part that is mounted to the machine. Surface grinders usually have a spinning grinding wheel suspended over a moving bed. The bed moves the part back and forth under the grinding wheel removing an extremely small amount of material at a time, sometimes down to just a ten-thousandth of an inch (o.0001″) in order to make a precision part.

Surface Grinder DIY
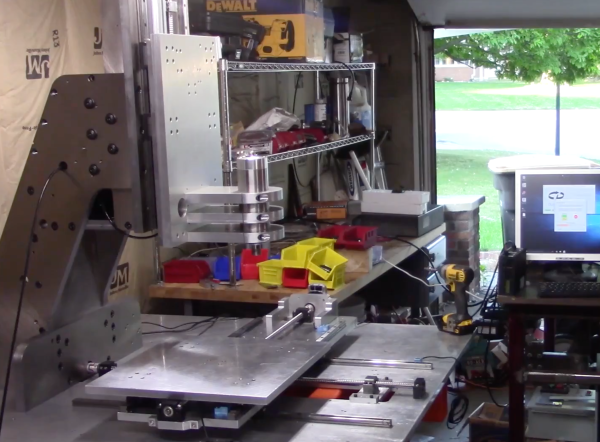
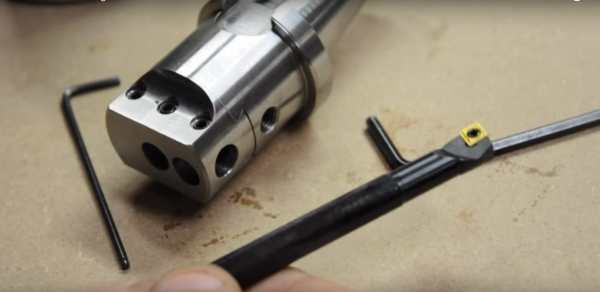
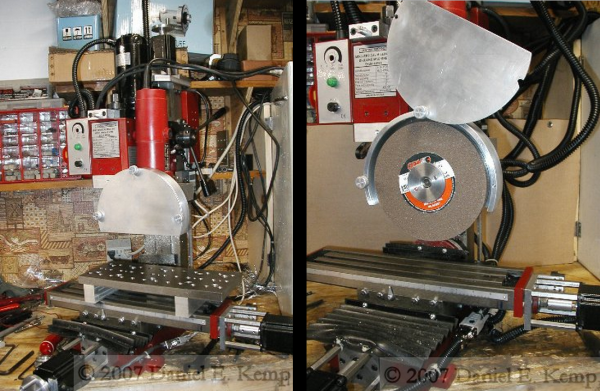
[Daniel] is a tool guy and wanted a Surface Grinder. He didn’t need a super-accurate commercial grinder so he decided to make one himself. It’s a doozy of a project and is made up of quite a few other tools. [Daniel] already had a mini CNC mill and decided this would be a good platform to begin with. The mill was rigid and already had automated X and Y axes, after all. For the grinder motor, nothing made more economical sense than to use a regular angle grinder, but there were two significant problems. First, no company made wide grinding wheels for an angle grinder. [Daniel] had to modify his spindle to accept an off-the-shelf surface grinding wheel. The second problem is that the new grinding wheel had a max RPM rating of 4400. The angle grinder can reach 10,600 RPM. In order to slow down the angle grinder, a speed control was taken out of an old variable-speed router and integrated with the angle grinder. Problem solved. A mount was then made to attached the angle grinder to the Z axis of the mill.

A magnetic chuck mounted to the mills bed is used to hold down metal work pieces. There is a lever on the chuck that when moved in one direction it creates a magnetic field to hold a ferrous piece of metal firmly to the chuck during machining. When the lever is moved in the other direction, the part is released and can be removed from the Surface Grinder.

To use his new Surface Grinder, [Daniel] creates a CNC g-code file to move his work piece back and forth underneath the grinding wheel. Being able to control the depth of cut and feed rates with his CNC machine removes human error from the grinding process and leaves a consistent finish on the part. Check out the video after the break.

Continue reading “DIY Surface Grinder For Making Precision Parts At Home”

Customized IPad LCD Screen Clips Onto Macbook As A Slick Second Screen

Macbook with iPad second screen

Last year, [Ben] found a good deal on iPad 3 LCD screens. He couldn’t resist buying a couple to play around with. It didn’t take him long to figure out that it’s actually quite simple to use these LCD screens with any computer. This is because the LCD panels have built-in Apple Display port interfaces. This means that you can add your own Display Port connector to the end of the LCD’s ribbon connector and just plug it into a computer. You’ll also need to hook up a back light driver, which [Ben] was able to find pre-made for around $35.

The hack doesn’t stop there, though. [Ben] wanted to have a nice, finished product. He laser cut an acrylic bezel for the LCD screen that was a perfect fit. He then milled out a space for the LCD to fit into. The acrylic was thick enough to accommodate the screen and all of the cables. To cover up the back, [Ben] chose to use the side panel of a PowerMac G5 computer case. He chose this mainly for aesthetics. He just couldn’t resist the nice brushed aluminum look with the giant Apple logo. It would be a perfect match to his Macbook.

Once the LCD panel was looking nice, [Ben] still needed a way to securely fasten it in the right place. He knew he’d want it next to his Macbook, so why not attach it directly to the Macbook? [Ben] got to work with his 3D printer and printed up some small plastic clips. The clips are glued to the iPad screen’s acrylic bezel and can be easily clipped on and off of the Macbook screen in seconds. This way his laptop is still portable, but he has the extra screen real estate when he needs it. [Ben] also printed up a plastic clip that turns the iPad’s USB power connector and the Display Port connector into one single connector. While this is obviously not required, it does effectively turn two separate plugs into one and makes the whole project that much more slick.