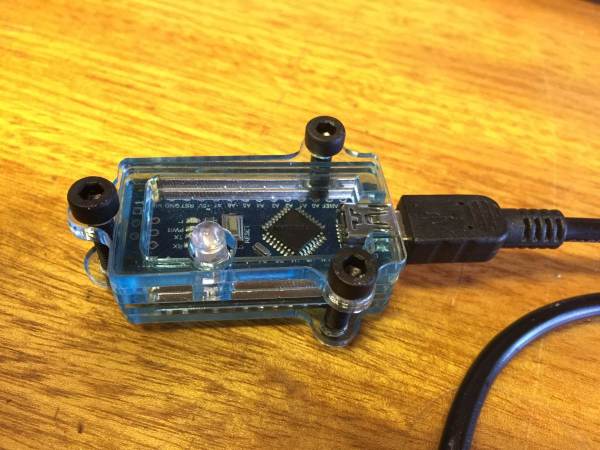
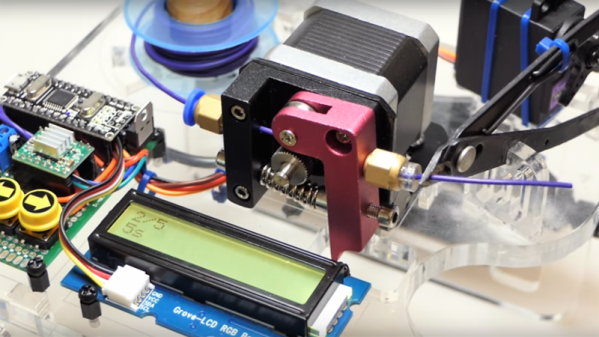
Automate Wire Prep With A Robot Wire Cutter

When you move from one-off builds to production scale, perhaps to meet that Kickstarter commitment or to keep your Tindie store stocked, you’re going to need to tool up. Jobs like building wiring harnesses can be tedious and time-consuming, so outsourcing them to this robot wire cutter might be a good idea.

The video below tells the whole tale of this build, which despite the fact that [Maclsk] seems to have put it together quickly from scrap bin parts still looks pretty professional. The business end of the machine is a 3D printer extruder, minus the hot end, of course. A Nano controls the extruder’s stepper to shoot out the right length of wire, as well as the servo that squeezes the snippers. An LCD display and some pushbuttons provide the UI that rounds out the build. Tell it how long and how many, and you’ll be ready to build. We can see how this might be upgraded to strip the wires as well, although getting both ends stripped might be tricky.

Might this component tape-cutting robot from a few weeks back have inspired [Maclsk]’s build? Perhaps, but in any case, both are fun to watch.

Continue reading “Automate Wire Prep With A Robot Wire Cutter”

Mouse Mis-Clicking? We Got You.

A mouse with malfunctioning buttons can be a frustrating to deal with — and usually a short leap to percussive maintenance. Standard fixes may not always last due to inferior build quality of the components, or when the microswitch won’t close at all. But, for mice that double/triple-click, will release when dragging, or mis-click on release, this Arduino-based hack may be the good medicine you’re after.

Instructables user [themoreyouknow]’s method cancels click malfunctions by latching the mouse’s controller switch trace to ‘on’ when pressed, keeping it there until the button normally closed contact closes again completely. Due to the confined spaces, you’ll want to use the smallest Arduino you can find, some insulating tape to prevent any shorts, and care to prevent damaging the wires this process adds to the mouse when you cram it all back together.

Before you take [themoreyouknow]’s guide as dogma, the are a few caveats to this hack; they are quick to point out that this won’t work on mice that share two pins between three buttons — without doing it the extra hard way, and that this might be trickier on gaming or other high-end mice, so attempt at your own peril.

Speaking of gaming mice, we recently featured a way to add some extra functionality to your mouse — cheating optional — as well as how to stash a PC inside an old Logitech model.

Touchless MIDI: The Secret’s In The Mitten

MIDI is a great tool for virtually any musician. Unless you’re a keyboard player, though, it might be hard to use it live. [Evan] recently came up with a great solution for all of the wistful guitar players out there who have been dreaming of having a MIDI interface as useful as their pianist brethren, though. He created a touchless MIDI controller that interfaces directly with a guitar.

Continue reading “Touchless MIDI: The Secret’s In The Mitten”

Bring Doping, Microfluidics, Photovoltaics, And More Into The Home

Can you make a spectrometer for your home lab all from materials you have sitting around? We might not believe it from a less credible source, but this MIT course does indeed build a spectrometer from foam board using two razor blades as the silt cover and a writable CD as the diffraction grating. The coolest part is removing the metal backing of the CD.

mit_experiments_thumbHackaday reader [gratian] tipped us off about the course available from MIT courseware called Nanomaker. It boils down some fairly complicated experiments to the kind one can do in the home lab without involving thousands of dollars of lab equipment. The whole point is to demystify what we think of as complicated devices and topics surrounding photovoltaics, organic photovoltaics, piezoelectricity and thermoelectricity.


Spectrometers are used to analyze the wavelengths of a light source. Now that you have a measurement tool in hand it’s time to build and experiment with some light sources of your own. Here you can see an LED that is the topic of one of the course labs.

If you have a bit of background in chemistry this is a good step-by-step guide for getting into these types of experiments at home. It reminds us of some of the really cool stuff [Jeri Ellsworth] was doing in her garage lab, like making her own EL panels.

Continue reading “Bring Doping, Microfluidics, Photovoltaics, And More Into The Home”

AV Remote Control Teams Arduino With – Visual Basic?

A large installed base of powered speakers from a defunct manufacturer and a dwindling supply of working remote controls. Sounds like nightmare fuel for an AV professional – unless you take matters into your own hands and replace the IR remotes with an Arduino and custom software.

From the sound of it, [Steve]’s crew was working on AV gear for a corporate conference room – powered speakers and an LCD projector. It was the speakers that were giving them trouble, or rather the easily broken or lost remotes. Before the last one gave up the ghost, [Steve] captured the IR codes for each button using an Arduino and the IRRemote library. With codes in hand, it was pretty straightforward to get the Nano to send them with an IR LED. But what makes this project unique is that the custom GUI that controls the Arduino was written in the language that everyone loves to hate, Visual Basic. It’s a dirty little secret that lots of corporate shops still depend on VB, and it’s good to see a little love for the much-maligned language for a change. Plus it got the job done.

Want to dive deeper into IR? Maybe this primer on cloning IR remotes with an Arduino will help. And for another project where VB shines, check out this voice controlled RGB LED lamp.

Molecular Motor Drives Nano Submarine

Technology keeps making things smaller, but this is ridiculous. Scientists at Rice University in Houston have just made a tiny submarine with a molecular motor. They call it a unimolecular submersible nanomachine (USN), because it is composed of a single molecule made up of 244 atoms. The really smart bit comes from how it is driven: when the molecule absorbs a photon of light, one of the bonds that holds it together becomes more flexible, and the tail spins a quarter of a rotation to attach to another atom and reach the preferred lower energy state. This motion moves the molecule, and the process repeats. This happens millions of times a second.

I wouldn’t put down a deposit on a nanosub quite yet, though: the motion is random, as there is no way to steer the molecule at present. The researchers figured out that it behaves this way by analyzing the way that the molecule diffuses, because these molecules diffuse 25 per cent quicker with the light source than without.  Nope, not very practical, but it is a neat bit of molecular hackery.

Tricking An Ancient Protocol To Play Tunes

A lot of technological milestones were reached in 2007. The first iPhone, for example, was released that January, and New Horizons passed Jupiter later on that year. But even with all of these amazing achievements, Volvo still wasn’t putting auxiliary inputs on the stereo systems in their cars. They did have antiquated ports in their head units though, and [Kalle] went about engineering this connector to accommodate an auxiliary input.

The connector in question is an 8-pin DIN in the back, which in the days of yore (almost eight years ago) would have been used for a CD changer. Since CDs are old news now, [Kalle] made use of this feature for the hack. The first hurdle was that the CD changer isn’t selectable from the menu unless the head unit confirms that there’s something there. [Kalle] used an Arduino Nano to fool the head unit by simulating the protocol that the CD changer would have used. From there, the left and right audio pins on the same connector were used to connect the auxiliary cable.

If you have a nearly-antique Volvo like [Kalle] that doesn’t have an aux input and you want to try something like this, the source code for the Arduino is available on the project page. Of course, if you don’t have a Volvo, there are many other ways to go about hacking an auxiliary input into various other devices, like an 80s boombox or the ribbon cable on a regular CD player. Things don’t always go smoothly, though, so there are a few nonstandard options as well.