Fortified Feeder For Feral Felines

Most of the commercially-available pet feeders littering the internet are cheaply-made, with wimpy motors and infuriating interfaces. Want to use it outdoors? Good luck. If you need a heavy-duty, outdoor cat feeder, you gotta heat up your soldering iron and do it yourself.

[jplanaux] is under contract to feed a bunch of feral cats that hang around, but he’s often gone for weeks at a time. His two-feeder fail-over system has one weak link, and it’s these commercial feeders — they’re under-powered and just plain unreliable, even after modding them for Raspi control. What he needed was an industrial strength automatic feeder that’s completely customized for his situation.

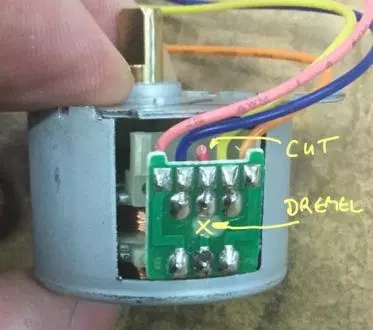
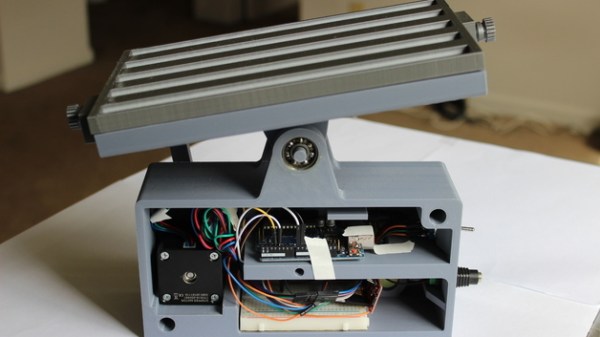
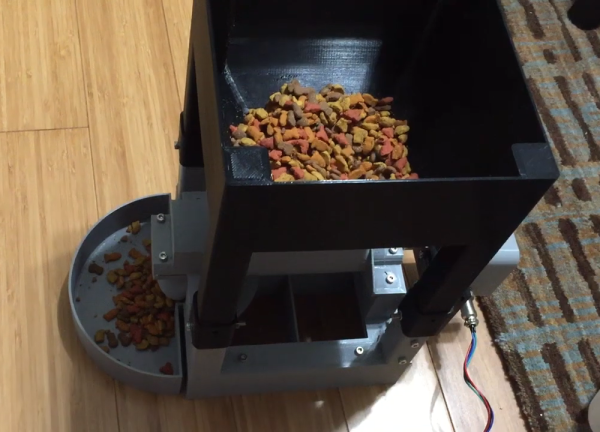
A simple web interface lets him set up automatic feeding times, or push kibble on demand if customers show up and there’s no food. The system takes pictures of the bowl to verify that food came out and was subsequently eaten. It’s supposed to be racoon-proof, so [jplanaux] can see who or what is chowing down. Aside from that, the feeder is pretty standard, with a large hopper on top of a screw drive that’s driven by a NEMA17. The stepper is relay-driven, so it only uses power when it’s driving the screw.

[jplanaux] has the STL files and code available, and even designed a bowl and base extension for people who want to build one and use it indoors. Nibble at the kibble-sized demo video after the break.

The lion’s share of the auto-feeder builds we chew on around here are designed for dry food. Serving wet food is a much harder problem, but is definitely possible to pull off.

Continue reading “Fortified Feeder For Feral Felines”

3D Printed Pen Plotter Is As Big As You Need It To Be

There’s nothing quite like building something to your own personal specifications. It’s why desktop 3D printers are such a powerful tool, and why this scalable plotter from the [Lost Projects Office] is so appealing. You just print out the end pieces and then pair it with rods of your desired length. If you’ve got some unusually large computer-controlled scribbling in mind, this is the project for you.

The design, which the team calls the Deep Ink Diver (d.i.d) is inspired by another plotter that [JuanGg] created. While the fundamentals are the same, d.i.d admittedly looks quite a bit more polished. In fact, if your 3D printed parts look good enough, this could probably pass for a commercial product.

For the electronics, the plotter uses an Arduino Uno and a matching CNC Shield. Two NEMA 17 stepper motors are used for motion: one to spin the rod that advances the paper, and the other connected to a standard GT2 belt and pulley to move the pen back and forth.

We particularly like the way [Lost Projects Office] handled lifting the pen off the paper. In the original design a solenoid was used, which took a bit of extra circuitry to drive from the CNC Shield. But for the d.i.d, a standard SG90 servo is used to lift up the arm that the pen is attached to. A small piece of elastic puts tension on the assembly so it will drop back down when the servo releases.

If this plotter isn’t quite what you’re after, don’t worry. There’s more where that came from. We’ve seen a number of very interesting 3D printed plotters that are just begging for a spot in your OctoPrint queue.

Arduino Drives Seventeen Stepper Motors, Carefully

It’s fair to say that building electronic gadgets is easier now than it ever has been in the past. With low-cost modular components, there’s often just a couple dozen lines of code and a few jumper wires standing between your idea and a functioning prototype. Driving stepper motors is a perfect example: you can grab a cheap controller board, hook it up to a microcontroller, and the rest is essentially just software. But recently [mechatronicsguy] wondered if even that was more hardware than was technically necessary to get the job done.

It’s not that he was intentionally looking to make things more complicated for himself, of course. His rationale was entirely economic; if you’re looking to drive a dozen or more stepper motors, even the “cheap” controllers can add up. So he started to wonder if he could skip the controller entirely and connect the stepper motor directly to the digital pins of an Arduino. Generally speaking this is a bad idea, but if you’re careful and are willing to take the risk, [mechatronicsguy] is living proof it’s possible

So what’s the trick to running a whopping seventeen individual stepper motors directly from the digital pins of an Arduino Mega? Well, to start with you’re not going to be running the beefy NEMA 17 motors like you might find in a 3D printer. [mechatronicsguy] is using the diminutive (and dirt cheap) 28BYJ-48, a light duty stepper used in many consumer products. Even with this relatively tiny motor, you need to crack open the case and cut a trace on the PCB to switch it from unipolar to bipolar.

Beyond that, you need to be careful. [mechatronicsguy] reports he’s had success running as many as ten of them at once, but realistically the fewer operating simultaneously the better. This is actually made easier due to the relatively poor specs of the 28BYJ-48 motor; its huge eleven degree step size means its not really susceptible to the same kind of slippage you’d get on a NEMA 17 when powered down. This means you can cut power to all but the actively moving motor and be fairly sure they’ll all stay where you left them.

With as popular as the 28BYJ-48 stepper is, there are several projects this “quick and dirty” method of interfacing could potentially work with. This small “barn door” star tracker is an obvious example, but we’ve also seen some very nice robotic arms built with these low-cost motors which could benefit from the technique.

Open Source Laboratory Rocker Is Super Smooth

Lab equipment is often expensive, but budgets can be tight and not always up to getting small labs or researchers what they need. That’s why [akshay_d21] designed an Open Source Lab Rocker with a modular tray that uses commonly available hardware and 3D printed parts. The device generates precisely controlled, smooth motion to perform automated mild to moderately aggressive mixing of samples by tilting the attached tray in a see-saw motion. It can accommodate either a beaker or test tubes, but since the tray is modular, different trays can be designed to fit specific needs.

Source code and schematics are available from [akshay_d21]’s Google Drive and the 3D models are also available from the National Institute of Health’s 3D Print Exchange. A demonstration video is embedded below, in which you can see how smooth and controlled the motions are.

Continue reading “Open Source Laboratory Rocker Is Super Smooth”

Soundproofing A CNC Mill Conversion

The Proxxon MF70 is a nice desktop sized milling machine with a lot of useful add-on accessories available for it, making it very desirable for a hacker to have one in his or her home workshop. But its 20000 rpm spindle can cause quite the racket and invite red-faced neighbors. Also, how do you use a milling machine in your home-workshop without covering the whole area in metal chips and sawdust? To solve these issues, [Tim Lebacq] is working on Soundproofing his CNC mill conversion.

To meet his soundproof goal, he obviously had to first convert the manual MF70 to a CNC version. This is fairly straightforward and has been done on this, and similar machines, in many different ways over the years. [Tim] stuck with using the tried-and-tested controller solution consisting of a Raspberry Pi, an Arduino Uno and a grbl shield sandwich, with stepper motor drivers for the three NEMA17 motors. The electronics are housed inside the reclaimed metal box of an old power supply. Since the Proxxon MF70 is already designed to accept a CNC conversion package, mounting the motors and limit switches is pretty straightforward making it easy for [Tim] to make the upgrade.

Soundproofing the box is where he faced unknown territory. The box itself is made from wooden frames lined with particle board. A pair of drawer slides with bolt-action locks is used for the front door which opens vertically up. He’s also thrown in some RGB strips controlled via the Raspberry-Pi for ambient lighting and status indications. But making it soundproof had him experimenting with various materials and techniques. Eventually, he settled on a lining of foam sheets topped up with a layer of — “bubble wrap” ! It seems the uneven surface of the bubble wrap is quite effective in reducing sound – at least to his ears. Time, and neighbours, will tell.

Maybe high density “acoustic foam” sheets would be more effective (the ones similar to “egg crate” style foam sheets, only more dense)? Cleaning the inside of the box could be a big challenge when using such acoustic foam, though. What would be your choice of material for building such a sound proof box? Let us know in the comments below. Going back many years, we’ve posted about this “Portable CNC Mill” and a “Mill to CNC Conversion” for the Proxxon MF70. Seems like a popular machine among hackers.

Featured Image

Go Go Camera Slider

Are your arms getting tired from pushing your camera back and forth across your camera slider? That must be the case with [Max Maker], which led him to convert his manual slider into a motorized one.

The electronics are minimal — an Arduino Micro, a few toggle switches, A4988 Stepper Driver, 12V battery pack, and the ever popular NEMA 17 stepper motor. If you’re wondering why we said ‘switches’ instead of ‘switch’, it’s because 4 of the switches are used to select a time frame. The time frame being how long it takes for the slider to move from one end to the other.

Fabrication shown off in the video below will net you a few new tricks. Our favorite is how he makes a template for the NEMA motor using masking tape. After completely covering the face of the motor with tape, he clearly marks the mounting holes and colors in the shape of the motor plate as if he were doing frottage. Then just pull the tape off as one and stick it onto the slider rack.

Not including the cost of the slider itself, the parts list came out to be around $75. Even if you don’t yet own a slider, this a great first adventure into building a CNC machine. It is one degree of freedom and the hard parts have already been taken care of by the manufacturer of the slider. Get used to using belts and programming for stepper motors and you’ll be whipping up your own 3D printer with a fancy belt scheme for the Z-axis.

Continue reading “Go Go Camera Slider”

Hackaday Prize Entry: 3D Printed Linear Actuator Does 2kg+

The rabbit hole of features and clever hacks in [chiprobot]’s NEMA17 3D Printed Linear Actuator is pretty deep. Not only can it lift 2kg+ of mass easily, it is mostly 3D printed, and uses commonplace hardware like a NEMA 17 stepper motor and a RAMPS board for motion control.

The main 3D printed leadscrew uses a plug-and-socket design so that the assembly can be extended easily to any length desired without needing to print the leadscrew as a single piece. The tip of the actuator even integrates a force sensor made from conductive foam, which changes resistance as it is compressed, allowing the actuator some degree of feedback. The force sensor is made from a 3M foam earplug which has been saturated with a conductive ink. [chiprobot] doesn’t go into many details about his specific method, but using conductive foam as a force sensor is a fairly well-known and effective hack. To top it all off, [chiprobot] added a web GUI served over WiFi with an ESP32. Watch the whole thing in action in the video embedded below.

Continue reading “Hackaday Prize Entry: 3D Printed Linear Actuator Does 2kg+”