Clock-of-Clocks Adds Light-Pipe Hands For Beauty And Function

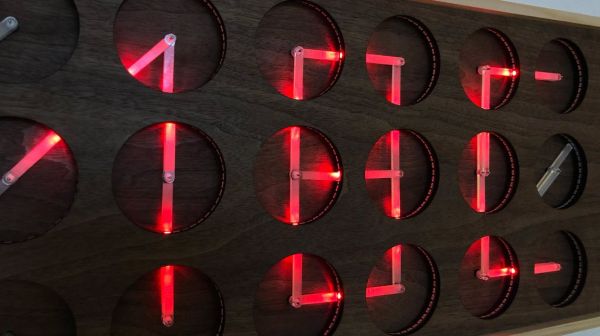
We’ve gotten used to seeing “meta clocks,” clocks that use an array of analog clock faces and piece together characters using the hands of the clocks. They’re very clever, and we always like to see them, especially when they come with detailed build instructions like this one does.

What’s also nice about [Erich Styger]’s “MetaClockClock” display is the twist on the original concept. Where most clock-of-clocks depend on the contrast between the hands and the faces of the analog movements, [Erich] added light to the mix. Hidden inside the bezel of each clock is a strip of RGB LEDs; coupled with the clear acrylic hands of the clock, which act as light pipes, each clock can contribute different shapes of different colors to the display. Each clock is built around a dual-shaft stepper motor of the kind used in car dashboard gauges; the motors each live on a custom PCB, while the LEDs are mounted on a ring-shaped PCB of their own. Twenty-four of the clocks are mounted in a very nice walnut panel, which works really well with the light-pipe hands. The video below shows just some of the display possibilities.

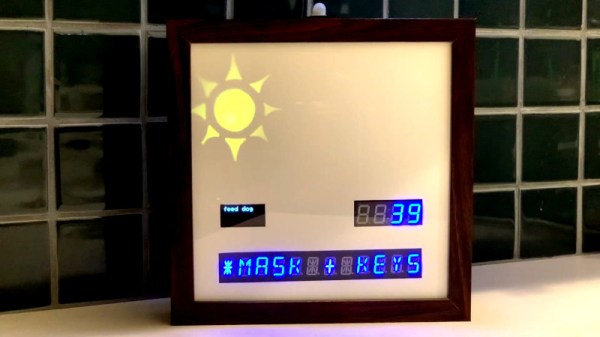
[Erich] has documented his build process in extreme detail, and has all the design files up on GitHub. We won’t say that recreating his build will be easy — there are a lot of skills needed here, from electronics to woodworking — but at least all the information is there. We think this is a beautiful upgrade to [Erich]’s earlier version, and we’d love to see more of these built.

Continue reading “Clock-of-Clocks Adds Light-Pipe Hands For Beauty And Function”

This Slimline Word Clock Uses Laser Etching To Keep Things Simple

Judging by the tips we get, it seems like the popularity of word clocks has perhaps started falling off lately. But back at peak word clock, we were seeing dozens of designs, some better than others. This simple but classy word clock seems to benefit from all that prior art, making the design just about as simple as it can get while still looking great.

The main tool for [t0mg]’s build is a laser cutter, which is a great choice for keeping the design simple. The tricky part of word clocks is getting the “word search” matrix executed cleanly, and we’ve seen everything from laser-cut wood to inkjet prints, and even commercially produced PCBs, used for the job. [t0mg] opted instead to spray paint a piece of glass and etch away the characters with the laser, which results in superb text quality. Etching the underside of the glass also has the advantage of protecting the paint layer while giving the finished clock a glossy face that really looks nice. Under the template lie layers of MDF that hold the Neopixel strips and act as light guides, while an ESP32 and RTC perform timekeeping and LED-driving duties. [t0mg] finished off the clock with a nice web interface to set the clock, change the colors, and perform maintenance functions. The video below shows the software in use.

We really think this clock looks great, and for those with access to a laser cutter, it seems like a great way to go about building your own.

Continue reading “This Slimline Word Clock Uses Laser Etching To Keep Things Simple”

Weather Note Tells You What You Need To Know, And No More

Smartphones are portals to an overwhelming torrent of information. Yes, they’re a great way to find out the time, your bus schedule, and the weather, but they’re also full of buzzers and bells going off every three minutes to remind you that your uncle has reposted a photo of the fish he caught ten years ago. Sometimes, it’s better to display just the essentials, and that’s what Weather Note does.

It’s built around the Adafruit Feather Huzzah, a devboard built around the venerable ESP8266. It’s a great base for an Internet of Things project like this one, with WiFi built-in and ready to go. The Weather Note talks to a variety of online platforms to scrape weather data and helpful reminders, with the assistance of If This Then That, or IFTTT. Reminders to walk the dog or get some milk are displayed on a small OLED screen, while there’s also a bunch of alphanumeric displays for other information. WS2812 LEDs are used behind a shadowbox to display weather conditions, with cute cloud, rain, and sun icons. It’s all wrapped up in a tidy frame perfect for the mantlepiece or breakfast table.

It’s a great build to learn about programming for the Internet of Things, and with those bright LED displays, it’s probably a viable nightlight too. It’s a rare project that can both tell you about the weather and keep you from stubbing your toe in the kitchen, after all. Those desiring a stealthier build should consider going down the smart mirror route instead. Video after the break.

Continue reading “Weather Note Tells You What You Need To Know, And No More”

Animatronic Saturn V Launch Tower Sends Lego Model To The Moon

When it comes to their more adult-oriented models, Lego really knocked it out of the park with their Saturn V rocket model. Within the constraints of the universe of Lego parts, the one-meter-tall model is incredibly detailed, and thousands of space fans eagerly snapped up the kit when it came out.

But a rocket without a launchpad is just a little sad, which is why [Mark Howe] came up with this animatronic Saturn V launch pad and gantry for his rocket model. The level of detail in the launchpad complements the features of the Saturn V model perfectly, and highlights just what it took to service the crew and the rocket once it was rolled out to the pad. As you can imagine, extensive use of 3D-printed parts was the key to getting the look just right, and to making parts that actually move.

When it’s time for a launch, the sway control arm and hammerhead crane swing out of the way under servo control as the Arduino embedded in the base plays authentic countdown audio. The crew catwalk swings away, the engines light, and the service arms swing back. Then for the pièce de résistance, the Saturn V begins rising slowly from the pad on five columns of flame. [Mark] uses a trio of steppers driving linear actuators to lift the model; the flame effect is cleverly provided by strings of WS2812s inside five clear plastic tubes. We have to say it took some guts to put the precious 1,969-piece model on a lift like that, but the effect was well worth the risk.

This project has a great look and is obviously a labor of love, and a great homage to the Apollo program’s many successes. We’ve got a ton of other Apollo-era hacks on our pages, including a replica DSKY, a rejuvenated AGC, and a look behind the big boards of mission control.

Continue reading “Animatronic Saturn V Launch Tower Sends Lego Model To The Moon”

Slim RGB Matrix Puts LEDs Inside The PCB

Sometimes all that’s required to build something interesting is to put the same old pieces together differently. [Sayantan Pal] did this for the humble RGB LED matrix, creating an extra-thin version by recessing WS2812b NeoPixel LEDs inside a PCB.

The popular WS2812B is 1.6 mm in height, which happens to be the most commonly used PCB thickness. Using EasyEDA, [Sayantan] designed a 8×8 matrix with modified WS2812B footprints. A slightly undersized cutout was added to create a friction-fit for the LEDs, and the pads were moved to the back side of the panel just outside the cutout, and their assignment were flipped. The PCB is assembled face down, and all the pads are soldered by hand. Unfortunately this creates rather large solder bridges which slightly increases the overall thickness of the panel, and is probably also unsuitable for production with conventional pick-and-place assembly.

We’ve seen some similar methods with PCB assemblies that use layered PCBs. Manufacturers are starting to even embed components inside multilayer PCBs.

RGB Party Bike Flashes With The Beat

One of the biggest dangers to a cyclist is not being seen at night. To counteract this, all manner of lighting and reflective gear is available to help ensure bicycles are seen on the streets. Of course, you don’t have to stop at the purely practical. [TechnoChic] decided to have some fun with her ride, festooning her party bike with many, many LEDs.

As you’d expect, the RGB illuminations are thanks to WS2812B LED strips. Running the show is  a trio of Arduino Nano 33 IoTs – one for the LEDs on the bike’s frame, the other two mounted on the front and back wheels respectively. This allowed for the easy control of LEDs on the spokes without having to pass data and power lines to the rotating wheels. The LEDs on the frame are even music-reactive, with the Arduino sampling music input via one of its analog-to-digital converters.

Paired with a boombox on the bike, the build makes for a great way to hype up group rides through the city at night. We can imagine such a bike being an absolute hit at Critical Mass, though you’ve probably gotta add a laser or glitter cannon if you’re going to draw attention at Burning Man. If you’re tired of pedaling, you might consider an electric conversion, too. Video after the break.

Continue reading “RGB Party Bike Flashes With The Beat”

Dad Scores Big With DIY Indoor Hockey Game

We suppose it’s a bit early to call it just yet, but we definitely have a solid contender for Father of the Year. [DIY_Maxwell] made a light-up hockey game for his young son that looks like fun for all ages. Whenever the puck is hit with the accompanying DIY hockey stick (or anything else), it lights up and produces different sounds based on its acceleration.

Inside the printed puck is an Arduino Nano running an MPU6050 accelerometer, a 12-NeoPixel ring, and a piezo buzzer. [DIY_Maxell] reused a power bank charging circuit to charge up the small LiPo battery.

The original circuit used a pair of coin cells, but the Arduino was randomly freezing up, probably because of the LEDs’ current draw. Be sure to check out the video after the break, which begins with a little stop motion and features a solder stand in the shape of a 3D printer.

Got a house full of carpet or breakables? You could always build an air hockey table instead.

Continue reading “Dad Scores Big With DIY Indoor Hockey Game”