Homemade E-Drums Hit All The Right Notes

In our eyes, there isn’t a much higher calling for Arduinos than using them to make musical instruments. [victorh88] has elevated them to rock star status with his homemade electronic drum kit.

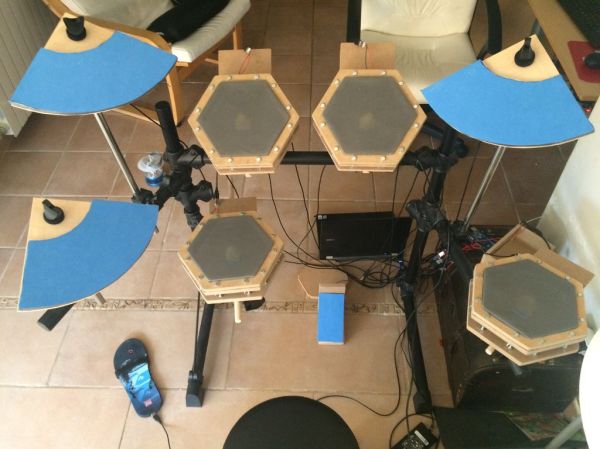
The kit uses an Arduino Mega because of the number of inputs [victorh88] included. It’s not quite Neil Peart-level, but it does have a kick drum, a pair of rack toms, a floor tom, a snare, a crash, a ride, and a hi-hat. With the exception of the hi-hat, all the pieces in the kit use a piezo element to detect the hit and play the appropriate sample based on [Evan Kale]’s code, which was built to turn a Rock Band controller into a MIDI drum kit. The hi-hat uses an LDR embedded in a flip-flop to properly mimic the range of an actual acoustic hi-hat. This is a good idea that we have seen before.

[victorh88] made all the drums and pads out of MDF with four layers of pet screen sandwiched in between. In theory, this kit should be able to take anything he can throw at it, including YYZ. The crash and ride cymbals are MDF with a layer of EVA foam on top. This serves two purposes: it absorbs the shock from the sticks and mutes the sound of wood against wood. After that, it was just a matter of attaching everything to a standard e-drum frame using the existing interfaces. Watch [victorh88] beat a tattoo after the break.

If you hate Arduinos but are still reading for some reason, here’s a kit made with a Pi.

Continue reading “Homemade E-Drums Hit All The Right Notes”

Greet The Sun With A 555 Flute

Here’s an interesting implementation of a classic: the 555 timer as astable multivibrator for the noble purpose of making weird music. [pratchel] calls this a Morgenflöte or morning flute, indicating that it is best played in the morning. It would certainly wake up everyone in the house.

Instead of using LDRs in straight-up Theremin mode and waving his hands about, [pratchel] mounted one in each of several cardboard tubes. One tube is small and has just a few holes; this is intended to be used as a flute. [pratchel] cautions against locating holes too close to the LDR, because it will overpower the others when left uncovered. A larger tube with more holes can be used as a kind of light-dependent slide whistle with another holey tube that fits inside. We were disappointed to find that the giant tube sitting by the amplifier hasn’t been made into a contrabass flute.

Continuing the theme of astability, [pratchel] went completely solderless and built the circuit on a breadboard. The LDR’s legs are kept separate by a piece of cardboard. This kind of project and construction is fairly kid and beginner-friendly. It would be a good one for getting your musically inclined friends and family members into electronics. Here’s a 555 player piano built by Hackaday’s own [Steven Dufresne] that might be a good second step. Check out [pratchel]’s performance after the break.

Continue reading “Greet The Sun With A 555 Flute”

Color Sonification Could Be Key To Rainbow Connection

Have you seen any loud sweaters this holiday season? Now there is a way to quantify their vibrancy and actually hear them at the same time. Cornell engineering students [Mengcheng Qi] and [Ryan Land] focused on the sonification of color and translated the visible spectrum into audible sounds.

They originally planned to use pixel samples from an OV7670 camera module, but weren’t able to extract any useful color data from it. We prefer their Plan B anyway, which was to use CdS photo resistors and the plastic color filters used for photography in red, blue, and green. The varying intensity of light falling on the photo resistors creates different patterns according to the voltage levels. The actual sound generation was done with FM sound synthesis.

There wasn’t a lot of natural sound variation between different RGB values, so in order to make it more fun, they created different instruments which play different patterns at variable speeds and pitch according to the colors. In addition to the audio feedback, the RGB values are displayed in real-time on a small TFT. Below those are dynamic bar graphs that show the voltages of each color.

Check out the demo after the break; they walk through the project and try it out on different things to hear their colors.

Continue reading “Color Sonification Could Be Key To Rainbow Connection”

Power Meter

Solar Panel System Monitoring Device Using Arduino

[Carl] recently upgraded his home with a solar panel system. This system compliments the electricity he gets from the grid by filling up a battery bank using free (as in beer) energy from the sun. The system came with a basic meter which really only shows the total amount of electricity the panels produce. [Carl] wanted to get more data out of his system. He managed to build his own monitor using an Arduino.

The trick of this build has to do with how the system works. The panel includes an LED light that blinks 1000 times for each kWh of electricity. [Carl] realized that if he could monitor the rate at which the LED is flashing, he could determine approximately how much energy is being generated at any given moment. We’ve seen similar projects in the past.

Like most people new to a technology, [Carl] built his project up by cobbling together other examples he found online. He started off by using a sketch that was originally designed to calculate the speed of a vehicle by measuring the time it took for the vehicle to pass between two points. [Carl] took this code and modified it to use a single photo resistor to detect the LED. He also built a sort of VU meter using several LEDs. The meter would increase and decrease proportionally to the reading on the electrical meter.

[Carl] continued improving on his system over time. He added an LCD panel so he could not only see the exact current measurement, but also the top measurement from the day. He put all of the electronics in a plastic tub and used a ribbon cable to move the LCD panel to a more convenient location. He also had his friend [Andy] clean up the Arduino code to make it easier for others to use as desired.

Power Meter

Electricity Usage Monitor Is Linked To Google Spreadsheets

If you want to make your home more energy-efficient, chances are you will need a way to monitor your electricity usage over time. There are off-the-shelf solutions for this of course, but hackers like us tend to do things our own way. Take [Karl] for example. He recently built himself a solution with only a few smart components. We’ve seen similar projects in the past, but none quite like this.

[Karl’s] home has a power meter that blinks an LED to indicate the current amount of used electricity in Watt-hours. He knew all he needed was a way to electronically detect the blinking LED and he’d be able to accurately track his usage without modifying the meter.

The primary components used in this project were a CC3200 development kit and a photoresistor module. The dev kit contained a WiFi module built-in, which allows the system to upload data to Google spreadsheets as well as sync the built-in clock with an accurate time source. The photoresistor module is used to actually detect the blinking LED on the power meter. Everything else is done easily with code on the dev kit.

laser keyboard

MIDI Keyboard With Frickin’ Laser Keys

MIDI instruments are cool, but they’re not laser cool. That is, unless you’ve added lasers to your MIDI instrument like [Lasse].

[Lasse] started out with an old MIDI keyboard. The plan was to recycle an older keyboard rather than have to purchase something new. In this case, the team used an ESi Keycontrol 49. They keyboard was torn apart to get to the creamy center circuit boards. [Lasse] says that most MIDI keyboards come withe a MIDI controller board and the actual key control board.

Once the key controller board was identified, [Lasse] needed to figure out how to actually trigger the keys without the physical keyboard in place. He did this by shorting out different pads while the keyboard was hooked up to the computer. If he hit the correct pads, a note would play. Simple, but effective.

The housing for the project is made out of wood. Holes were drilled in one piece to mount 12 laser diodes. That number is not arbitrary. Those familiar with music theory will know that there are 12 notes in an octave. The lasers were powered via the 5V source from USB. The lasers were then aimed at another piece of wood.

Holes were drilled in this second piece wherever the lasers hit. Simple photo resistors were mounted here. The only other components needed for each laser sensor were a resistor and a transistor. This simple discreet circuit is enough to simulate a key press when the laser beam is broken. No programming or microcontrollers required. Check out the demonstration video below to see how it works. Continue reading “MIDI Keyboard With Frickin’ Laser Keys”

TightLight: A 3D Projection Mapping Assistant

tightLight

Anyone can grab a projector, plug it in, and fire a movie at the wall. If, however, you want to add some depth to your work–both metaphorical and physical–you’d better start projection mapping. Intricate surfaces like these slabs of styrofoam are excellent candidates for a stunning display, but not without introducing additional complexity to your setup. [Grady] hopes to alleviate some tedium with the TightLight (Warning: “music”).

The video shows the entire mapping process of which the Arduino plays a specific role toward the end. Before tackling any projector calibration, [Grady] needs an accurate 3D model of the projection surface, and boy does it look complicated. Good thing he has a NextEngine 3D laser scanner, which you’ll see lighting the surface red as it cruises along.

Enter the TightLight: essentially 20 CdS photocells hooked up to a Duemilanove, each of which is placed at a previously-marked point on the 3D surface. A quick calibration scan scrolls light from the projector across the X then Y axis, hitting each sensor to determine its exact position. [Grady] then merges the photocell location data with the earlier 3D model using the TouchDesigner platform, and bam: everything lines up and plays nice.