Pi Microcontroller Still Runs A Webserver

At first glance, the Raspberry Pi Pico might seem like a bit of a black sheep when compared to the other offerings from the Raspberry Pi Foundation. While most of the rest of their lineup can run Linux environments with full desktops, the Pico is largely limited to microcontroller duties in exchange for much smaller price tags and footprints. But that doesn’t mean it can’t be coerced into doing some of the things we might want a mainline Pi to do, like run a web server.

The project can run a static web page simply by providing the Pico with the project code available on the GitHub page and the HTML that you’d like the Pico to serve. It can be more than a static web page though, as it is also capable of running Python commands through the web interface as well. The server can pass commands from the web server and back as well, allowing for control of various projects though a browser interface. In theory this could be much simpler than building a physical user interface for a project instead by offloading all of this control onto the web server instead.

The project not only supports the RP2040-based Raspberry Pi Pico but can also be implemented on other WiFi-enabled microcontroller boards like the ESP8266 and ESP32. Having something like this on hand could greatly streamline smaller projects without having to reach for a more powerful (and more expensive) single-board computer like a Pi 3 or 4. We’ve seen some other builds on these boards capable of not only running HTML and CSS renderers, but supporting some image formats as well.

Continue reading “Pi Microcontroller Still Runs A Webserver”

A Smart Home That CAN Do It All

In an ideal smart home, the explosion of cheap WiFi and Bluetooth chips has allowed hundreds of small wireless devices to control the switches, lights, and everything else required for a “smart home” at a relatively low price. But what if you don’t want hundreds of internet-connected devices in your home polluting the wireless spectrum and allowing potential security holes into your network? If you’re like [Lucas Teske], you might reach for something wired and use cheap and (currently) available Raspberry Pi Picos to create PicoHome.

The unique twist of PicoHome is that it uses a CAN bus for communication. One of [Lucas’] goals was to make the boards easily swappable when hardware failed. This meant board-to-board communication and protocols like I2C were susceptible to noise (every time a relay triggered, the bus would lock up briefly). The CAN bus is designed to work in an electrically noisy environment.

There are two parts to the system: pico-relay and pico-input. The first connects to a 16 relay board and can control 16 different 24v relays. The second has 16 optoisolators to read from 12v-24v switches and various buttons throughout the house. These can be placed in a giant metal box in a central wiring location and not worry about it.

The firmware and board files are all released under an Apache 2.0 license, but the CAN2040 library this project relies on is under GPL. We covered the CAN2040 library when it was first released, and it’s lovely to see it being used for something entirely unexpected.

Continue reading “A Smart Home That CAN Do It All”

A Pi Pico plugged into a breadboard, with jumpre wires going away from its pins to an SPI flashing clip, that's in turn clipped onto an SPI flash chip on a BeagleBone board

Programming SPI Flash Chips? Use Your Pico!

At this point, a Pi Pico is equivalent to a bag full of programmers and debugging accessories. For instance, when you want to program an SPI flash chip, do you use one of those wonky CH341 dongles, or perhaps, even a full-on Raspberry Pi with a Linux OS? If so, it might be time to set those two aside – any RP2040 board can do this now. This is thanks to work of [stacksmashing] who implemented serprog protocol for the RP2040, letting us use a Pi Pico with stock flashrom for all our SPI flash chip needs.

After flashing the code to your RP2040 board, all you need to do is to wire your flash chip to the right pins, and then use the serprog programmer type in your flashrom commandline – instructions are available on GitHub along with the code, as you’d expect. Don’t feel like installing flashrom, or perhaps you happen to run Windows and need a flasher in a pinch? [stacksmashing] has a WebSerial-based SPI flasher tool for you, too, and shows it off with a fancy all-the-pinouts board of his own making.

This kind of tool is indispensable – you don’t need to mod one of these CH341 programmers to fix the bonkers 5 V default IO, or keep an entire Linux computer handy when you likely already have one at your fingertips. All in all, yay for one more RP2040 trick up our sleeve – this SPI flashing helper joins an assortment of applets for SWD, JTAG, UART, I2C and CAN, and in a pinch, your Pi Pico will also work as a digital and analog logic analyzer or an FPGA playground.


PCB mounted on 3D-printed holder, debug pins attached to Pi Pico on a breadboard. The battery is in the background, disconnected

Reverse Engineering E-Ink Price Tags

E-ink displays are great, but working with them can still be a bit tricky if you aren’t an OEM. [Jasper Devreker] got his hands on three e-ink shelf displays to reverse engineer.

After cracking the tag open, [Devreker] found a CC2510 microcontroller running the show. While the spec sheet shows a debug mode, this particular device has been debug locked making reading the device’s code problematic. Undaunted, he removed the decoupling capacitor from the DCOUPL pin and placed a MOSFET between it and the ground pin to perform a voltage glitch attack.

A Pi Pico was used to operate the MOSFET over PIO with the chip overclocked to 250 MHz to increase the precision and duration of the glitch. After some testing, a successful glitch pathway was found, but with only a 5% success rate. With two successive glitches in a row needed to read out a byte from the device, the process is not a fast one. Data pulled so far has shown to be valid code when fed into Ghidra, and this project page is being updated as progress continues.

If you want to delve further into hacking e-ink price tags, checkout this deep dive on the topic or this Universal E-paper Sniffer.

a Pi Pico on a breadboard, running a 7-segment counter gateware, with a 7-segment digit and a pushbutton next to the Pico

Want To Play With FPGAs? Use Your Pico!

Ever want to play with an FPGA, but don’t have the hardware? Now, if you have one of those ever-abundant Pi Picos, you can start playing with Verilog without getting an FPGA board. The FakePGA project by [tvlad1234], based on the Verilator toolkit, provides you with a way to compile Verilog into C++ for the RP2040. FakePGA even integrates RP2040 GPIOs so that they work as digital pins for the simulated GPIOs, making it a significant step up from computer-aided FPGA code simulation

[tvlad1234] provides instructions for setting this up with Linux – Windows, though untested, could theoretically run this through WSL. Maximum clock speed is 5KHz – not much, but way better than not having any hardware to test with. Everything you’d want is in the GitHub repo – setup instructions, Verilog code requirements, and a few configuration caveats to keep in mind.

We cover a lot of projects where FPGAs are used to emulate hardware of various kinds, from ISA cards to an entire Game BoyCPU emulation on FPGAs is basically the norm — it’s just something easy to do with the kind of power that an FPGA provides. Having emulation in the opposite direction is unusual,  though, we’ve seen FPGAs being emulated with FPGAs, so perhaps it was inevitable after all. Of course, if you have neither a Pico nor an FPGA, there’s always browser based emulators.

Continue reading “Want To Play With FPGAs? Use Your Pico!”

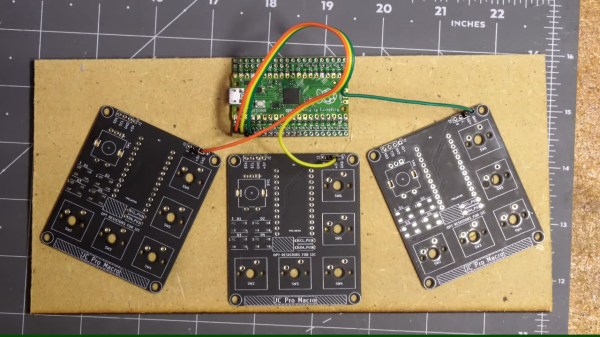
The macropad PCB panel next to an assembled macropad

A Fun Low-Cost Start For Your Macropad Hobby

If you were ever looking for a small relaxing evening project that you could then use day-to-day, you gotta consider the Pico Hat Pad kit by [Natalie the Nerd]. It fits squarely within the Pi Pico form-factor, giving you two buttons, one rotary encoder and two individually addressable LEDs to play with. Initially, this macropad was intended as an under-$20 device that’s also a soldering practice kit, and [Natalie] has knocked it out of the park.

You build this macropad out of a stack of three PCBs — the middle one connecting the Pi Pico heart to the buttons, encoders and LEDs, and the remaining ones adding structural support and protection. All the PCBs fit together into a neat tab-connected panel — ready to be thrown into your favorite PCB service’s shopping cart. Under the hood, this macropad uses KMK, a CircuitPython-based keyboard firmware, with the configuration open-source. In fact everything is open-source, just the way we like it.

If you find yourself with an unexpected affinity for macropads after assembling this one, don’t panic. It’s quite a common side-effect. Fortunately, there are cures, and it’s no longer inevitable that you’ll go bananas about it. That said, if you’re fighting the urges to go bigger, you can try a different hand-wireable Pico-based macropad with three more keys. Come to find that one not enough? Here’s a 2×4 3D printable one.

Now, if you eventually find yourself reading every single Keebin’ With Kristina episode as soon as it comes out, you might be too far gone, and we’ll soon find you spending hundreds of dollars building tiny OLED screens into individual keys — in which case, make sure you document it and share it with us!

Continue reading “A Fun Low-Cost Start For Your Macropad Hobby”

Foot Pedal Ups Vim Productivity, Brings Ergonomic Benefits

Vim is the greatest or the worst text editor of all time, depending on the tribe you’re in. Either way, members of both camps can appreciate this build from [Chris Price], which uses a foot pedal to ease operations for the user.

The basic concept was to use a pedal to enable switching between normal and insert modes. In Vim’s predecessor, vi, switching modes was easy, with the ESC key located neatly by the Q on the keyboard of the ADM-3A terminal. On modern keyboards, though, it’s a pain, and so a foot pedal is a desirable solution. In the Vim world, it’s referred to as a “Vim clutch.”

The build used a cheap pedal switch sourced from eBay, into which a Raspberry Pi Pico was installed. The Pico was hooked up to the switch contacts, and programmed to act as a USB HID device. When the pedal is pressed down, the Pico sends an “i” keypress to enter Vim’s insert mode. Releasing the pedal has the Pico send a “ESC” keypress to return to normal mode.

Those that use Vim on a regular basis would likely appreciate the productivity improvements of such a device. Plus, there’s some ergonomic benefits to not having to strain one’s hand over to reach the ESC key. Of course, it’s an old-school solution, but there’s still something so compelling and next-level about having a foot pedal hooked up to one’s dev rig.