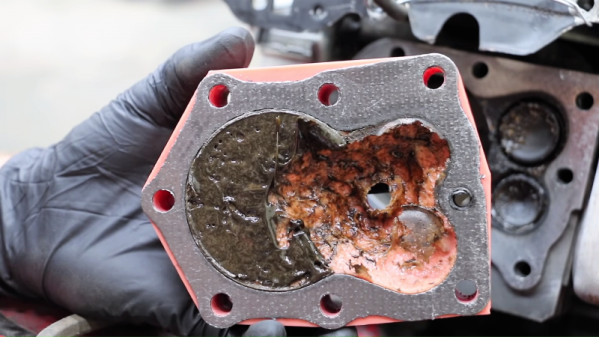
3D-Printing Saves Collectible Lures From A Fishy Ending

Give a man a fishing lure, and he catches fish until he loses the lure. Give a fisherman a 3D-printer, and he can print all the fishing lures he wants, especially replicas of those that are too valuable to actually use.

It may seem strange that some people collect fishing lures rather than use them, but when you look at [Hunter]’s collection, it’s easy to see why. Lures can be very artistic, and the Heddon River Runts in his collection are things of beauty and highly prized. They’re also highly effective at convincing fish to commit suicide, so rather than risk the originals, he and his dad 3D-printed replicas.

After modeling the body of the lure in Blender, they modified it with air pockets for buoyancy and located holes for attaching the treble hooks and lip spoon, which was fabricated from a scrap of brass from a rifle casing. The finished lure lacks the painted details and some of the charm of the original River Runt, but it has something Mr. Heddon couldn’t dream of in 1933 when he introduced it — it glows in the dark, thanks to the phosphorescent PLA filament used. That seems to be irresistible to the bass, who hit the lure so often that they got sick of taking pictures. See it in action in the video below.

[Hunter] and his dad have been busy exploring what 3D printing can do, replicating all sorts of Heddon lures. They’ve even got plans to design and print their own lures. But maybe archery is more your sportsman thing than fishing, in which case this PVC pipe compound bow or a recurve bow from skis would be something to check out.

Continue reading “3D-Printing Saves Collectible Lures From A Fishy Ending”

Smooth PLA Through The Fire And Flames

3D printing makes it easy to produce complex geometries, but the fused deposition methods generally create parts with poor surface finish, largely due to the layers being highly visible in the finished part. There are a wide variety of ways to deal with this, often involving sanding parts after production, or the use of fillers and paints. [XerotoLabs] has another solution. (YouTube, video below the break.)

To smooth the parts, a butane torch is pressed into service. The flame temperature is kept fairly low, and the torch is used almost like a brush to evenly apply heat to the surface of the part. As the PLA reaches its melting temperature, surface tension helps to smooth the part out. This is very similar to flame polishing which is commonly used in the fabrication of acrylic plastics.

It is a technique that requires some finesse – too much heat or focus on a single area, and you’re liable to end up with a molten plastic blob instead of a nice shiny finished part. Precautions must also be taken to avoid burning yourself or your workshop to the ground. But it’s a useful tool to have in your kit when you’re producing PLA parts that you want to look their best.

We’ve seen other techniques for smoothing PLA, too – the solvent method is particularly interesting. Continue reading “Smooth PLA Through The Fire And Flames”

Homebrew Wrist Brace Helps Beat Injury With Style

Repetitive motion injuries are no joke, often attended by crippling pain and the possibility of expensive surgery with a lengthy recovery. Early detection and treatment is the key, and for many wrist and hand injuries such as [ktchn_creations] case of “Blackberry thumb,” that includes immobilization with a rigid brace.

Sadly, the fiberglass brace her doctor left her with was somewhat lacking in the style department, and rather than being left with something unappealing to wear for half a year, she 3D-printed a stylish and functional wrist immobilizer. Starting in Autocad, she designed the outline of the brace, essentially an unwrapped version of the splint she started with. For breathability as well as aesthetics, a pattern of tessellated hexagons was used. The drawing was then exported to Fusion 360 for modeling and printing in black PLA. We were surprised to see that the brace was printed flat and later heat formed around her wrist, but that makes more sense than printing it in its final wrapped state. With a few velcro straps, the thermoformed brace was ready for service on the long road to recovery.

While [ktchn_creations] stipulates that looks were the motivator here, we’re not unaware that a 3D-printed brace might be more affordable than something dispensed by a doctor. But if you do build your own DIY appliance, whether for bracing your wrist, your knee, or your wayward teeth, you’ll want to run it past your health care provider, of course.

Locally Sourced: PLA Adhesive

When I first started getting into 3D printed projects that would require final assembly from multiple parts, I wanted to make sure I had an adhesive that would really hold up. I couldn’t imagine anything worse than spending 10’s of hours printing and assembling something, only to have it fall apart because my adhesive wasn’t up to the task. So I spent a lot of time trolling 3D printing message boards and communities trying to find the best way of gluing PLA. It should come as no surprise that, like everything else in the world, there are a ridiculous number of opinions on the subject.

If you’re printing with ABS, the general wisdom is that solvent welding with acetone is the best bet. You put some acetone on the printed parts, rub them together, and the plastic fuses together. This happens because the ABS melts slightly when exposed to the acetone, so they end up essentially melding into one piece. This sounded like exactly what I wanted, but unfortunately, acetone doesn’t have this same effect on PLA.

After some more research I found people suggesting Weld-On #16, an acrylic adhesive that will actually melt PLA. A little of this applied to the parts, they said, and you can solvent weld PLA just like acetone on ABS. Sure enough, the stuff works great and I’ve used it to put together nearly everything I’ve printed in PLA over the last few years. Only problem is, this stuff is a bit nasty, takes 24 hours to fully cure, and nobody has it locally.

So as an experiment I thought I’d take a look at a few adhesives sold at the local big box retailer and see if I couldn’t find something comparable. Do I need to keep ordering this nasty goop online every time, or can I pick something up off the shelf? More to the point, is solvent welding PLA really any better than just gluing it?

Continue reading “Locally Sourced: PLA Adhesive”

3D Printering: Printing Sticks For A PLA Hot Glue Gun

When is a hot glue stick not a hot glue stick? When it’s PLA, of course! A glue gun that dispenses molten PLA instead of hot glue turned out to be a handy tool for joining 3D-printed objects together, once I had figured out how to print my own “glue” sticks out of PLA. The result is a bit like a plus-sized 3D-printing pen, but much simpler and capable of much heavier extrusion. But it wasn’t quite as simple as shoving scrap PLA into a hot glue gun and mashing the trigger; a few glitches needed to be ironed out.

Why Use a Glue Gun for PLA?

Some solutions come from no more than looking at two dissimilar things while in the right mindset, and realizing they can be mashed together. In this case I had recently segmented a large, hollow, 3D model into smaller 3D-printer-sized pieces and printed them all out, but found myself with a problem. I now had a large number of curved, thin-walled pieces that needed to be connected flush with one another. These were essentially butt joints on all sides — the weakest kind of joint — offering very little surface for gluing. On top of it all, the curved surfaces meant clamping was impractical, and any movement of the pieces while gluing would result in other pieces not lining up.

An advantage was that only the outside of my hollow model was a presentation surface; the inside could be ugly. A hot glue gun is worth considering for a job like this. The idea would be to hold two pieces with the presentation sides lined up properly with each other, then anchor the seams together by applying melted glue on the inside (non-presentation) side of the joint. Let the hot glue cool and harden, and repeat. It’s a workable process, but I felt that hot glue just wasn’t the right thing to use in this case. Hot glue can be slow to cool completely, and will always have a bit of flexibility to it. I wanted to work fast, and I wanted the joints to be hard and stiff. What I really wanted was melted PLA instead of glue, but I had no way to do it. Friction welding the 3D-printed pieces was a possibility but I doubted how maneuverable my rotary tool would be in awkward orientations. I was considering ordering a 3D-printing pen to use as a small PLA spot welder when I laid eyes on my cheap desktop glue gun.

Continue reading “3D Printering: Printing Sticks For A PLA Hot Glue Gun”

Repairs You Can Print: Broken Glue Gun Triggers Replacement

Picture this: you need to buy a simple tool like a glue gun. There’s usually not a whole lot going on in that particular piece of technology, so you base your decision on the power rating and whether it looks like it will last. And it does last, at least for a few years—just long enough to grow attached to it and get upset when it breaks. Sound familiar?

[pixelk] bought a glue gun a few years ago for its power rating and its claims of strength. Lo and behold, the trigger mechanism has proven to be weak around the screws. The part that pushes the glue stick into the hot end snapped in two.

It didn’t take much to create a replacement. [pixelk] got most of the measurements with calipers and then got to work in OpenSCAD. After printing a few iterations, it fit well enough, but [pixelk] saw a chance to improve on the original design and added a few teeth where the part touches the glue stick. The new part has been going strong for three months.

We think this entry into our Repairs You Can Print contest is a perfect example of the everyday utility of 3D printers. Small reproducible plastic parts are all around us, just waiting to fail. The ability to not only replace them but to improve on them is one of the brightest sides of our increasingly disposable culture.

Still haven’t found a glue gun you can stick to? Try building your own.

They’re Putting Soy In Your Wires, Man

I’ve got a friend who tells me at every opportunity that soy is the downfall of humanity. Whatever ails us as a society, it’s the soy beans that did it. They increase violent tendencies, they make us fat and lazy, they run farmers out of business, and so on. He laments at how hard it is to find food that doesn’t include soy in some capacity, and for a while was resigned to eating nothing but chicken hot dogs and bags of frozen peas; anything else had unacceptable levels of the “Devil’s Bean”. Overall he’s a really great guy, kind of person who could fix anything with a roll of duct tape and a trip to the scrap pile, but you might think twice if he invites you over for dinner.

A column of soy soldiers stand at the ready.

So when he recently told me about all the trouble people are having with soy-based electrical wiring, I thought it was just the latest conspiracy theory to join his usual stories. I told him it didn’t make any sense, there’s no way somebody managed to develop a reliable soy-derived conductor. “No, no,” he says, “not the conductor. They are making the insulation out of soy, and animals are chewing through it.”

Now that’s a bit different. I was already well aware of the growing popularity of bioplastics: the PLA used in desktop 3D printers is one such example, generally derived from corn. It certainly wasn’t unreasonable to think somebody had tried to make “green” electrical wiring by using a bioplastic insulation. While I wasn’t about to sit down to a hot bag of peas for dinner, I had to admit that maybe in this case his claims deserved a look.

Continue reading “They’re Putting Soy In Your Wires, Man”