Tiptoe Through The Tulip Mania

Spring is headed back toward the northern hemisphere, and we’ll soon see brilliant tulips waking up from their dirt naps to dot the thawing landscape with vibrant hues. These harbingers of spring are closely associated with the Netherlands, but they are actually native to Turkey and central Asia, and weren’t brought to Europe until the 1500s. Tulips became so immensely popular that the market reached what is considered the first speculative financial fever pitch, and crashed hard in 1637.

This electromechanical parlor game arranges the tulips with another artifact of the Dutch Golden Age —  hand-painted Delft tiles designed to line fireplaces. [BuiltByBlatt] made all 114 of his on a CNC with a paint pen. To play the game, you roll a small ball toward a row of holes with different point values. Each hole has a break beam detector so the Raspberry Pi knows what you scored.

There’s also a rotating bonus hole that changes based on how many balls are left. As your score goes up, Titus the Tulip works his way to the right. It seems like it’d be fairly easy to hit the 5-point hole in the middle, but the tiles give it a horizontal Pachinko feel that makes it move less predictably. Slip into your clogs and check it out after the break.

We love the heavy clacks of electromechanical contraptions, especially old pinball machines. You can even tear ’em down and build them into other games.

Continue reading “Tiptoe Through The Tulip Mania”

Keeping A 3D Printed NAS Updated With The Times

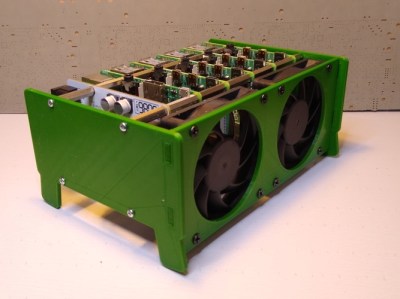
Back in 2018, [Paul-Louis Ageneau] created a 3D printed network-attached storage (NAS) enclosure for his Raspberry Pi. The design worked well, the Internet liked it when he posted the details on his blog, and all was right with the world. But of course, such glories are fleeting. Two years later that design needs updating, and thanks to the parametric nature of OpenSCAD, he’s been able to refresh his design for another tour of duty.

In our book, this is as much a cautionary tale as it is a success story. On one hand, it’s a testament to the power of CAD and desktop 3D printing. That a design can be tweaked and reproduced down the line with only minimal hassle is great for folks like us. But it’s also a shame that he didn’t get more than two years before some of the parts he used in the original NAS became unobtainium.

The main issue was that the integrated USB hub he used for the first version is no longer available, so the design had to be modified to accept a similar board. Unfortunately, the new hub is quite a bit wider than the old one. Resizing the entire case isn’t really an option since the Pi has to slide into it, so the hub now bumps out a bit on one side. He’s added a printable cover that cleans it up a bit, but the asymmetrical look might be a problem for some. While fiddling with the design, he also changed around the cooling setup so a larger fan could be mounted; now that the Raspberry Pi 4 is out, it can use all the cooling help it can get.

We covered the original version of the printed NAS back when it was first released, and it’s always good to see a creator coming back and keeping a project updated; even if it’s because hardware availability forced their hand.

A Raspberry Pi Terminal That’s Always Within Reach

Inspired by films such as The Matrix, where hackers are surrounded by displays and keyboards on articulated arms, [Jay Doscher] created this cyberpunk “floating” terminal so your favorite Linux single board computer is always close at hand. Do you actually need such a thing mounted to the wall next to the workbench? Probably not. But when has that ever stopped a Hackaday reader?

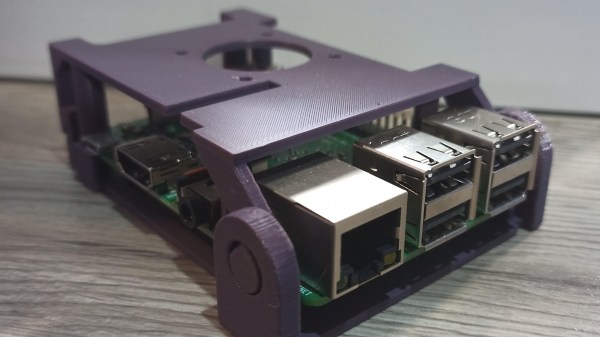
[Jay] has come up with a modular design for the “A.R.M. Terminal” that allows the user to easily augment it with additional hardware. The 3D printed frame of the terminal has hardpoints to bolt on new modules, which thanks to threaded metal inserts, will have no problem surviving multiple configurations.

This initial version features a panel on the left side that holds various buttons and switches attached to the Pi’s GPIO pins. With a bit of code, it’s easy to pick up the status of these controls and use them to fire off whatever tasks your imagination can come up with. On the bottom [Jay] has mounted a stand-alone VFD audio spectrum display that’s hooked up to the Pi’s 3.5 mm jack. It’s totally unnecessary and costs as much as the Raspberry Pi itself, but it sure is pretty.

If there’s a downside to the design, it’s that the only display currently supported is the official Raspberry Pi touchscreen which is only 800×480 and a bit pricey compared to more modern panels. On the other hand, there’s something to be said for the standardized bolt pattern on the back of the official screen; so if you want to use a higher resolution display, be prepared to design your own mounting bracket. Extra points if you share your changes with the rest of the class.

For anyone who likes the look of the A.R.M. Terminal but isn’t too keen on being tethered to the wall, you’re in luck. [Jay] previously created the Raspberry Pi Recovery Kit which shares many of the same design principles but puts them into a ruggedized case that’s ready for life in the field.

Destroy My Vegetable Garden? Oh Hail No!

Building and maintaining a garden takes a lot of work. And unless you have a greenhouse, you’re forced to leave your hard work outside to fend for itself against the double-edged sword of the elements. Rain and sun are necessary, but hard, pelting hail is never welcome. Just ask [Nick Rogness]. He didn’t go through all the trouble of building a 12’x12′ garden and planting tasty vegetables just to have Mother Nature spew her impurity-filled ice balls on it every other night during the summertime.

[Nick] did what any of us would do: fight back with technology. His solution was to build a retractable roof that covers the garden with a heavy duty tarp. A Raspberry Pi Zero W controls pair of linear actuators via motor controllers, and [Nick] put a limit switch in each of the four corners to report on the roof status. He can run the roof manually, or control it with his phone using MQTT. The whole thing runs on a 12V marine battery that gets charged up by a solar panel, so part of the interface is dedicated to reporting the battery stats.

[Nick] ran out of time to implement all the features he wanted before the season started, but there’s always next year. He has big plans that include soil moisture sensors, rain detection sensors, and an automatic watering system that collects and uses rain water. We planted the bite-size demo video for you after the break — just wash the dirt off and you’re good to go.

Maybe someday [Nick] will create a system that can automate the entire garden, like the FarmBot. Hey, we’re just trying to plant seeds of ideas.

Continue reading “Destroy My Vegetable Garden? Oh Hail No!”

Raspberry Pi 4 And The State Of Video Game Emulation

The modern ideal of pixel art is a fallacy. Videogame art crammed onto cartridges and floppy discs were beholden to the CRT display technology of their day. Transmitting analog video within the confines of dingy yellow-RCA-connector-blur, the images were really just a suggestion of on-screen shapes rather than clearly defined graphics. Even when using the superior RGB-video-over-SCART cables, most consumer grade CRT televisions never generated more than about 400 lines, so the exacting nature of digitized plots became a fuzzy raster when traced by an electron beam. It wasn’t until the late 90s when the confluence of high resolution PC monitors, file sharing, and open source emulation software that the masses saw pixels for the sharp square blocks of color that they are.

More importantly, emulation software is not restricted to any one type of display technology any more than the strata of device it runs on. The open-source nature of videogame emulators always seems to congregate around the Lowest Common Denominator of devices, giving the widest swath of gamers the chance to play. Now, that “L.C.D.” may very well be the Raspberry Pi 4. The single board computer’s mix of tinker-friendly IO at an astonishingly affordable entry price has made it a natural home for emulators, but at fifty bucks what options unlock within the emulation scene?

Continue reading “Raspberry Pi 4 And The State Of Video Game Emulation”

Guitar Hero Controller Gets A New Musical Life

Guitar Hero was a big deal, right up until it wasn’t. The best efforts of the video game industry couldn’t resurrect the once-off rush of enthusiasm for rhythm gaming, and thrift stores around the globe are now littered with little plastic instruments. [Analog Sketchbook] decided to give one of these guitars for the Wii a new life, repurposing it as a synth controller.

The build is a straightforward one, thanks to the prevalence of modern maker solutions to electronic problems. Hooking up to the guitar is a solved problem, with an Adafruit Nunchucky breakout board allowing the Guitar Hero controller to be connected via jumper wires to the Raspberry Pi’s IO pins.

Communication is via I2C, and is easy to work with in Pure Data, running on the Pi. [Analog Sketchbook] created a patch that runs a synthesizer, controlled by the buttons and controls on the guitar itself. With this setup, you could create any number of different routines to allow the guitar to be played differently. We’d love to see a chiptune-esque arpeggio patch, or something that plays fat FM synth tones a la the Genesis, but that’s just our opinion. The sky really is the limit here, with plenty of grunt on the Pi for various forms of synthesis.

It’s a fun build that gives new life to an otherwise forgotten gaming accessory. We’ve seen them repurposed before too, as far back as 2010. Video after the break.

Continue reading “Guitar Hero Controller Gets A New Musical Life”

The Internet Controls This Monster

What’s worse than unleashing a monster on the internet? Allowing the internet to control the monster! But that’s just what [8BitsAndAByte] did, created a monster that anyone on the internet can control. Luckily for us, this monster only talks.

This is a very simple project and most of the parts are off the shelf. Hardware wise the monster’s body is made out of a plastic flowerpot; its mouth is a bit of wood that covers the top of the flowerpot; its eyes, two halves of a plastic sphere painted white with some felt for irises. And then whole thing is covered in some blue fake fur.

Electronics wise, a Raspberry Pi is running the show and handling the text-to-speech is an AIY Voice Hat. A servo fits inside the flowerpot to open and close the monster’s mouth. On the software end of things, a bit of Python has been written that waits for a bit of text, sends it off to the Voice Hat’s text-to-speech module and moves the servo to open and close the mouth. The scary part, connecting the monster to the internet, is done with remo.tv, which is some open-source code hosted on GitHub specifically for allowing control of robots over the internet.

This is a neat little project which is simple enough that kids could build one themselves. The instructions and the python script are up on the Instructables page, and you can see the monster in action at its page on remo.tv. Perhaps [8BitsAndAByte] could add a couple of these internet controlled robot arms to the monster to create a monster that could create some real havoc!

Continue reading “The Internet Controls This Monster”