Raytheon’s Analog Read-Only Memory Is Tube-Based

There are many ways of storing data in a computer’s memory, and not all of them allow the computer to write to it. For older equipment, this was often a physical limitation to the hardware itself. It’s easier and cheaper for some memory to be read-only, but if you go back really far you reach a time before even ROMs were widespread. One fascinating memory scheme is this example using a vacuum tube that stores the characters needed for a display.

[eric] over at TubeTime recently came across a Raytheon monoscope from days of yore and started figuring out how it works. The device is essentially a character display in an oscilloscope-like CRT package, but the way that it displays the characters is an interesting walk through history. The monoscope has two circuits, one which selects the character and the other determines the position on the screen. Each circuit is fed a delightfully analog sine wave, which allows the device to create essentially a scanning pattern on the screen for refreshing the display.

[eric] goes into a lot of detail on how this c.1967 device works, and it’s interesting to see how engineers were able to get working memory with their relatively limited toolset. One of the nice things about working in the analog world, though, is that it’s relatively easy to figure out how things work and start using them for all kinds of other purposes, like old analog UHF TV tuners.

Marvel At Soviet-era Smart Display’s Tiny Size

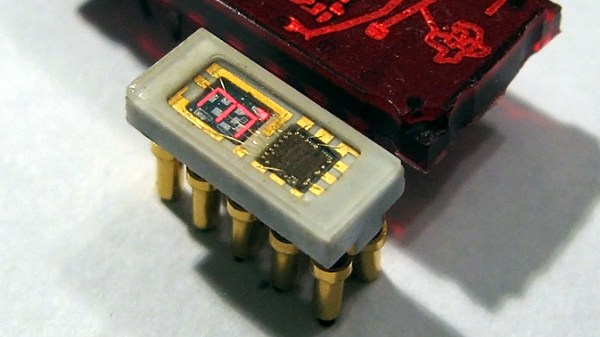
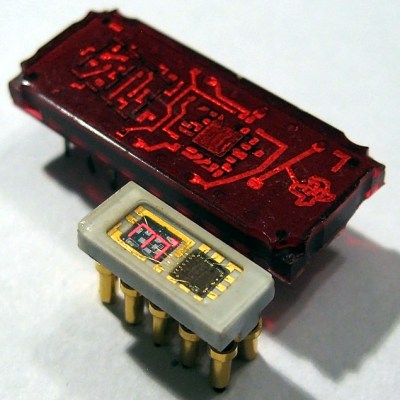
The Soviet-era 490IP1 LED. The digit is a mere 2.5 mm in height. Pictured with the Texas Instruments TIL306. [image: industrialalchemy.org]
It’s easy to assume that older components will be less integrated and bulkier than we might otherwise expect. Then something seems ahead of its time, like the teeny-tiny 490IP1 LED which was produced in the former Soviet Union. [AnubisTTP] obtained and shared images of this tiny integrated single digit LED display in which the number measures a scant 2.5 mm tall; in production it was made easier to read with an external bubble lens magnifier clipped to the outside. The red brick the 490IP1 is pictured with is the Texas Instruments TIL306, a relatively normal sized DIP component with similar functionality.

The 490IP1 is called an intelligent LED display because the package contains a decade counter and driver circuitry for the integrated seven-segment LED digit, complete with a carry signal that meant multiple displays could be chained together. It is notable not just due to its size, but because the glass cover makes it easy to see the die inside, as well as the wire-bonded pads.

It’s always fascinating to see glimpses of the development path that display technologies took. It’s easy to take a lot of it for granted today, but back before technology was where it is now, all sorts of things were tried. Examples we’ve seen in the past include the fantastic (and enormous) Eidophor projector which worked by drawing images onto a rotating disk of oil with an electron gun. On the smaller end of things, the Sphericular display used optics and image masks to wring a compact 0-9 numerical display out of only a few lamps at the back of a box.

Bringing A VIC-20 Back From An Oily Grave

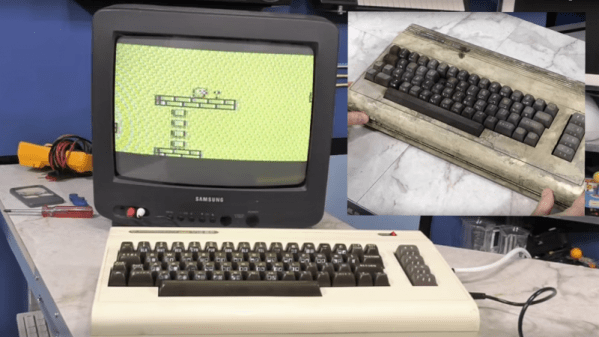
No matter which platform you’re into, retrocomputing is usually a labor of love. The obsolete, the unpopular, the downright weird – old computers of every stripe are found, restored to something like their former glory, and given a new lease on life. It’s heartwarming, in a way. But when a computer has obviously been abused, it takes a little extra effort, of a lot in the case of this oil-submerged VIC-20 restoration.

In the two-part video below, [The 8-Bit Guy] goes through the gory details of bringing this classic Commodore back from the grave. The first video shows the cosmetic rebuild, which given the filthy state of the machine was no mean feat. Cracked open, the guts were found to be filled with an oily residue; [The 8-Bit Guy] chalks that up to a past life in some kind of industrial setting, but we see it more as flood damage. Whatever the sad circumstances on the machine’s demise, the case required a workout to clean up, and it came out remarkably fresh looking. The guts needed quite a bit of cleaning too, mainly with brake cleaner to cut through the gunk.

Part two focuses on getting the machine running again, and here [The 8-Bit Guy] had his work cut out as well. With a logic probe, signal injector, and some good old-fashioned chip swapping, he was able to eliminate most of the potential problems before settling in on some RAM chips as culprits for the video problems he saw at power-up. It all worked out in the end, and the machine looks and acts like new. We’re impressed.

Maybe we shouldn’t question [The 8-Bit Guy]’s call on the VIC-20 being from an industrial setting, though. After all, the “little Amiga that could” ran a school’s HVAC system for over 30 years.

Continue reading “Bringing A VIC-20 Back From An Oily Grave”

Ditch The Tapes, Put An Android In Your Deck

While we here at Hackaday never question why an individual took on a particular project, it surely doesn’t stop our beloved readers from grabbing their pitchforks and demanding such answers in the comments. Perhaps no posts generate more of this sort of furore than the ones which feature old audio gear infused with modern hardware. In almost every case the answer is the same: the person liked the look and feel of vintage hardware, but didn’t want to be limited to antiquated media.

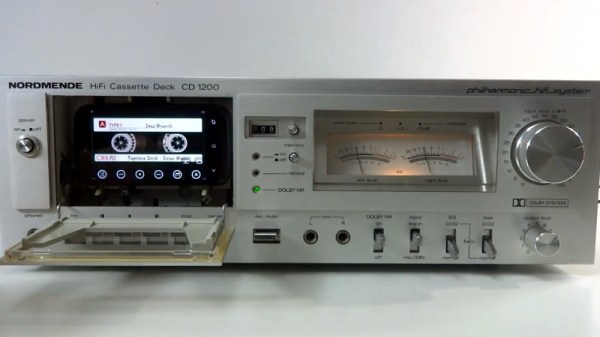
That sentiment is perhaps perfectly personified by the TapeLess Deck Project, created by [Artur Młynarz]. His creations combine vintage cassette decks with an Android phone small enough to fit behind the tape door. An Android application which mimics the look of a playing tape, complete with “hand written” track info, completes the illusion.

The output from the phone is tied into the deck where the audio signal from the tape head would have been, so the volume controls and VU meters still work as expected. Watching the meters bounce around while the animated “tape” plays on the screen really does look incredibly slick, though the effect is somewhat hindered by the fact the physical playback controls don’t seem to be implemented. Incidentally, the whole experience works better if the plastic window on the tape door is removed; that way you can utilize the touch and swipe interface [Artur] has in the software.

We’ve seen previous attempts to modernize the audio cassette experience, but they’ve tended to be more of a novelty than anything. But these decks are nice enough that you can like them non-ironically. Though if we’re talking about portable tape players, there’s only room for one in our cold mechanical hearts.

[Thanks to Nikolai for the tip]

Continue reading “Ditch The Tapes, Put An Android In Your Deck”

Making Vintage Computing Easy, The Hard Way

If you want to not take for granted how easy and seamless computers have become, take up vintage computing as a hobby. If you venture down the retro path, you’ll quickly question how anyone ever got any useful work done with computers, and the farther back you go in computer history, the more difficult everything seems to become.

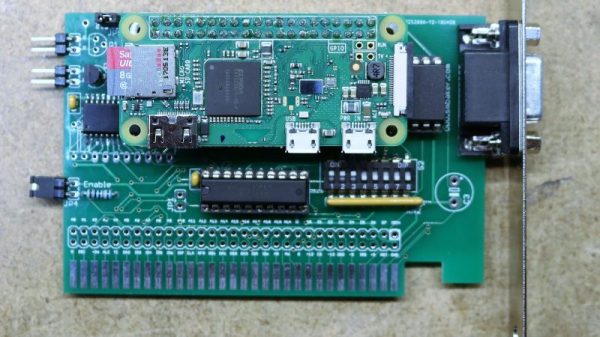
Case in point: how do you easily transfer files between a home-brew PC/XT and your modern desktop? Back in the day we did it with null modem cables or by sneaker-netting stacks of floppies, but [Scott M. Baker] found another way — putting a Raspberry Pi on the ISA bus as a virtual floppy drive. The heart of the ISA card is an IDT7130, a 1-kb RAM chip that allows simultaneous asynchronous access over dual ports. One port talks to the ISA bus and the other talks to the GPIO of the Pi, after level-shifting to make everything voltage compatible, of course. [Scott] wrote a driver for the card, plugged a Pi Zero W into the header pins, and threw a Python server together that makes local images available to the shared memory on the card. The upshot of this is that the retro machine thinks it has a floppy in it, but it’s actually a server. The video below has tons of detail and shows the card in action. Pretty slick.

[Scott]’s projects are always fun to check out, and he really seems to have the retro life dialed in. Whether it’s old jukebox hacks or a Unix-ish OS for Z80s, there’s plenty to learn. Although we’d like to see more about that PC/XT in the video; are those Nixies we spy along the front panel?

Continue reading “Making Vintage Computing Easy, The Hard Way”

Classic American Dial Phone Gets A GSM Makeover

For sturdy utilitarianism, there were few designs better than the Western Electric Model 500 desk phone. The 500 did one thing and did it well, and remained essentially unchanged from the mid-1940s until Touch Tone phones started appearing in the early 70s. That doesn’t mean it can’t have a place in the modern phone system, though, as long as you’re willing to convert it into a cellphone.

Luckily for [bicapitate], the Model 500 has plenty of room inside the case once the network interface is removed, because the new electronics take up a fair bit of space. There’s no build log per se, but the photo album makes it clear what’s going on. An Arduino reads the hook switch and dial pulses, while a Fona GSM module takes care of the cellular side of things. It looks like a small electret mic and a speaker replace the original transmitter and receiver. As a nice touch, the original ringer is used, but instead of trying to drive it electrically, [bicapitate] came up with a simple cam mechanism on a small motor. Driven at the right speed, the cam hooks the clapper arm, rings one bell, then releases it to let the clapper spring back to hit the other bell. Everything is powered by a LiPo, so it could be taken to the local coffee shop for some hipster hijinks.

We’ve seen similar retro-mods like this before using phones from all over the world; here’s a British take and one from Belgium, both using phones with equally classic lines.

[via r/arduino]

Universal Chip Analyzer: Test Old CPUs In Seconds

Collecting old CPUs and firing them up again is all the rage these days, but how do you know if they will work? For many of these ICs, which ceased production decades ago, sorting the good stuff from the defective and counterfeit is a minefield.

Testing old chips is a challenge in itself. Even if you can find the right motherboard, the slim chances of escaping the effect of time on the components (in particular, capacitor and EEPROM degradation) make a reliable test setup hard to come by.

Enter [Samuel], and the Universal Chip Analyzer (UCA). Using an FPGA to emulate the motherboard, it means the experience of testing an IC takes just a matter of seconds. Why an FPGA? Microcontrollers are simply too slow to get a full speed interface to the CPU, even one from the ’80s.

So, how does it actually test? Synthesized inside the FPGA is everything the CPU needs from the motherboard to make it tick, including ROM, RAM, bus controllers, clock generation and interrupt handling. Many testing frequencies are supported (which is helpful for spotting fakes), and if connected to a computer via USB, the UCA can check power consumption, and even benchmark the chip. We can’t begin to detail the amount of thought that’s gone into the design here, from auto-detecting data bus width to the sheer amount of models supported, but you can read more technical details here.

The Mojo v3 FPGA development board was chosen as the heart of the project, featuring an ATmega32U4 and Xilinx Spartan 6 FPGA. The wily among you will have already spotted a problem – the voltage levels used by early CPUs vary greatly (as high as 15V for an Intel 4004). [Samuel]’s ingenious solution to keep the cost down is a shield for each IC family – each with its own voltage converter.

Continue reading “Universal Chip Analyzer: Test Old CPUs In Seconds”