No Filament Needed In This Direct Extrusion 3D-Printer

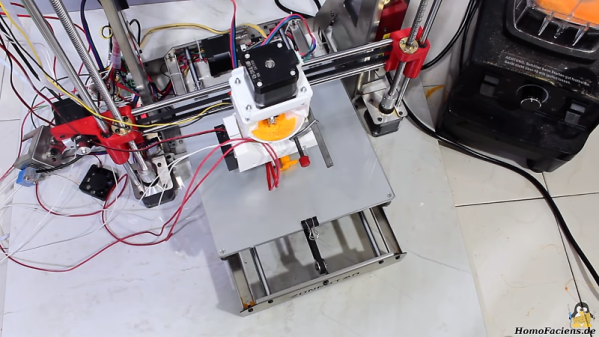
Ground plastic bits go in one end, finished 3D-prints come out the other. That’s the idea behind [HomoFaciens]’ latest build: a direct-extrusion 3D-printer. And like all of his builds, it’s made from scraps and bits most of us would throw out.

Pellet agitator is part of the extruder. All of this travels along with the print head.

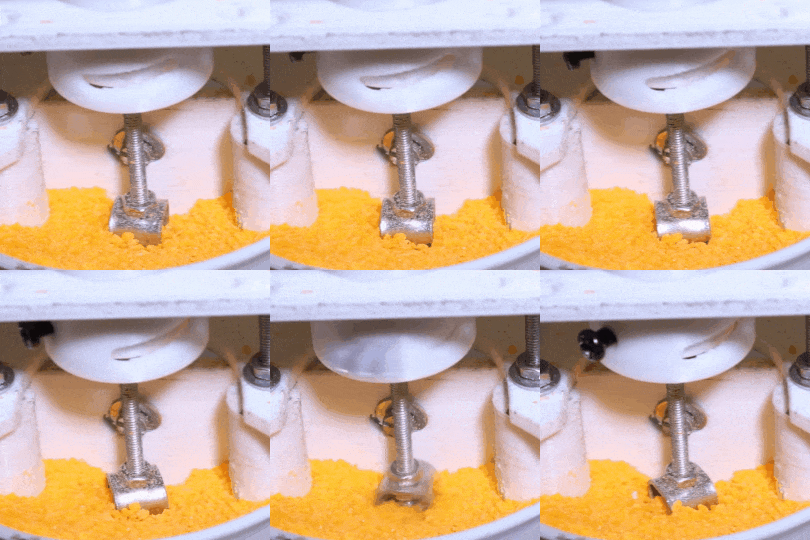
Take the extrusion screw. Like the homemade rotary encoders [HomoFaciens] is known for, it appears at first glance that there’s no way it could work. An early version was just copper wire wrapped around a threaded rod inside a Teflon tube; turned by a stepper motor, the screw did a decent job of forcing finely ground PLA from a hopper into the hot end, itself just a simple aluminum block with holes drilled into it. That worked, albeit only with basically powdered PLA. Later versions of the extruder used a plain galvanized woodscrew soldered to the end of a threaded rod, which worked with chunkier plastic bits. Paddles stir up the granules in the hopper for an even flow into the extruder, and the video below shows impressive results. We also picked up a few tips, like using engine gasket paper and exhaust sealant to insulate a hot end. And the slip coupling, intended to retract the extruder screw slightly to reduce stringing, seems brilliant but needs more work to make it practical.

It’s far from perfect, but given the inputs it’s pretty amazing, and there’s something attractive about reusing all those failed prints. It reminds us a bit of the trash printer we featured recently, which is another way to stick it to the filament man. Continue reading “No Filament Needed In This Direct Extrusion 3D-Printer”

Linear Clock Is A Different Way To Look At Time

There are usually two broad user interfaces for clocks. On the one hand you’ve got the dial clock, the default display for centuries, with its numbered face and spinning hands. The other mode is some form of digital clock, where the current time is displayed directly as alphanumeric characters. They’re both useful representations of time, but they both have their limits.

Here’s a third model — the linear clock. [Jan Derogee] came up with it thanks to the inspiration of somewhat dubious run-ins with other kinds of clocks; we feel like this introductory video was made with tongue firmly planted in cheek. Whatever the inspiration, we find this idea clever and well executed. The running gear of the clock is just a long piece of M6 threaded rod and a stepper motor. A pointer connected to a nut rides on the rod, moving as the stepper rotates it. There are scales flanking the vertical rod, with the morning hours going up the left side and afternoon hours coming down the right. The threaded rod rotates one way for twelve hours before switching to the other direction; when the rotation changes, the pointer automatically swivels to the right scale. For alarms, [Jan] has brass rods running along each scale that make contact with the pointer; when they encounter a sliding plastic insulator to break the contact, it triggers an alarm. An ESP8266 controls everything and plays the audio files for the alarm.

Unusual clocks seem to be a thing with [Jan]. His other builds include this neat phosphorescent clock and YouTube subs counter, which is sure to turn heads along with this clock.

Continue reading “Linear Clock Is A Different Way To Look At Time”

To Ferrule Or Not To Ferrule?

We recently posted about a spectacular 3D-printer fire that was thankfully caught and extinguished before spreading to the hacker’s house or injuring his family. Analyzing the remains of the printer, the hacker determined that the fire was caused when a loose grub screw let the extruder’s heater cartridge fall out and touch the ABS fan shroud. It ran full-on and set things on fire.

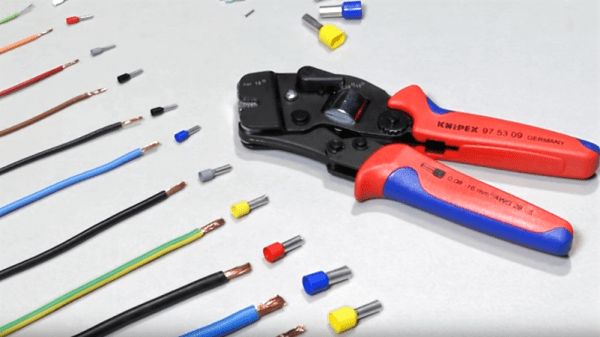
A number of us have similar 3D printers, so the comments for this article were understandably lively, but one comment stood out by listing a number of best practices for wiring, including the use of ferrules. In particular, many 3D printers connect the heated bed, which draws a lot of current, with screw terminals to the motherboard. While not the cause of the fire in the original post, melted terminal blocks are a common complaint with many DIY 3D printer kits, and one reason is that simply jamming thick stranded wire into a screw terminal and hoping for the best can result in increased resistance, and heat, at the joint. In such situations, the absolutely right thing to do is to crimp on a ferrule. So let’s talk about that.


Continue reading “To Ferrule Or Not To Ferrule?”

Screw Drive Tank Is Radio Controlled, 3D Printed

Screw drives are something that we don’t see a lot of – they’ve got an interesting set of attributes making them useful on soft ground, but woe betide you if your local transport department catches you trying to belt one of these up the freeway. After a long development period, [Ivan] has finally perfected his screw drive tank.

This is something that’s been in the works for a long time. It’s a primarily 3D-printed build, showing just how easy it is to build complex machines from scratch in this day and age of rapid prototyping. Over time, [Ivan] has experimented with different screw shapes and taken feedback from his audience on how to improve the craft. With some changes to the gearing and drive layout, the tank returned to the beach, with great success. Powered by twin brushless motors and controlled by off-the-shelf RC gear, the tank has no trouble scooting about the sand.

The project shows the value in iterative design, with [Ivan] taking time to lay out all the parts which have changed since the last revision. It’s a project that is now a five-part series, and we can’t wait to see where it goes next. There’s every chance an amphibious version could be in the works. For something on the larger scale, check out this screw drive tractor set to conquer Canada.

Continue reading “Screw Drive Tank Is Radio Controlled, 3D Printed”

Mechanisms: The Screw Thread

They hold together everything from the most delicate watch to the largest bridge. The world is literally kept from coming apart by screws and bolts, and yet we don’t often give a thought to these mechanisms. Part of that is probably because we’ve gotten so good at making them that they’re seen as cheap commodities, but the physics and engineering behind the screw thread is interesting stuff.

We all likely remember an early science lesson wherein the basic building blocks of all mechanisms laid out. The simple machines are mechanisms that use an applied force to do work, such as the inclined plane, the lever, and the pulley. For instance, an inclined plane, in the form of a splitting wedge, directs the force of blows against its flat face into a chunk of wood, forcing the wood apart.

Screw threads are another simple machine, and can be thought of as a long, gently sloped inclined plane wrapped around a cylinder. Cut a long right triangle out of paper, wrap it around a pencil starting at the big end, and the hypotenuse forms a helical ramp that looks just like a thread. Of course, for a screw thread to do any work, it has to project out more than the thickness of a piece of paper, and the shape of the projection determines the mechanical properties of the screw.

Continue reading “Mechanisms: The Screw Thread”

Indexing Chuck Not Required

Becoming accomplished with a lathe is a powerful skillset, but it’s only half of the journey. Being clever comes later, and it’s the second part of the course. Patience is in there somewhere too, but let’s focus on being clever. [TimNummy] wants a knobbed bolt with critical parameters, so he makes his own. After the break, there is a sixty-second summary of the linked video.

Making stock hardware is a beginner’s tasks, so custom hardware requires ingenuity or expensive machinery. Adding finger notches to a bolthead is arbitrary with an indexing chuck, but one isn’t available. Instead, hex stock becomes a jig, and the flat sides are utilized to hold the workpiece at six intermittent angles. We can’t argue with the results which look like a part that would cost a pretty penny.

Using material found in the workshop is what being clever is all about. Hex brass stock comes with tight tolerances on the sides and angles so why not take advantage of that?

[TimNummy] can be seen on HaD for his Jeep dome light hack and an over-engineered mailbox flag. Did you miss [Quinn Dunki]’s piece on bootstrapping precision machine tools? Go check that out!

Continue reading “Indexing Chuck Not Required”

Adding Screws To A DIY CNC Machine

When it comes to CNC machines, your SureFine has screws on its axes, and the Bodgeport does too. A shopbot has an amazing rack gear system, but when you start to dig into the small CNC routers available for under $2,000, you’ll only find belts moving a router back and forth. This isn’t to say belts won’t work — you can create a fine CNC machine with bits of rubber. However, belts stretch, they wear out, and if you want more precision screws and racks are the way to go.

The WorkBee CNC machine is the first desktop CNC router we’ve seen that uses screws instead of belts. It’s a project on OpenBuilds, and a reasonably well-configured machine is now available from ooznest for about £1,700 ($2,200 USD), or just a bit more than other CNC routers that consist of a Dewalt router and some aluminum extrusion.

The WorkBee CNC is based on the OX CNC machine, another cartesian router machine built around the OpenBuilds aluminum extrusion. The OX, while a fine machine for DIY tinkerers, uses belts. The WorkBee trades them out for screws, and should gain better accuracy, much lower maintenance, and deeper cuts. Screws are slower, yes, but do you really need that much acceleration when routing a thick piece of wood?