Pac Man Clock

Pac-Man Clock Eats Time, Not Pellets

[Bob’s] Pac-Man clock is sure to appeal to the retro geek inside of us all. With a tiny display for the time, it’s clear that this project is more about the art piece than it is about keeping the time. Pac-Man periodically opens and closes his mouth at random intervals. The EL wire adds a nice glowing touch as well.

The project runs off of a Teensy 2.0. It’s a small and inexpensive microcontroller that’s compatible with Arduino. The Teensy uses an external real-time clock module to keep accurate time. It also connects to a seven segment display board via Serial. This kept the wiring simple and made the display easy to mount. The last major component is the servo. It’s just a standard servo, mounted to a customized 3D printed mounting bracket. When the servo rotates in one direction the mouth opens, and visa versa. The frame is also outlined with blue EL wire, giving that classic Pac-Man look a little something extra.

The physical clock itself is made almost entirely from wood. [Bob] is clearly a skilled wood worker as evidenced in the build video below. The Pac-Man and ghosts are all cut on a scroll saw, although [Bob] mentions that he would have 3D printed them if his printer was large enough. Many of the components are hot glued together. The electronics are also hot glued in place. This is often a convenient mounting solution because it’s relatively strong but only semi-permanent.

[Bob] mentions that he can’t have the EL wire and the servo running at the same time. If he tries this, the Teensy ends up “running haywire” after a few minutes. He’s looking for suggestions, so if you have one be sure to leave a comment. Continue reading “Pac-Man Clock Eats Time, Not Pellets”

Inventory Report

Security Problems With Gas Station Automated Tank Gauges

[HD Moore] recently posted an article on Rapid 7’s blog about an interesting security problem. They’ve been doing some research into the security of automated tank gauges (ATGs). These devices are used at gas stations and perform various functions including monitoring fuel levels, tracking deliveries, or raising alarms. [Moore] says that ATGs are used at nearly every fueling station in the United States, but they are also used internationally. It turns out these things are often not secured properly.

Many ATG’s have a built-in serial port for programming and monitoring. Some systems also have a TCP/IP card, or even a serial to TCP/IP adapter. These cards allow technicians to monitor the system remotely. The most common TCP port used in these systems is port 10001. Some of these systems have the ability to be password protected, but Rapid 7’s findings indicate that many of them are left wide open.

The vulnerability was initial reported to Rapid 7 by [Jack Chadowitz]. He discovered the problem due to his work within the industry and developed his own web portal to help people test their own systems. [Jack] approached Rapid 7 for assistance in investigating the issue on a much larger scale.

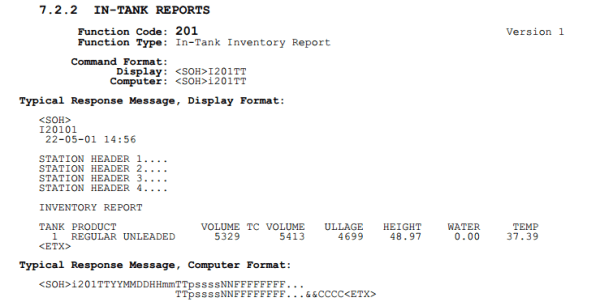
Rapid 7 then scanned every IPv4 address looking for systems with an open port 10001. Each live system discovered was then sent a “Get In-Tank Inventory Report” request. Any system vulnerable to attack would respond with the station name, address, number of tanks, and fuel types. The scan found approximately 5,800 systems online with no password set. Over 5,300 of these stations are in the United States.

Rapid 7 believes that attackers may be able to perform such functions as to reconfigure alarm thresholds, reset the system, or otherwise disrupt operation of the fuel tank. An attacker might be able to simulate false conditions that would shut down the fuel tank, making it unavailable for use. Rapid 7 does not believe this vulnerability is actively being exploited in the wild, but they caution that it would be difficult to tell the difference between an attack and a system failure. They recommend companies hide their systems behind a VPN for an additional layer of security.

[Thanks Ellery]

Tiptoe Through The Tulips In No Time With Ukule-LED

Take it from someone who has played at the guitar for over 20 years: reading sheet music can be a big stumbling block to musical enjoyment. Playing by ear is somewhat unreliable, tablature only works well if you’re already familiar with the tune and tempo, and pulling melody from chord charts is like weaving fiction from the dictionary. A lot can be said for knowing basic chord formations, but it can be difficult get your fingers to mimic what you see on the page, the screen, or someone else’s fretboard. Enter Ukule-LED, a learning tool and all-around cool project by [Raghav and Jeff] at Cornell.

Ukule-LED uses 16 NeoPixels across the first four positions of the fretboard to teach chord positions. All 16 NeoPixels are connected in series to a single pin on an ATMega1284P, which sits on a board mounted to the bottom of the uke along with power and serial. [Raghav and Jeff] set the NeoPixels below the surface so as not to interrupt playability. The uke can operate in either of two modes, ‘play’, and ‘practice’. In ‘play’ mode, the user feeds it a text file representing a song’s chords, tempo, and time signature. The LEDs show the chord changes in real-time, like a karaoke teleprompter for fingers. In ‘practice’ mode, the user enters a chord through the CLI, and the lights hold steady until they get a new assignment. Knowing which fingers to use where is up to the user.

To add another layer of learning, major chords alight in green, minor chords in red, and 7th chords in blue. These are the currently supported chord types, but the project was built with open, highly extendable Python sorcery available for download and subsequent tinkering. Go on tour after the break.

Continue reading “Tiptoe Through The Tulips In No Time With Ukule-LED”

Finding A Cheaper USB To Serial Chips

FTDI-gate wasn’t great for anybody, and now with hardware hobbyists and technological tinkerers moving away from the most popular USB to serial adapter, some other chip has to fill the void. The cheapest USB to serial chip on the market appears to be the CH340G, available for 20-40 cents apiece from the usual retailers. There is, however, almost no English documentation, and the datasheet for the CH340 family doesn’t include this chip. [Ian]’s here to help you out. He got his mitts on a few of these chips and managed to figure out the pinout and a few reference schematics. He even made an Eagle part for you. Isn’t that nice?

The CH340 series of chips do exactly what you would expect them to do: a full-speed USB device that emulates a standard serial interface, with speeds from 50bps to 2Mpbs. The chip supports 5V and 3.3V, and all the weird modem lines are supported. This chip even has an IrDA mode, because wireless communication in the 90s was exactly as rad as you remember.

With [Ian]’s help, we now have a cheap source of USB to serial chips. If you need the datasheet, here you go. The driver is a bit more difficult to find, but what you’re looking for is the CH341 family of chips. That can be found with a little bit of Google fu.

FTDI Screws Up, Backs Down

A few days ago we learned chip maker FTDI was doing some rather shady things with a new driver released on Windows Update. The new driver worked perfectly for real FTDI chips, but for counterfeit chips – and there are a lot of them – the USB PID was set to 0, rendering them inoperable with any computer. Now, a few days later, we know exactly what happened, and FTDI is backing down; the driver has been removed from Windows Update, and an updated driver will be released next week. A PC won’t be able to communicate with a counterfeit chip with the new driver, but at least it won’t soft-brick the chip.

Microsoft has since released a statement and rolled back two versions of the FTDI driver to prevent counterfeit chips from being bricked. The affected versions of the FTDI driver are 2.11.0 and 2.12.0, released on August 26, 2014. The latest version of the driver that does not have this chip bricking functionality is 2.10.0.0, released on January 27th. If you’re affected by the latest driver, rolling back the driver through the Device Manager to 2.10.0.0 will prevent counterfeit chips from being bricked. You might want to find a copy of the 2.10.0 driver; this will likely be the last version of the FTDI driver to work with counterfeit chips.

Thanks to the efforts of [marcan] over on the EEVblog forums, we know exactly how the earlier FTDI driver worked to brick counterfeit devices:

ftdi_evil

[marcan] disassembled the FTDI driver and found the source of the brick and some clever coding. The coding exploits  differences found in the silicon of counterfeit chips compared to the legit ones. In the small snippet of code decompiled by [marcan], the FTDI driver does nothing for legit chips, but writes 0 and value to make the EEPROM checksum match to counterfeit chips. It’s an extremely clever bit of code, but also clear evidence FTDI is intentionally bricking counterfeit devices.

A new FTDI driver, presumably one that will tell you a chip is fake without bricking it, will be released next week. While not an ideal outcome for everyone, at least the problem of drivers intentionally bricking devices is behind us.

Watch That Windows Update: FTDI Drivers Are Killing Fake Chips

The FTDI FT232 chip is found in thousands of electronic baubles, from Arduinos to test equipment, and more than a few bits of consumer electronics. It’s a simple chip, converting USB to a serial port, but very useful and probably one of the most cloned pieces of silicon on Earth. Thanks to a recent Windows update, all those fake FTDI chips are at risk of being bricked. This isn’t a case where fake FTDI chips won’t work if plugged into a machine running the newest FTDI driver; the latest driver bricks the fake chips, rendering them inoperable with any computer.

Reports of problems with FTDI chips surfaced early this month, with an explanation of the behavior showing up in an EEVblog forum thread. The new driver for these chips from FTDI, delivered through a recent Windows update, reprograms the USB PID to 0, something Windows, Linux, and OS X don’t like. This renders the chip inaccessible from any OS, effectively bricking any device that happens to have one of these fake FTDI serial chips.

Because the FTDI USB to UART chip is so incredibly common,  the market is flooded with clones and counterfeits. it’s very hard to tell the difference between the real and fake versions by looking at the package, but a look at the silicon reveals vast differences. The new driver for the FT232 exploits these differences, reprogramming it so it won’t work with existing drivers. It’s a bold strategy to cut down on silicon counterfeiters on the part of FTDI. A reasonable company would go after the manufacturers of fake chips, not the consumers who are most likely unaware they have a fake chip.

The workaround for this driver update is to download the FT232 config tool from the FTDI website on a WinXP or Linux box, change the PID of the fake chip, and never using the new driver on a modern Windows system. There will surely be an automated tool to fix these chips automatically, but until then, take a good look at what Windows Update is installing – it’s very hard to tell if your devices have a fake FTDI chip by just looking at them.

MicroModem, For Data Transmission Explorations

modemThem kids with those Arduinos don’t know what they’re missing. A serial connection is just too easy, and there’s so much fun to be had with low bandwidth modems. [Mark] made the MicroModem with this in mind. It’s a 1200 baud AFSK modem, capable of APRS, TCP/IP over SLIP, mesh network experimentations, and even long-range radio communication.

As the MicroModem is designed to be an introduction to digital wireless communication, it’s an extremely simple build using only 17 components on a board compatible with the Microduino. The software is built around something called MinimalProtocol1, a protocol that will be received by all other listening stations, features error correction, and automatic data compression. There’s also the ability to send TCP/IP over the link, which allowed [Mark] to load up our retro site at a blistering 1200 bps.

The code is extremely well documented, as seen on the Github for this project, with board files and even breadboard layouts included. [Mark] has three PCBs of his prototype left over, and he’s willing to give those out to other Hackaday readers who would like to give his modem a shot.