3D Printed Electric Longboard Courtesy Of Stratasys

[Tallaustin] worked at Stratasys as an intern this past summer. They let him know that he was welcome to use their fancy industrial printers as much as he’d like. Not to waste such an opportunity he promptly got to work and designed an electric longboard, printable for a mere $8,000.

Just in case the idea of a 3D printer that can print a whole longboard was causing envy. Here's a photo of a print delaminating inside of it half way. Just in case the idea of a 3D printer that can print a whole longboard was causing envy. Here's a photo of a print delaminating inside of it half way.
Just in case the idea of a 3D printer that can print a whole longboard was inducing acute envy. Here’s a photo of a print delaminating inside of it half way through.

[Tallaustin] is presumably tall, and confided to Reddit that he weighs in at 210 lbs. For those of us who have had the pleasure of designing for FDM 3D printing, we know that getting a skateboard one can actually skate on without it delaminating somewhere unexpected is pretty difficult if you weigh 80 lbs, 200+  is another category entirely. So it’s not surprising that his first version shattered within in moments of testing.

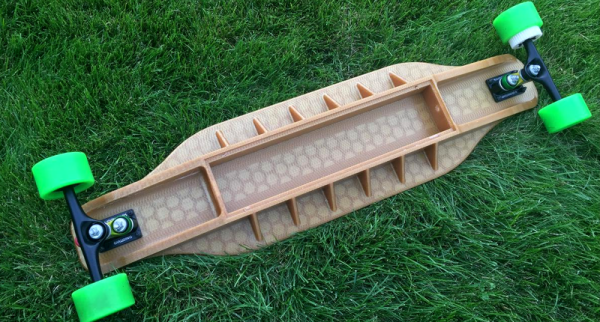
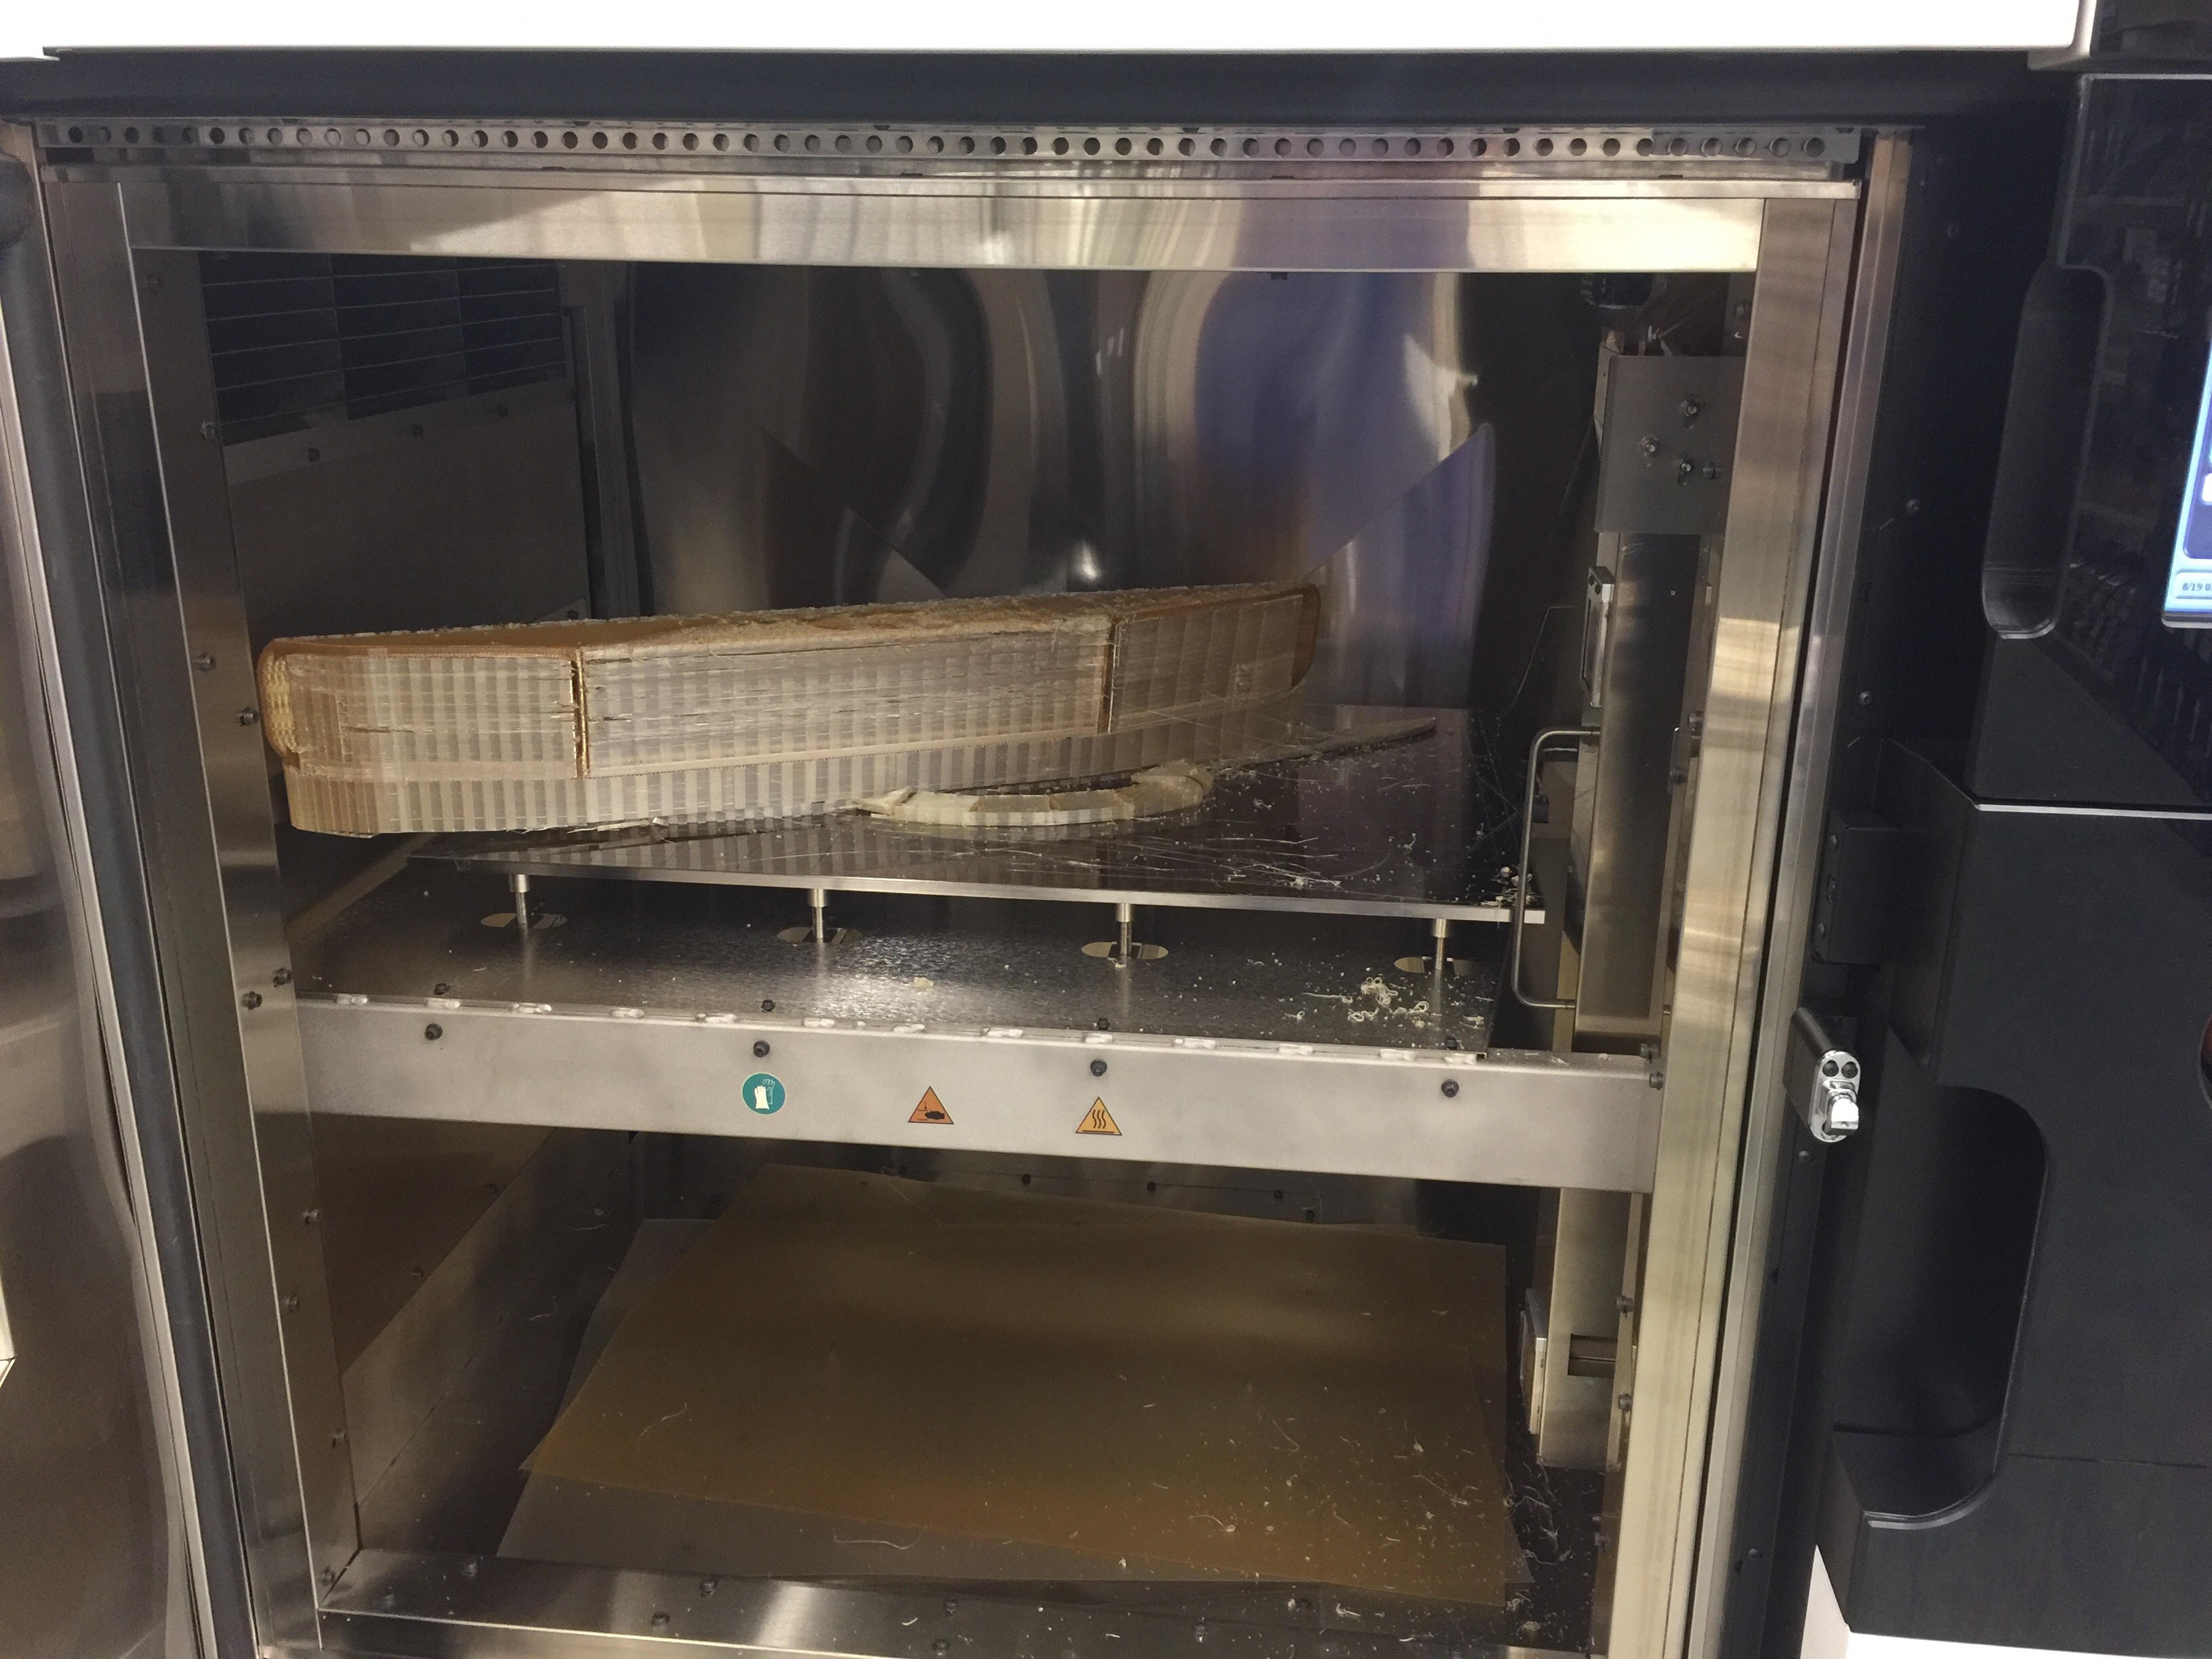
So, he went back to the drawing board. Since he had his pick of all of Stratasys’s most expensive and fine spools of plastic, he picked one of the expensivest and finest, Ultem 1010. Aside from adding a lot of ribbing and plastic, he also gave it a full rundown with some of SolidWorks’s simulation tools to see if there were any obvious weak points.

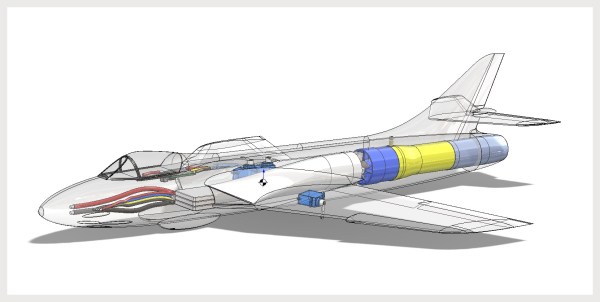
Six days of exceedingly expensive printing later, he had a working long board. The base holds some batteries, an ESC, and a 2.4 GHz transceiver. The back has a brushless motor that drives a pulley slotted into one of the wheels. The rest is standard skateboard hardware.

If you’d like to build it yourself he’s posted the design on Thingiverse. He was even nice enough to put together a version that’s printable on a plebeian printer, for a hundredth of the price.

Making An Espresso Pot In The Machine Shop

[This Old Tony] was cleaning up his metal shop after his yearly flirtation with woodworking when he found himself hankering for a nice coffee. He was, however, completely without a coffee making apparatus. We imagine there was a hasty round of consulting with his inanimate friends [Optimus Prime] and [Stefan Gotteswinter Brush] before he decided the only logical option was to make his own.

So, he brought out two chunks of aluminum from somewhere in his shop, modeled up his plan in SolidWorks, and got to work.  It was designed to be a moka style espresso pot sized around both the size of stock he had, and three purchased parts: the gasket, funnel, and filter. The base and top were cut on a combination of lathe and mill. He had some good tips on working with deep thin walled parts. He also used his CNC to cut out some parts, like the lid and handle. The spout was interesting, as it was made by building up a glob of metal using a welder and then shaped afterward.

As usual the video is of [This Old Tony]’s exceptional quality. After quite a lot of work he rinsed out most of the metal chips and WD40, packed it with coffee, and put it on the stove. Success! It wasn’t long before the black stuff was bubbling into the top chamber ready for consumption.

Nexus 7 Dashboard

Custom Double-Din Mount For Nexus 7 Carputer

Many new vehicles come with computers built into the dashboard. They can be very handy with features like GPS navigation, Bluetooth connectivity, and more. Installing a computer into an older car can sometimes be an expensive process, but [Florian] found a way to do it somewhat inexpensively using a Nexus 7 tablet.

The size of the Nexus 7 is roughly the same as a standard vehicle double-din stereo slot. It’s not perfect, but pretty close. [Florian] began by building a proof of concept mounting bracket. This model was built from sections of MDF hot glued and taped together. Plastic double-din mounting brackets were attached the sides of this new rig, allowing it to be installed into the dashboard.

Once [Florian] knew that the mounting bracket was feasible, it was time to think about power. Most in-vehicle devices are powered from the cigarette lighter adapter. [Florian] went a different direction with this build. He started with a cigarette lighter to USB power adapter, but he cut off the actual cigarette lighter plug. He ended up wiring this directly into the 12V line from the stereo’s wiring harness. This meant that the power cord could stay neatly tucked away inside of the dashboard and also leave the cigarette lighter unused.

[Florian] then wanted to replace the MDF frame with something stronger and nicer. He modeled up his idea in Solidworks to make sure the measurements would be perfect. Then the pieces were all laser cut at his local Techshop. Once assembled, the plastic mounting brackets were placed on the sides and the whole unit fit perfectly inside of the double-din slot.

When it comes to features, this van now has it all. The USB hub allows for multiple USB devices to be plugged in, meaning that Nexus only has a single wire for both power and all of the peripherals. Among these peripherals are a USB audio interface, an SD card reader, and a backup camera. There is also a Bluetooth enabled OBD2 reader that can monitor and track the car’s vitals. If this project seems familiar to you, it’s probably because we’ve seen a remarkably similar project in the past.

Dial

Dial Is A Simple And Effective Wireless Media Controller

[Patrick] was looking for an easier way to control music and movies on his computer from across the room. There is a huge amount of remote control products that could be purchased to do this, but as a hacker [Patrick] wanted to make something himself. He calls his creation, “Dial” and it’s a simple but elegant solution to the problem.

Dial looks like a small cylindrical container that sits on a flat surface. It’s actually split into a top and bottom cylinder. The bottom acts as a base and stays stationary while the top acts as a dial and a push button. The case was designed in SOLIDWORKS and printed on a 3D printer.

The Dial runs on an Arduino Pro mini with a Bluetooth module. The original prototype used Bluetooth 2.0 and required a recharge after about a day. The latest version uses the Bluetooth low energy spec and can reportedly last several weeks on a single charge. Once the LiPo battery dies, it can be recharged easily once plugged into a USB port.

The mechanical component of the dial is actually an off-the-shelf rotary encoder. The encoder included a built-in push button to make things easier. The firmware is able to detect rotation in either direction, a button press, a double press, and a press-and-hold. This gives five different possible functions.

[Patrick] wrote two pieces of software to handle interaction with the Dial. The first is a C program to deal with the Bluetooth communication. The second is actually a set of Apple scripts to actually handle interaction between the Dial and the various media programs on his computer. This allows the user to more easily write their own scripts for whatever software they want. While this may have read like a product review, the Dial is actually open source! Continue reading “Dial Is A Simple And Effective Wireless Media Controller”

3D Printing RC Airplanes That Fly: An Engineer’s Chronicle

In the past, creating accurate replicas of models and fantasy objects was a task left to the most talented of cosplayers. These props need not be functional, though. [Steve Johnstone] takes replica model-building to the next step. He’s designing and building a model airplane that flies, and he’s documenting every step of the way.

Armed with a variety of 3D printing techniques and years of model-building experience, [Steve] is taking the lid off a number of previously undocumented techniques, many of which are especially relevant to the model-builder equipped with a 3D printer in the workshop.

As he continues his video log, [Steve] takes you through each detail, evaluating the quality of both his tools and techniques. How does a Makerbot, a Formlabs, and a Shapeways print stand up against being used in the target application? [Steve] evaluates a number of his turbine prints with a rigorous variable-controlled test setup.

How can we predict the plane’s center-of-gravity before committing to a physical design? [Steve] discusses related design decisions with an in-depth exploration of his CAD design, modeled down to the battery-pack wires. Though he’s not entirely finished, [Steve’s] work serves as a great chance to “dive into the mind of the engineer,” a rare opportunity when we usually discover a project after it’s been sealed from the outside.

3D printing functional parts with hobbyist-grade printers is still a rare sight, though we’ve seen a few pleasant and surprisingly practical components. With some tips from [Steve], we may complete this video journey with a few techniques that bump us out of the “novelty” realm and into a space where we too can start reliably printing functional parts. We’re looking forward to seeing the maiden voyage.

Continue reading “3D Printing RC Airplanes That Fly: An Engineer’s Chronicle”

The FrankenCamera: Digitizing Old School Film Into Something New

After being awarded a generous sum of money from a scholarship fund, [Ollie] decided to utilize some of the cash to convert an analog camera into a device that could store photos onto an SD card. The result was this FrankenCamera that was pieced together from multiple electronic parts to create a new photograph-taking machine.

The Konica Auto S3 rangefinder was chosen due to its stellar fixed 38mm f1.8 lens and unobtrusive internal leaf shutter. A Sony NEX-5 was dismantled and the components were removed and transplanted into the Konica Auto S3. This included a circuit board, SD card slot, and battery connector.

The housing for the electronics was 3D printed from CAD files that were developed in SolidWorks. Designs were sent to a company in London who did the actual SLS printing.

Once completed, the camera operated just like any digital camera, but with the added twist of knowing that it was created from an old school camera frame with new electronic parts, making it a nice hacked together work of functional art.

Videos of the working FrankenCamera can be seen below:

Continue reading “The FrankenCamera: Digitizing Old School Film Into Something New”

3D Printering: Making A Thing With Solidworks, Part II

printering1

Last week we started to Make a Thing  in Solidworks.  We got as far as sketching and extruding the base. This week we’ll make the back portion. We’ll use some of the same techniques in Part I and a few new features such as 3D filleting and the Hole Wizard.

As you know, this is not the first ‘Making a Thing’ tutorial. In case you missed them, the softwares previously covered in the 3D Printering series are:

engineeringdrawingblack1

Continue reading “3D Printering: Making A Thing With Solidworks, Part II”