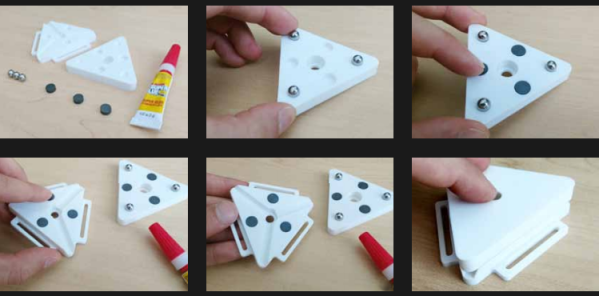
3D Printering: The Past And Future Of Prusa’s Slicer

If you own a desktop 3D printer, you’re almost certainly familiar with Slic3r. Even if the name doesn’t ring a bell, there’s an excellent chance that a program you’ve used to convert STLs into the G-code your printer can understand was using Slic3r behind the scenes in some capacity. While there have been the occasional challengers, Slic3r has remained one of the most widely used open source slicers for the better part of a decade. While some might argue that proprietary slicers have pulled ahead in some respects, it’s hard to beat free.

So when Josef Prusa announced his team’s fork of Slic3r back in 2016, it wasn’t exactly a shock. The company wanted to offer a slicer optimized for their line of 3D printers, and being big proponents of open source, it made sense they would lean heavily on what was already available in the community. The result was the aptly named “Slic3r Prusa Edition”, or as it came to be known, Slic3r PE.

Ostensibly the fork enabled Prusa to fine tune print parameters for their particular machines and implement support for products such as their Multi-Material Upgrade, but it didn’t take long for Prusa’s developers to start fixing and improving core Slic3r functionality. As both projects were released under the GNU Affero General Public License v3.0, any and all of these improvements could be backported to the original Slic3r; but doing so would take considerable time and effort, something that’s always in short supply with community developed projects.

Since Slic3r PE still produced standard G-code that any 3D printer could use, soon people started using it with their non-Prusa printers simply because it had more features. But this served only to further blur the line between the two projects, especially for new users. When issues arose, it could be hard to determine who should take responsibility for it. All the while, the gap between the two projects continued to widen.

With a new release on the horizon that promised to bring massive changes to Slic3r PE, Josef Prusa decided things had reached a tipping point. In a recent blog post, he announced that as of version 2.0, their slicer would henceforth be known as PrusaSlicer. Let’s take a look at this new slicer, and find out what it took to finally separate these two projects.

Continue reading “3D Printering: The Past And Future Of Prusa’s Slicer”

When Unfolding An STL In Software, Math Isn’t The Tricky Part

Some time ago, [Trammell Hudson] took a shot at creating a tool that unfolds 3D models in STL format and outputs a color-coded 2D pattern that can be cut out using a laser cutter. With a little bending and gluing, the 3D model can be re-created out of paper or cardboard.

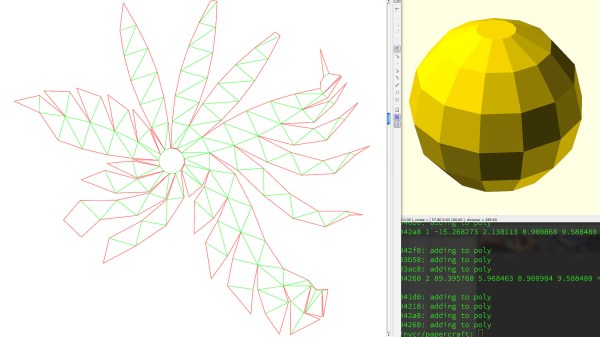
There are of course other and more full-featured tools for unfolding 3D models: Pepakura is used by many, but is not free and is Windows only. There is also a Blender extension called Paper Model that exists to export 3D shapes as paper models.

What’s interesting about [Trammell]’s project are the things he discovered while making it. The process of unfolding an STL may be conceptually simple, but the actual implementation is a bit tricky in ways that have little to do with number crunching.

For example, in a logical sense it doesn’t matter much where the software chooses to start the unfolding process, but in practice some start points yield much tighter groups of shapes that are easier to work with. Also, his software doesn’t optimize folding patterns, so sometimes the software will split a shape along a perfectly logical (but non-intuitive to a human) line and it can be difficult to figure out which pieces are supposed to attach where. The software remains in beta, but those who are interested can find it hosted on GitHub. It turns out that it’s actually quite challenging to turn a 3D model into an unfolded shape that still carries visual cues or resemblances to the original. Adding things like glue tabs in sensible places isn’t trivial, either.

Tools to unfold 3D models feature prominently in the prop-making world, and it’s only one of the several reasons an economical desktop cutter might be a useful addition to one’s workshop.

Tiny Drone Racing Gates Use Up Those Filament Scraps

Drone racing comes in different shapes and sizes, and some multirotor racers can be very small indeed. Racing means having gates to fly though, and here’s a clever DIY design by [Qgel] that uses a small 3D printed part and a segment of printer filament as the components for small-scale drone racing gates.

The base is 3D printed as a single piece and is not fussy about tolerances, meanwhile the gate itself is formed from a segment of printer filament. Size is easily adjusted, they disassemble readily, are cheap to produce, and take up very little space. In short, perfect for its intended purpose.

Races benefit from being able to measure lap time, and that led to DIY drone racing transponders, complete with a desktop client for managing the data. Not all flying is about racing, but pilots with racing skills were key to getting results in this Star Wars fan film that used drones. Finally, those who still feel that using the word “drone” to include even palm-sized racers is too broad of a use may be interested in [Brian Benchoff]’s research into the surprisingly long history of the word “drone” and its historically broad definition.

Save A Few Steps On Your Next Build With These Easy Linear Actuators

A lot of projects require linear motion, but not all of them require high-accuracy linear slides and expensive ball screws. When just a little shove for a door or the ability to pop something up out of an enclosure is all you need, finding just the right actuator can be a chore.

Unless someone has done the work for you, of course. That’s what [Ali] from PotentPrintables did with these 3D-printed linear actuators. It’s a simple rack-and-pinion design that’s suitable for light loads and comes in two sizes, supporting both the 9-g micro servos and the larger, more powerful version. Each design has a pinion that has to be glued to a servo horn, and a selection of rack lengths to suit your needs. The printed parts are nothing fancy, but seem to have material in the right places to bear the loads these actuators will encounter. [Ali] has included parts lists and build instructions in with the STL files, as well as sample Arduino code to get you started. The video below shows the actuators in action.

We’re heartened to learn that [Ali] was at least partly inspired to undertake this design by a previous Hackaday post. And we’re glad he decided to share his version; it might save us a few steps on our next build.

Continue reading “Save A Few Steps On Your Next Build With These Easy Linear Actuators”

3D Printering: When An STL File Is Not Quite Right

STL files are everywhere. When there’s something to 3D print, it’s probably going to be an STL. Which, as long as the model is good just as it is, is no trouble at all. But sooner or later there will be a model that isn’t quite right in some way and suddenly project progress hits a snag.

When models interface with other physical things, those other components may not always be exactly as the designer expected. Being mindful about such potential inconsistencies during the design phase can help prevent problems, but it’s not always avoidable. The reason it’s a problem is because an STL file represents a solid model as a finished unit; it is not really intended to be rolled back into CAD programs for additional design changes.

STL files can be edited, but just like re-modeling a component from scratch, it can be a tricky process for those who don’t live and breathe this stuff. I’ll describe a few common issues related to STLs that can hold up getting that new project together, along with ways to deal with them. Thanks to 3D printing becoming much more commonplace, basic tools are within reach of even the least CAD-aware among us.

Continue reading “3D Printering: When An STL File Is Not Quite Right”

3D Printering: Which Raspberry Pi Is Best At Slicing In Octoprint?

OctoPrint is arguably the ultimate tool for remote 3D printer control and monitoring. Whether you simply want a way to send G-Code to your printer without it being physically connected to your computer or you want to be able to monitor a print from your phone while at work, OctoPrint is what you’re looking for. The core software itself is fantastic, and the community that has sprung up around the development of OctoPrint plugins has done an incredible job expanding the basic functionality into some very impressive new territory.

RAMBo 3D controller with Pi Zero Integration

But all that is on the software side; you still need to run OctoPrint on something. Technically speaking, OctoPrint could run on more or less anything you have lying around the workshop. It’s cross platform and doesn’t need anything more exotic than a free USB port to connect to the printer, and people have run it on everything from disused Windows desktops to cheap Android smartphones. But for many, the true “home” of OctoPrint is the Raspberry Pi.

As I’ve covered previously, the Raspberry Pi does make an exceptional platform for OctoPrint. Given the small size and low energy requirements of the Pi, it’s easy to integrate into your printer. The new Prusa i3 MK3 even includes a header right on the control board where you can plug in a Raspberry Pi Zero.

But while the Raspberry Pi is more than capable of controlling a 3D printer in real-time, there has always been some debate about its suitability for slicing STL files. Even on a desktop computer, it can sometimes be a time consuming chore to take an STL file and process it down to the raw G-Code file that will command the printer’s movements.

In an effort to quantify the slicing performance on the Raspberry Pi, I thought it would be interesting to do a head-to-head slicing comparison between the Pi Zero, the ever popular Pi 3, and the newest Pi 3 B+.

Continue reading “3D Printering: Which Raspberry Pi Is Best At Slicing In Octoprint?”

Bringing Fiction To Life With 3D Printing

I print something nearly every day, and over the last few years, I’ve created hundreds of practical items. Parts to repair my car, specialized tools, scientific instruments, the list goes on and on. It’s very difficult for me to imagine going back to a time where I didn’t have the ability to rapidly create and replicate physical objects at home. I can say with complete honesty that it has been an absolutely life-changing technology for me, personally.

But to everyone else in my life, my friends and family, 3D printers are magical boxes which can produce gadgets, weapons, and characters from their favorite games and movies. Nobody wants to see the parts I made to get my girlfriend’s 1980’s Honda back on the road before she had to go to work in the morning, they want to see the Minecraft block I made for my daughter. I can’t get anyone interested in a device I made to detect the algal density of a sample of water, but they all want me to run off a set of the stones from The Fifth Element for them.

As I recently finished just such a project, a 3D printed limpet mine from Battlefield 1, I thought I would share some thoughts on the best practices for turning fiction into non-fiction.

Continue reading “Bringing Fiction To Life With 3D Printing”