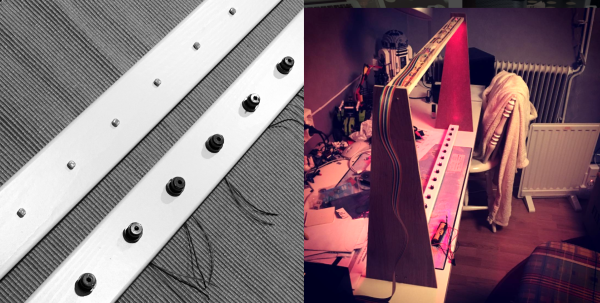
Vintage Laptop Keyboard Types Again Through USB

Have you ever had a laptop you just wish you didn’t have to retire when its specification becomes to aged for your needs? Wouldn’t it be great if you could upgrade it and keep using the physical hardware!

[Alpinedelta] has a vintage Toshiba T1000 laptop, roughly a PC-XT clone from the late 1980s. Its 80C88 processor, CGA display, and 512k of memory make it a museum-piece, but he has plans to modernise it using a LattePanda Intel Atom based single board computer.

To make that happen, he has to ensure all the Toshiba’s peripherals will talk to a modern host. Unfortunately back in the 1980s many PC clones were clones in a rather loose sense, and especially so in the laptop arena. Thus there are no handy standard PC interfaces and since USB was several years away at the time, nothing the LattePanda can talk to directly. His solution for the keyboard is to wire its matrix directly to a Teensy microcontroller that then provides a USB interface, and he’s put up a useful step-by-step Instructables guide.

There is no standard for a laptop keyboard matrix, so the first and most tedious task is to unpick its layout.This he did by identifying each trace and assigning a different rainbow colour to it, before noting down which keys appeared on it and collating the results in a spreadsheet. The different colours of wire could then be assigned to the colours of a piece of rainbow ribbon cable, and wired in sequence to the Teensy’s I/O pins. There then follows a step in the software in which he assigns the pin mappings to the lines in his spreadsheet, then the sketch can be compiled and uploaded to the Teensy. Result: a vintage keyboard now talking USB.

Using a Teensy to present a USB keyboard to the world is a well-worn path, we’ve seen it with both newer keyboards and other relics like this one from a DEC VT100.

Thanks [Brent] for the tip.

Robo-Flute Whistles MIDI

We aren’t sure this technically qualifies as music synthesis, but what else do you call a computer playing music? In this case, the computer is a Teensy, and the music comes from a common classroom instrument: a plastic recorder. The mistaken “flute” label comes from the original project. The contraption uses solenoids to operate 3D printed “fingers” and an air pump — this is much easier with a recorder since (unlike a flute) it just needs reasonable air pressure to generate sound.

automated-recorder-solenoid-driver
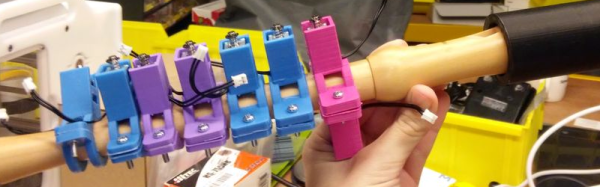
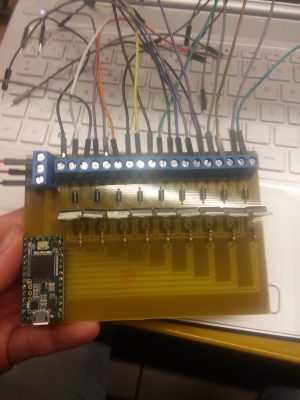
A Teensy 3.2 programmed using the Teensyduino IDE drives the solenoids. The board reads MIDI command sent over USB from a PC and translates them into the commands for this excellent driver board. It connects TIP31C transistors, along with flyback diodes, to the solenoids via a terminal strip.

On the PC, a program called Ableton sends the MIDI messages to the Teensy. MIDI message have three parts: one sets the message type and channel, another sets the velocity, and one sets the pitch. The code here only looks at the pitch.

This is one of those projects that would be a lot harder without a 3D printer. There are other ways to actuate the finger holes, but being able to make an exact-fitting bracket is very useful. Alas, we couldn’t find a video demo. If you know of one, please drop the link in the comments below.

We have seen bagpipe robots (in fact, we’ve seen several). We’ve also seen hammering shotguns into flutes, which is certainly more melodious than plowshares.

MIDI DAC For Vintage Synth Hacks

A lot of classic synthesizers rely on analog control voltages to vary parameters; this is a problem for the modern musician who may want to integrate such hardware with a MIDI setup. For just this problem, [little-scale] has built a MIDI-controllable DAC for generating control voltages.

It’s a simple enough build – a Teensy 2 is used to speak USB MIDI to a laptop. This allows the DAC to be used with just about any modern MIDI capable software. The Teensy then controls a Microchip MCP4922 over SPI to generate the requisite control voltages. [little-scale]’s video covers the basic assembly of the hardware on a breadboard, and goes on to demonstrate its use with a performance using the MIDI DAC to control a Moog Mother 32 synth. [little-scale] has also made the code available, making it easy to spin up your own.

We can see this project being indispensable to electronic musicians working with banks of modular synths, making it much easier to tie them in with automation in their DAW of choice. This isn’t the first MIDI interfacing hack we’ve seen either – check out this setup to interface an iPad to guitar pedals.

Continue reading “MIDI DAC For Vintage Synth Hacks”

Making VR Controllers From The Ground Up

VR is going to be the next big thing in five to seven years, and with that comes the problem of what the controllers will look like. The Vive and PS Move are probably close to what the first successful consumer VR setup will look like, but there’s plenty of room for experimentation. [ShinyQuagsire] decided to experiment with VR, IMUs, and computer vision and managed to make a VR controller from the ground up.

The design of [Quagsire]’s VR controller is very similar to the PS Move controller: there’s a glowy ball on top of a Wii-nunchuckish controller. There’s a good reason for this design: a sphere projected onto a 2D surface is always a circle. By illuminating a sphere with an IR LED, [Quagsire] can get an OpenCV script to hone in on the controller.

One thing that was particularly hard for [Quagsire] was building the 3D printed controllers. The first hardware revision wasn’t designed for manufacturing on a 3D printer — there were curves everywhere and very few flat areas for bed adhesion. The second hardware revision corrected these problems, but there’s a world of difference between designing a 3D printable part and being able to calibrate and tune a 3D printer. In the end, [Quagsire] sent the files off to 3DHubs to put that whole ordeal behind him.

With the case printed, [Quagsire] filled it with IMU breakouts, buttons, and a tiny joystick. The brains of the controller is a Teensy 3.2 that has plenty of examples of how to transmit gyro data and button presses over serial. With that done, the only thing left to do was to tie everything together.

The controller worked, and [Quagsire] learned a lot in the process. Making VR controllers is hard, even though a lot of the project isn’t the optimal way of doing things. For the next iteration of this project, [Quagsire] might look at wireless, but for now the entire project is up on Github for everyone to take a look at.

Barely-There GSM GPS Tracker

What’s the most un-intrusive GPS you’ve ever seen? How about for a bike? Redditor [Fyodel] has built a Teensy-based GPS/GSM tracker that slides into your bike’s handlebars and really is out of sight.

The tracker operates on T-Mobile’s 2G service band — which will enable the device to work until about 2020 — since AT/T is phasing out their service come January. Since each positioning message averages 60 bytes, an IoT data plan is sufficient for moderate usage, with plans to switch over to a narrow-band LTE service when it becomes more affordable. [Fyodel] admits that battery life isn’t ideal at the moment, but plans to make it more efficient by using a motion sensor to ensure it’s only on when it needs to be.

Continue reading “Barely-There GSM GPS Tracker”

Swear Bleep Detecting Eyebrows

Swear on broadcast television and they’re going to bleep out the audio to protect the sensibilities of the general public. Swear bleeps are fairly standardised at 1kHz, or so [mechatronicsguy] tells us. You learn something new every day.

OK, it’s not as though there’s an ISO document somewhere detailing the exact tone to use when someone says a naughty word on camera, it is far more likely that a 1kHz tone is the most likely frequency to be at hand in a studio. It’s so ubiquitous that even audio engineers with nowhere near perfect pitch can identify it, and one to which an acquaintance of ours swears years of exposure have given his ears a selective notch filter.

Armed with this information, [mechatronicsguy] created a fun project. As a fan of the [electroBOOM] Youtube channel he made a set of LED eyebrows for a picture of his bleep-prone hero, and using a Teensy with its audio and FFT libraries he made them light up whenever a 1kHz tone is detected. It’s not the most amazing of hacks, but if you find yourself in need of a smile on a chilly November morning then maybe it’ll have the same effect on you as it did with us. He’s posted a quick video of the ‘brows in action which we’ve embedded below the break.

Continue reading “Swear Bleep Detecting Eyebrows”

Stormtrooper Voice Changer Helmet Uses Teensy To Mangle Audio

Halloween has come and gone, but this DIY voice changing Star Wars Stormtrooper helmet tutorial by [Shawn Hymel] is worth a look for a number of reasons. Not only is the whole thing completely self-contained, but the voice changing is done in software thanks to the Teensy’s powerful audio filtering abilities. In addition, the Teensy also takes care of adding the iconic Stormtrooper clicks, pops, and static bursts around the voice-altered speech. Check out the video below to hear it in action.

Besides a microphone and speakers, there’s a Teensy 3.2, a low-cost add-on board for the Teensy that includes a small audio amp, a power supply… and that’s about it. There isn’t a separate WAV board or hacked MP3 player in sight.

Continue reading “Stormtrooper Voice Changer Helmet Uses Teensy To Mangle Audio”