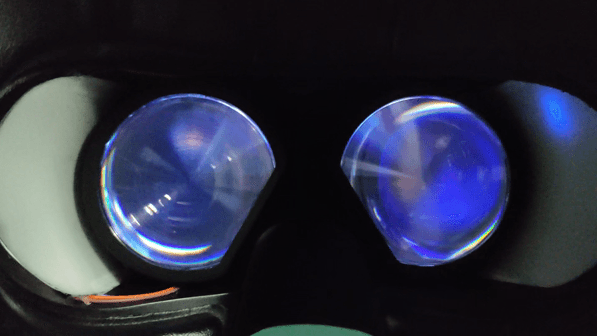
Everyone wants a wider field of view in their VR headsets, but that’s not an easy nut to crack. [Statonwest] shows there’s a way to get at least some of the immersion benefits with a bit of simple hardware thanks to the VR Ambilight.
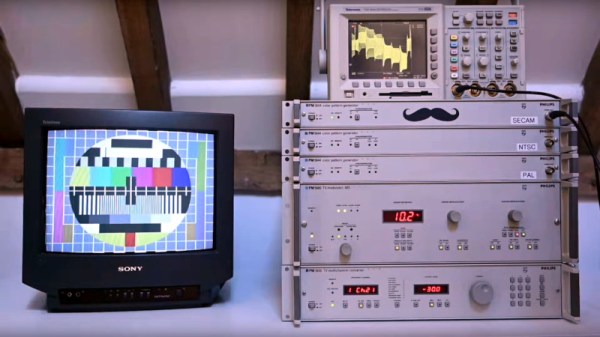
Today, acronyms such as PAL and initialisms such as NTSC are used as a lazy shorthand for 625 and 525-line video signals, but back in the days of analogue TV broadcasting they were much more than that, indeed much more than simply colour encoding schemes. They became political statements of technological prowess as nations vied with each other to demonstrate that they could provide their citizens with something essentially home-grown. In France, there was the daddy of all televisual symbols of national pride, as their SECAM system was like nothing else. [Matt’s TV Barn] took a deep dive into video standards to find out about it with an impressive rack of test pattern generation equipment.
At its simplest, a video signal consists of the black-and-while, or luminance, information to make a monochrome picture, along with a set of line and frame sync pulses. It becomes a composite video signal with the addition of a colour subcarrier at a frequency carefully selected to fall between harmonics of the line frequency and modulated in some form with the colour, or chrominance, information. In this instance, PAL is a natural progression from NTSC, having a colour subcarrier that’s amplitude modulated and with some nifty tricks using a delay line to cancel out colour shifting due to phase errors.
SECAM has the same line and frame frequency as PAL, but its colour subcarrier is frequency modulated instead of amplitude modulated. It completely avoids the NTSC and PAL phase errors by not being susceptible to them, at the cost of a more complex decoder in which the previous line’s colour information must be stored in a delay line to complete the decoding process. Any video processing equipment must also, by necessity, be more complex, something that provided the genesis of the SCART audiovisual connector standard as manufacturers opted for RGB interconnects instead. It’s even more unexpected at the transmission end, for unlike PAL or NTSC, the colour subcarrier is never absent, and to make things more French, it inverted the video modulation found in competing standards.
The video below takes us deep into the system and is well worth a watch. Meanwhile, if you fancy a further wallow in Gallic technology, peer inside a Minitel terminal.
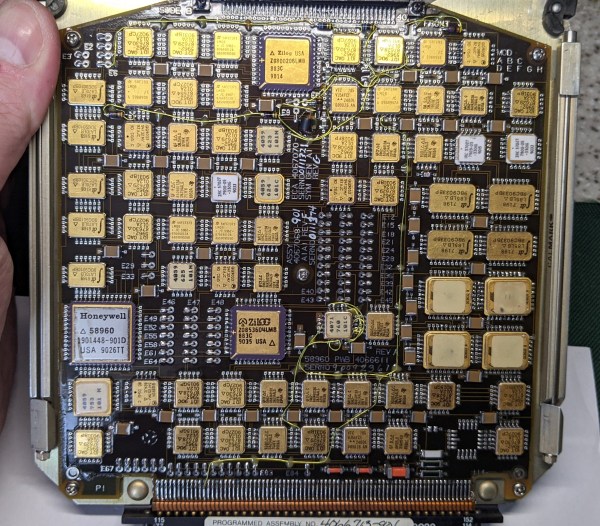
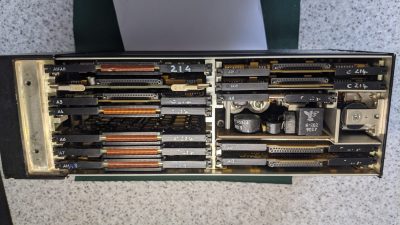
[Adrian Smith] recently scored an avionics module taken from a British Aerospace 146 airliner and ripped it open for our viewing pleasure. This particular aircraft was designed in the early 1980s when the electronics used to feed the various displays in the cockpit were very different from modern designs. This particular box is called a ‘symbol generator’ and is used to generate the various real-time video feeds that are sent to the cockpit display units. Various instruments, for example, the weather radar, feed into it, and it then reformats the video if needed, mixing in any required additional display.
Top view of the symbol generator instrument rack
There are many gold-plated chips on these boards, which indicates these may be radiation-hardened versions of familiar devices, most of which are 54xx series logic. 54xx series logic is essentially the same functionally as the corresponding 74xx series, except for the much wider operating temperature range mandated by military and, by extension, commercial aviation needs. The main CPU board appears to be based around the Intel 8086, with some Zilog Z180 compatible processors used on the two video display controller boards. We noted the Zilog Z0853604, which is their counter/timer/GPIO chip. Obviously, there are many custom ASICs produced by Honeywell as well as other special order items that you’ll never find the datasheet for. Now there’s a challenge!
Finally, we note the standard 400 Hz avionics-standard power supply, which, as some may know, is the standard operating frequency for the AC power system used within modern aircraft systems. The higher frequency (compared to 50 or 60 Hz) means the magnetic components can be physically smaller and, therefore, lighter for a given power handling capability.
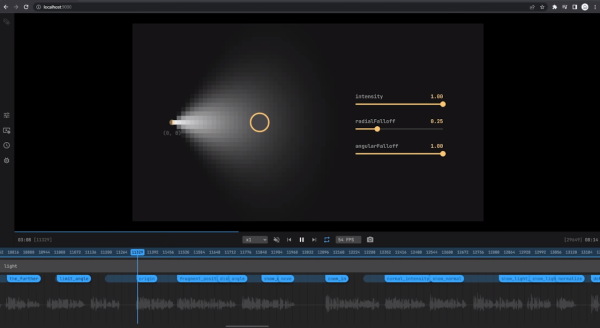
Generating videos for projects can be difficult. Not only do you have to create the thing, but you film the process and cut it together in a story that a viewer can follow. Explaining complex topics to the viewer often involves a whiteboard of some sort, but as we all know, it’s not always a perfect solution. [Jacob] was working on a video game and making videos to document the progress and built a tool called Motion Canvas to help visualize topics like custom shaders. A few months ago, he decided to release it as an open source project.
Since then, it has seen quite a few forks and GitHub forks with a lively showcase on the community Discord. Looking at the docs, it is pretty easy to see why. The interface allows you to write procedural animations using the async semantics of TypeScript while still offering the GUI interface we expect from our video editors. In particular, the signal system allows dependencies to be defined between values. The system runs in Node, and the GUI runs in your browser locally while you edit the files in your terminal/notepad/IDE. CSS and Flexbox are available as the video is rendered to a web canvas and then compiled into a video via FFMPEG. The documentation is quite extensive, and it’s a great example of a tool someone built to fit a need they had going on to become something a little more fantastic.
You used to need a lot of equipment to be a video DJ. Now you can do it all with a Raspberry Pi Zero and [cyberboy666]’s recurBOY. And if you missed out on the 1970’s video-editing psychedelia, now’s your chance to catch up – recurBOY is a modern video synth with all of the bells and whistles, and it’ll fit in your pocket. Check out [cyberboy666]’s demo video if you don’t yet know what you’re getting into. (Embedded below.)
RecurBOY has four modes: video, shader, effects, and external input, and each of these is significantly cooler than the previous. Video mode plays videos straight off of the SD card through the recurBOY’s composite video out. Shader mode lets you program your own shaders using the GLES shader dialect for resource-constrained devices. And this is where the various knobs and buttons come in. You can program the various shader routines to read any of the pots as input, allowing you to tweak the graphics demos on the fly.
Effects mode overlays your shaders on the video that’s playing, and external mode allows you to plug in a USB video capture card or a webcam so you can do all that same mangling with a live camera feed. And these two modes are where it gets awesome. The shader effects in the demo video cover all of the analog classics – including bloom and RGB separation – but also some distinctly digital effects. And again, you can tweak them all live with the knobs. Or plug in a MIDI controller and control it all externally. What hasn’t he thought of?
Old school analog video effects are really fun, and recurBOY brings them to you with the flexibility of modern shader coding. What’s not to love? If you want to see the pinnacle of the pre-digital era, that would be the Scanimate. For a video synth that integrates with your audio synth, check out Hypno. And if glitching the video is more your style, you can hijack the RAM of a VGA/composite converter.
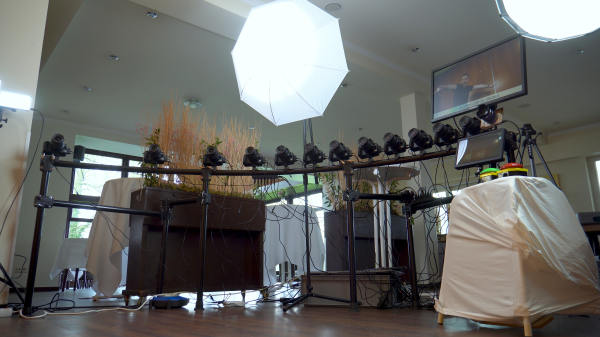
[Sebastian Staacks] built a video booth for his wedding, and the setup was so popular with family, that it was only fitting to do one better and make some improvements to the setup, Matrix-style. The “bullet time” video effect was introduced by the classic movie franchise and makes for a splendid video transition effect for video montages.
Hardware-wise, the effect is pretty expensive, requiring many cameras at various angles to be simultaneously triggered, in order to capture the subject in a fixed pose with a rotating camera. Essentially you need as many cameras as frames in the sequence, so even at 24 frames per second (FPS), that’s a lot of hardware. [Sebastian] cheated a bit, and used a single front-facing camera for the bulk of the video recording, and twelve individual DSLRs covering approximately 90 degrees of rotation for the transition. More than that is likely impractical (not to mention rather expensive) for an automated setup used in as chaotic an environment as a wedding reception! So, the video effect is quite the same as in the movies, as this is a fixed pose, but it still looks pretty good.
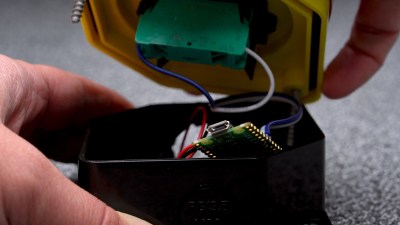
A Pico-W hidden in there providing a BT connected interface button
[Sebastian] did consider going down the Raspberry Pi plus Pi-cam route, but once you add in a lens and the hassle of the casing and mounting hardware, not to mention availability and cost, snagging a pile of old DLSRs looks quite attractive. Connectivity to the camera is a simple 3.5 mm jack for the focus and trigger inputs, with frames read out via a USB connection.
For practical deployment, the camera batteries were replaced with battery eliminator adapters which step-up the 5 V from the USB connection to the 7.4 V the cameras need, but the current spike produced by the coordinated trigger of all twelve cameras overwhelmed any power supply available. The solution, to be practical, and not at all elegant, is to just have lots of power supplies hidden in a box. Sometimes you’ve just got a job to do.
Reproducing this at home might be a bit awkward unless you have exactly the same hardware to hand, but the principles are sound, and there are a few interesting details to dig into, if you were so inclined.
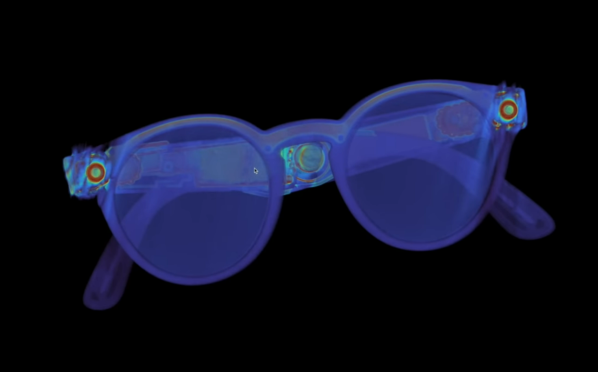
If you’re willing to spend $200 USD on nothing more than 100 grams of plastic, there are a few trendy sunglasses brands that are ready to take your money before you have time to think twice. Sure, you can get a pair of sunglasses for an order of magnitude less money that do the exact same job, but the real value is in the brand stamped into the plastic and not necessarily the sunglasses themselves. Not so with this pair of Ray-Bans, though. Unlike most of their offerings, these contain a little bit more than a few bits of stylish plastic and [Becky Stern] is here to show us what’s hidden inside.
At first glance, the glasses don’t seem to be anything other than a normal pair of sunglasses, if a bit bulky But on closer inspection they hide a pair of cameras and a few other bits of electronics similar to the Google Glass, but much more subtle. The teardown demonstrates that these are not intended to be user-repairable devices, and might not be repairable at all, as even removing the hinges broke the flexible PCBs behind them. A rotary tool was needed to remove the circuit boards from the ear pieces, and a bench vice to remove the camera modules from the front frame. We can presume these glasses will not be put back together after this process.
Hidden away inside is a pair of cameras, a Snapdragon quad-core processor, capacitive touch sensors, an amplifier for a set of speakers. Mostly this is to support the recording of video and playback of audio, and not any sort of augmented reality system like Google Glass attempted to create. There are some concerning ties with Facebook associated with this product as well which will be a red flag for plenty of us around here, but besides the privacy issues, lack of repairability, and lack of features, we’d describe it as marginally less useful as an entry-level smartwatch. Of course, Google Glass had its own set of privacy-related issues too, which we saw some clever projects solve in unique ways.