Thanks to Home Assistant, automating the various systems that run your home is easier than ever. But you still need to make a connection between those systems and your Home Assistant setup, which can be tricky if the manufacturer didn’t have this use case in mind. When [Simon] wanted to automate his home heating system, he discovered that most Home Assistant-enabled thermostats that he could find didn’t support his two separate heating zones connected to a single boiler. The easiest solution turned out to be to design his own.
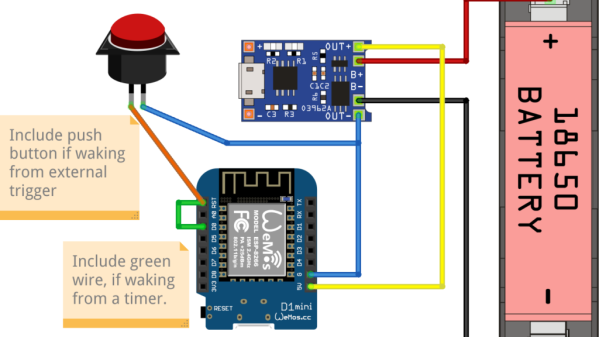
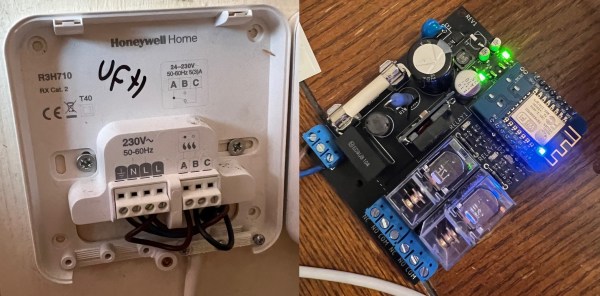
The original heating system consisted of two control boxes that each had a 230 V mains connection coming in and a “request heat” control line going to the boiler. [Simon] considered replacing these with a simple off-the-shelf ESP8266 relay board and a 12 V power supply, but figured this would look messy and take up quite a bit of space. So he bought a neat DIN-rail mounted enclosure instead, and designed a custom PCB to fit inside it.
 The PCB holds a Wemos D1 Mini connected to two relays that switch the two heating circuits. The D1 runs ESPhome and needs just a few lines of configuration to connect it to [Simon]’s home network. There’s no separate power supply — the 230 V line is connected directly to a 12 V DC power module mounted on the PCB, so the new system is plug-and-play compatible with the old.
Complete PCB design files are available on [Simon]’s website and GitHub page. There are several other ways to make custom thermostats for your home, with an Arduino for example. If you’re interested in repairing your own heating system, or want to optimize it even further, there’s a whole community out there to help you.