Hackaday Retro Edition: Pen Computing

Although we’re well past the heyday of ‘pen computing’, and seemingly into a retro revival with laptops and tablets that come with Wacom styluses and digitizers, this doesn’t mean the pen computers of old weren’t useful. While they were mostly used for industrial applications, they were useful and some of the first practical applications of touch screen displays.

[Jason] got his hand on one of these ruggedized handheld PCs – specifically, an Itronix T5200. This three-pound mini notebook runs Windows CE Handheld PC Edition 3.01. The specs include a 74MHz RISC processor, 16 MB of RAM, 16MB of Flash, and a 7.3 inch monochrome touch screen with 640×240 resolution. It’s odd and old: when closed, it’s over two inches thick. You’ll be hard pressed to find a modern laptop that thick. [Jason]’s hardware is a pre-production version.

Unlike a lot of retro submissions that have somehow managed to pull up the Hackaday Retro Edition on old hardware, this machine actually has a browser. It’s old, it’s clunky, but it works. There are three options for getting this old computer up on the Internet – either IrDA, an RJ11 modem port, or RS232. [Jason] didn’t tell us which port he used to load up the retro edition, but he did send in a few pictures. You can check those out below.

Continue reading “Hackaday Retro Edition: Pen Computing”

Handheld Linux Terminal Gets An A+

Are you all thumbs when it comes to Linux? If you follow [Chris]’s guide to building a handheld Linux terminal, that particular condition could work to your advantage. His pocket-sized machine is perfect for practicing command line-fu and honing your scripting skills on the go.

[Chris]’s creation is built around a Raspberry Pi A+ that he stripped to its essentials by removing the GPIO pins, HDMI and USB ports, the audio port, and the camera and display ports. It’s housed in a pair of plastic 2.5″ hard drive enclosures connected with a piano hinge, making it about the size of a Nintendo DS. The display is an Adafruit PiTFT touch screen and in order to save space, he soldered it directly to the Pi.

The 2.4GHz wireless thumb keyboard has all the special characters necessary for Linuxing, but the four USB ports from a dismantled hub provide flexibility. If [Chris] were to make another one, he might use this slightly larger screen from Tindie and add some charging ports to the case.

[Thanks for the tip, ar0cketman]

Arduino Reads Punch Cards

Punch cards were a standard form of program and data storage for decades, but you’d never know it by looking around today. Card punches and even readers are becoming rare and expensive. Sometimes it takes a bit of hacking [YouTube link] to get that old iron running again!

[Antiquekid3] managed to score an old punch card reader on Ebay, but didn’t have a way to interface with it. The reader turned out to be a Documation M-1000-L. After a bit of searching, [Antiquekid3] managed to find the manual [PDF link] on BitSavers. It turns out that the Documation reader used a discrete output for each row of data. One would think the Documation reader would be a perfect fit for the PDP-8 lurking in the background of [Antiquekid3’s] video, but unfortunately the ‘8 lacks the necessary OMNIBUS card to interface with a reader.

Undaunted, [Antiquekid3] threw some modern hardware into the mix, and used an Arduino Uno as a Documation to Serial interface. The Arduino had plenty of I/O to wire up with the card reader’s interface. It also had a serial interface which made outputting data a snap. The ATmega328 even had enough power to translate each card from one of IBM’s many keypunch formats to serial.

[Antiquekid3’s] test deck of cards turned out to be a floating point data set. Plotting the data with a spreadsheet results in a nice linear set of data points. Of course, no one knows what the data is supposed to mean! Want more punch card goodness? Check out this tweeting punch card reader, or this Arduino based reader which uses LEGO and a digital camera to coax the data from the paper.

Continue reading “Arduino Reads Punch Cards”

Husband Uses MRI Images To 3D Print Wife’s Skull And Tumor

[Michael Balzer] shows us that you are your own best advocate when it comes to medical care – having the ability to print models of your own tumors is a bonus. [Michael’s] wife, Pamela, had been recovering from a thyroidectomy when she started getting headaches. She sought a second opinion after the first radiologist dismissed the MRI scans of her head – and learned she had a 3 cm tumor, a meningioma, behind her left eye.  [Michael], host of All Things 3D, asked for the DICOM files (standard medical image format) from her MRI.  When Pamela went for a follow-up, it looked like the tumor had grown aggressively; this was a false alarm. When [Michael] compared the two sets of DICOM images in Photoshop, the second MRI did not truly show the tumor had grown. It had only looked that way because the radiologist had taken the scan at a different angle! Needless to say, the couple was not pleased with this misdiagnosis.

However, the meningioma was still causing serious problems for Pamela. She was at risk of losing her sight, so she started researching the surgery required to remove the tumor. The most common surgery is a craniotomy: the skull is sawed open and the brain physically lifted in order to access the tumor below it. Not surprisingly, this carries a high risk of permanent damage to any nerves leading to loss of smell, taste, or sight if the brain is moved the wrong way. Pamela decided to look for an alternative surgery that was less invasive. [Michael] created a 3D print of her skull and meningioma from her MRIs. He used InVesalius, free software designed to convert the 2D DICOM files into 3D images. He then uploaded the 3D rendered skull to Sketchfab, sharing it with potential neurologists. Once a neurologist was found that was willing to consider an alternative surgery, [Michael] printed the skull and sent it to the doctor. The print was integral in planning out the novel procedure, in which a micro drill was inserted through the left eyelid to access the tumor. In the end, 95% of the tumor was removed with minimal scarring, and her eyesight was spared.

If you want to print your own MRI or CT scans, whether for medical use or to make a cool mug with your own mug, there are quite a few programs out there that can help. Besides the aforementioned InVesalius, there is DeVIDE, Seg3D, ImageVis3D, and MeshLab or MeshMixer.

Twisted String Actuators

[Travis] tells us about a neat actuator concept that’s as old as dirt. It’s capable of lifting 7kg when powered by a pager motor, and the only real component is a piece of string.

The concept behind the twisted string actuator, as it’s known to academia, is as simple as putting a motor on one end of a piece of string, tying the other end off to a load, and putting a few twists in the string. It’s an amazingly simple concept that has been known and used for thousands of years: ballistas and bow-string fire starters use the same theory.

Although the concept of a twisted string actuator is intuitively known by anyone over the age of six, there aren’t many studies and even fewer projects that use this extremely high gear ratio, low power, and very cheap form of linear motion. A study from 2012 (PDF) put some empirical data behind this simple device. The takeaway from this study is that tension on the string doesn’t matter, and more strands or larger diameter strands means the actuator shrinks with a fewer number of turns. Fewer strands and smaller diameter strands take more turns to shrink to the same length.

As for useful applications of these twisted string actuators, there are a few projects that have used these systems in anthropomorphic hands and elbows. No surprise there, really; strings don’t take up much space, and they work just like muscles and tendons do in the human body.

Thanks [ar0cketman] for the link.

Vacuum Tube

Vacuum Tube Repair After A Spectacular Failure

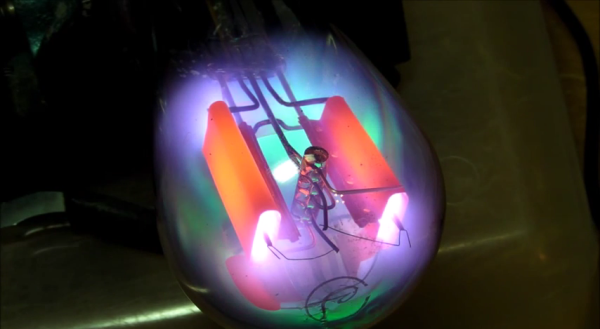
[Eric] has an Atwater Kent 55C AM radio from the early 1900’s. He’s been trying to restore the radio to proper working condition. His most recent pain has been with the rectifier tube. The tube is supposed to have a complete vacuum inside, but that’s not the case here. When the tube is powered up, it glows a beautiful violet color. It may look pretty, but that’s indicative that gas has leaked into the tube. It needed to be replaced.

[Eric] had a tube that would serve as a good replacement, but it’s plug didn’t fit the socket properly. He was going to have to use this old broken tube to make an adapter. Rather than just tearing the old tube apart, he decided to have some fun with it first. He hooked it up to a variac, an ammeter, and a volt meter. Then he slowly increased the voltage to see what would happen. The result was visually stunning.

The tube starts out with the same violet/blue glowing [Eric] experienced previously. As the voltage increases, it gets more and more intense. Eventually we start to see some green colors mixing in with the violets. [Eric’s] reaction to this unexpected result is priceless. As the tube gets increasingly hot, the anode starts glowing an orange-red color. Finally, the filament starts to crackle like a sparkler before the tube just gives up and completely fails.

After the light show, [Eric] moves on to replacing the tube. He begins by tapping on the old tube’s socket with the end of a screwdriver. After much tapping, the glass starts to come lose from the socket. After a bit of wiggling and twisting the tube finally came free from the socket. [Eric] luckily had an unused octal socket that fit perfectly inside of the old socket. All he needed to do to build his adapter was to connect the four pins from the old adapter to the proper pins on the octal socket. Piece of cake.

…Or so [Eric] thought. After testing some new tubes with a tube tester, he realized he had soldered all four pins incorrectly. On top of that, he had super glued the adapter together. He eventually got the two pieces apart. This time he removed all of the unused pins from the octal socket so he wouldn’t get it wrong. Another run on the tube tester confirmed that everything looked good. After plugging the tube into the radio, it worked just as expected

If you need fabrication rather than repair, we’ve got you covered there as well. Check out [Charles Alexanian’s] process for making new vacuum tubes in his garage. Now if you just have too darn many of them around, you can always decorate your pad with ’em.

Continue reading “Vacuum Tube Repair After A Spectacular Failure”

Dial

Dial Is A Simple And Effective Wireless Media Controller

[Patrick] was looking for an easier way to control music and movies on his computer from across the room. There is a huge amount of remote control products that could be purchased to do this, but as a hacker [Patrick] wanted to make something himself. He calls his creation, “Dial” and it’s a simple but elegant solution to the problem.

Dial looks like a small cylindrical container that sits on a flat surface. It’s actually split into a top and bottom cylinder. The bottom acts as a base and stays stationary while the top acts as a dial and a push button. The case was designed in SOLIDWORKS and printed on a 3D printer.

The Dial runs on an Arduino Pro mini with a Bluetooth module. The original prototype used Bluetooth 2.0 and required a recharge after about a day. The latest version uses the Bluetooth low energy spec and can reportedly last several weeks on a single charge. Once the LiPo battery dies, it can be recharged easily once plugged into a USB port.

The mechanical component of the dial is actually an off-the-shelf rotary encoder. The encoder included a built-in push button to make things easier. The firmware is able to detect rotation in either direction, a button press, a double press, and a press-and-hold. This gives five different possible functions.

[Patrick] wrote two pieces of software to handle interaction with the Dial. The first is a C program to deal with the Bluetooth communication. The second is actually a set of Apple scripts to actually handle interaction between the Dial and the various media programs on his computer. This allows the user to more easily write their own scripts for whatever software they want. While this may have read like a product review, the Dial is actually open source! Continue reading “Dial Is A Simple And Effective Wireless Media Controller”