A Cloned Bluetooth Tracker Meets Its Maker

The holidays bring us many things. Family and friends are a given, as is the grand meal in which we invariably overindulge. It’s a chance for decades old songs and movies to somehow manage to bubble back up to the surface, and occasionally a little goodwill even slips in here or there. But perhaps above all, the holidays are a time for every retailer to stock themselves to the rafters with stuff. Do you need it? No. Do they want it? No. But it’s there on display anyway, and you’re almost certainly going to buy it.

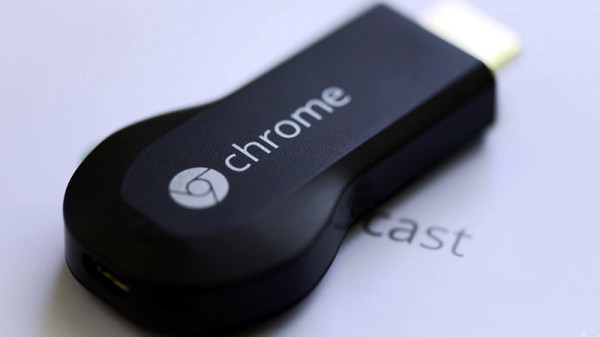
Which is precisely how I came to purchase a two pack of Bluetooth Low Energy (BLE) “trackers” for the princely sum of $10 USD. I didn’t expect much out of them for $5 each, but as this seemed an exceptionally low price for such technology in a brick and mortar store, I couldn’t resist. Plus there was something familiar about the look of the tracker that I couldn’t quite put my finger on while I was still in the store.

That vague feeling of recollection sent me digging through my parts bin as soon as I got home, convinced that I had seen something among the detritus that reminded me of my latest prize. Sure enough, I found a “Cube” Bluetooth tracker which, ironically, I had received as a Christmas gift some years ago. Putting them side by side, it was clear that the design of these “itek” trackers took more than a little inspiration from the better known (and five times as expensive) product.

The Cube was a bit thicker, but otherwise the shape, size, and even button placement on the itek was nearly identical. Reading through their respective manuals, the capabilities also seemed in perfect parity, down to being able to use the button on the device as a remote camera control for your smartphone. Which got me thinking: just how similar would these two devices be internally? Clearly they looked and functioned the same, but would they be built the same as well? They would have to cut costs somewhere.

Determined to find out how a company can put out what for all the world looks like a mirror image of a competitor’s device while undercutting them by such a large margin, I cracked both trackers open to get a bit more familiar with what makes them tick. What I found on closer inspection of these two similar gadgets is perhaps best summarized by that age old cautionary adage: “Don’t judge a book by its cover.”

Continue reading “A Cloned Bluetooth Tracker Meets Its Maker”

Hold That Cam Belt Pulley In Place With This Neat CNC Work

The modern overhead-cam internal combustion engine is a mechanical masterpiece of hundreds of parts in perfect synchronisation. In many cases it depends for that synchronisation upon a flexible toothed belt, and those of you who have replaced one of these belts will know the exacting requirements for keeping the various pulleys in perfect alignment during the process.

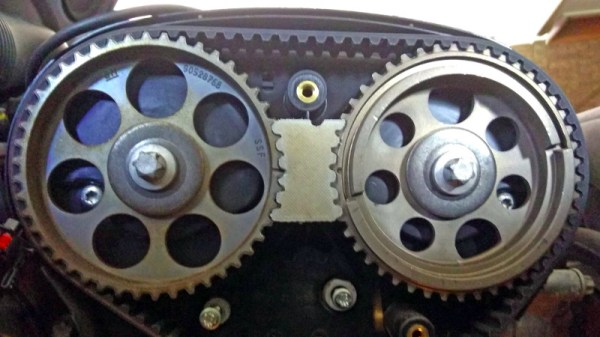
[Greolt] had this problem with a dual overhead-cam engine, particularly that the shafts would spring out of alignment on removal of the belt. The solution was one of those beautifully simple hacks that use high-tech methods to make something that is not high-tech in itself but which solves a problem perfectly. He produced a CNC-machined block of HDPE to sit between the two toothed pulleys that was machined exactly to their profiles and which once inserted kept them securely and exactly in alignment.

It’s likely that the same job could easily be done with a 3D printer, and indeed we’ve seen it done with a small piece of soft wood and a hammer. But there is something very elegant indeed about this particular incarnation that we like, it may not be the most complex of the hacks you’ll see here but we’re sure you’ll agree if you’ve ever changed a cambelt, it’s a pretty useful one.

Of course, once you’ve changed that belt, perhaps you’d like to do something with the old one.

Thanks [Brian Moran] for the tip.

UPnP, Vulnerability As A Feature That Just Won’t Die

UPnP — in a perfect world it would have been the answer to many connectivity headaches as we add more devices to our home networks. But in practice it the cause of a lot of headaches when it comes to keeping those networks secure.

It’s likely that many Hackaday readers provide some form of technical support to relatives or friends. We’ll help sort out Mom’s desktop and email gripes, and we’ll set up her new router and lock it down as best we can to minimise the chance of the bad guys causing her problems. Probably one of the first things we’ll have all done is something that’s old news in our community; to ensure that a notorious vulnerability exposed to the outside world is plugged, we disable UPnP on whatever cable modem or ADSL router her provider supplied.

Continue reading “UPnP, Vulnerability As A Feature That Just Won’t Die”

ULX3S: An Open-Source Lattice ECP5 FPGA PCB

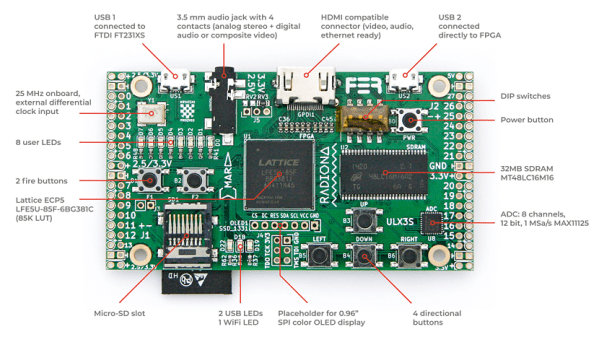
The hackers over at Radiona.org, a Zagreb Makerspace, have been hard at work designing the ULX3S, an open-source development board for LATTICE ECP5 FPGAs. This board might help make 2019 the Year of the Hacker FPGA, whose occurrence has been predicted once again after not quite materializing in 2018. Even a quick look at the board and the open-source development surrounding it hints that this time might be different.

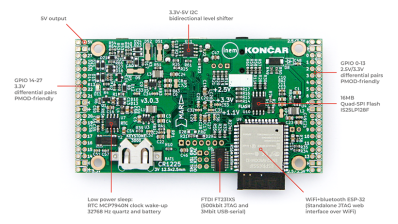
Bottom side of ULX3S PCB

The ULX3S was developed primarily as an educational tool for undergraduate-level digital logic classes. As such, it falls into the “kitchen sink” category of FPGA boards, which include a comprehensive suite of peripherals and devices for development, as opposed to more bare-bones FPGA breakouts. The board includes 32 MB SDRAM, WiFi via an ESP-32 (supporting over-the-air update), a connector for an SPI OLED display, USB, HDMI, a microSD slot, eight channels of 12-bit ADC (1 MS/s), a real-time-clock, 56 GPIO pins, six buttons, 11 LEDs, and an onboard antenna for 433 MHz FM/ASK. This seems like a great set of I/Os for both students and anyone else starting FPGA development.

The ULX3S supports members of the Lattice ECP5 FPGA family, ranging from the 12F (12 k LUTs) to the 85F (84 k LUTs). What can you do with this much FPGA horsepower? Have a look at the long list of examples curated in the ULX3S Links repo. There, you’ll find code from retro-computing to retro-gaming, the usual LED and HDMI demos, and even Linux running on a mor1kx OpenRISC core. Maybe the most interesting links in the repo, however, are those that show how to program the FPGA with a completely open-source toolchain. Proprietary toolchains are the last link keeping some vendor’s FPGAs from wider adoption in the OSHW community, and it’s great to see people chipping away at them.

The board itself is completely open-source. In the GitHub repo, you’ll find the KiCAD 5 design files for the PCB released under an MIT-style license. Even more impressive is the advice in the README, which not only welcomes independent production of the boards, but gives some solid advice on dealing with PCBA vendors during manufacture. Our own advice is to do the right thing and offer the developers a cut if you decide to independently market this board, even though you aren’t required to by the license. If want one, but don’t want to manufacture your own, you can contact the developers using the email or gitter links at the bottom of the ULX3S page: they’re currently doing a small production run.

The Radiona Org folks have created a few videos showcasing example code. Check out how the on-board ESP-32 runs a web server that can load bitstreams into the FPGA (in this case for some retro-gaming), after the break.

Continue reading “ULX3S: An Open-Source Lattice ECP5 FPGA PCB”

Project Shows How To Use Machine Learning To Detect Pedestrians

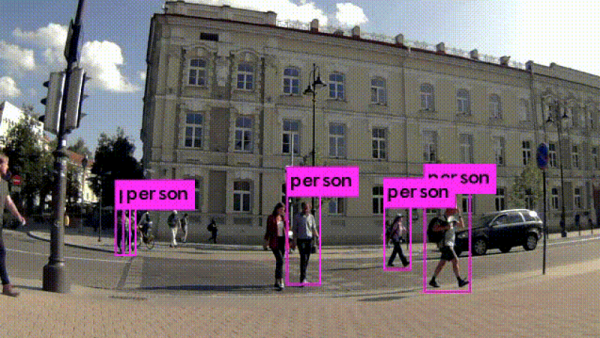
Most people are familiar with the idea that machine learning can be used to detect things like objects or people, but for anyone who’s not clear on how that process actually works should check out [Kurokesu]’s example project for detecting pedestrians. It goes into detail on exactly what software is used, how it is configured, and how to train with a dataset.

The application uses a USB camera and the back end work is done with Darknet, which is an open source framework for neural networks. Running on that framework is the YOLO (You Only Look Once) real-time object detection system. To get useful results, the system must be trained on large amounts of sample data. [Kurokesu] explains that while pre-trained networks can be used, it is still necessary to fine-tune the system by adding a dataset which more closely models the intended application. Training is itself a bit of a balancing act. A system that has been overly trained on a model dataset (or trained on too small of a dataset) will suffer from overfitting, a condition in which the system ends up being too picky and unable to usefully generalize. In terms of pedestrian detection, this results in false negatives — pedestrians that don’t get flagged because the system has too strict of an idea about what a pedestrian should look like.

[Kurokesu]’s walkthrough on pedestrian detection is great, but for those interested in taking a step further back and rolling their own projects, this fork of Darknet contains YOLO for Linux and Windows and includes practical notes and guides on installing, using, and training from a more general perspective. Interested in learning more about machine learning basics? Don’t forget Google has a free online crash course to get you up to speed.

CNC Turns A Single PCB Into Origami Hemisphere

Trying to make a hemispherical surface out of a PCB is no easy feat. Trying to do that and make the result a working circuit is even harder. Doing it with one solid piece of FR4 seems impossible, right?

Not so much. [brainsmoke] came up with a clever way to make foldable, working PCBs that can be formed into hemispheres. The inspiration for this came from a larger project that resulted in a 32-cm diameter LED-studded sphere, which a friend thought would make a swell necklace if it was scaled down. That larger sphere was made somewhat like a PCB soccer ball, with individual panels soldered together. [brainsmoke] didn’t relish juggling dozens of tiny PCBs to make a necklace-sized version, so the unfolded pattern for half a deltoidal hexecontahedron was laid out as one piece on single-sided FR4. The etched boards were then cut out on a CNC mill, with the joints between the panels cut as V-grooves from the rear of the board. By leaving just enough material to act as a live hinge, [brainsmoke] was able to fold the pattern up into a hemisphere while leaving the traces intact. The process was fussy and resulted in a lot of broken FR4 and traces, but with practice and the use of thicker board material and heavier copper, the hemisphere came together. The video below shows the final product

This objet d’art is [brainsmoke]’s entry in the Circuit Sculpture Contest, which is just wrapping up wrapped up last week. We can’t wait to share some of the cool things people came up with in this contest, which really seemed to get the creative juices flowing.

Continue reading “CNC Turns A Single PCB Into Origami Hemisphere”

Vintage Audio Gear Gets A Display Upgrade

The lengths the retrocomputing devotee must go to in order to breathe new life into old gear can border on the heroic. Tracing down long-discontinued parts, buying multiple copies of the same unit to act as organ donors for the one good machine, and when all else fails, improvising with current productions parts to get that vintage look and feel.

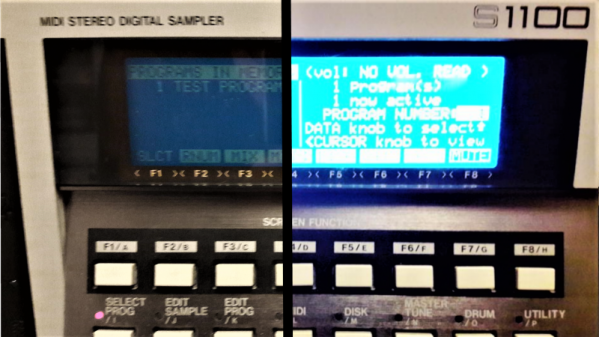
This LCD display backlighting fix for a vintage audio sampler falls into that last category, which was pulled off by [Inkoo Vintage Computer]. The unit in question is an Akai S1100 sampler, a classic from the late 1980s that had already been modified to replace the original floppy drive with a USB reader when the backlight on the LCD began to give out. Replacements for the original electroluminescent backlight are available, but [Inkoo] opted for a cheaper way out. An iPhone 6s 6 Plus backlight was an inexpensive option, if it could be made to fit. Luckily, [Inkoo] was able to trim the diffuser without causing any electrical issues. A boost converter was needed to run the backlight from the sampler’s 5 V DC rail, and interfacing the backlight’s flexible circuitry to the 80s-era copper wiring was a bit fussy, but the results were great. The sampler’s LCD is legible again, and looks just like it might have in the studio back when [Depeche Mode] and [Duran Duran] were using it to crank out hits.

As much as we like this repair, it doesn’t imply that EL is a dead technology. Far from it – [Ben Krasnow] is using it to create unique displays, and EL wire makes for some dazzling wearables. It doesn’t last forever, but while it does, it’s pretty neat stuff.