One thing that always provokes spirited debate around the Hackaday bunker is just how dangerous is it to use 3D printed plastic in contact with food. We mostly agree it isn’t a good thing, but we also know some people do it regularly and they don’t drop dead instantly, either. [Jakub] decided to do some testing and make some recommendations. There’s even a video explaining the results.
Unlike a lot of what we’ve read about this topic in the past, [Jakub’s] post is well-researched and does actual testing including growing bacteria cultures from cups used for milk. He starts out identifying the EU and US regulations about what you can call food-grade. There’s also recognition that while a base plastic might be safe for contact with food, there’s no way to know exactly what additives and other things are in the plastic to change its properties and color.
Tape may not sound that great compared to vinyl, but cassette players can be tons of fun when it comes to making your own music. See for instance the Mellotron, or this relatively easy DIY alternative, [Rich Bernett]’s Cassettone cassette player synth.
The Cassettone works by substituting the trim pot that controls the speed of the tape player’s motor with a handful of potentiometers. These are each activated with momentary buttons located underneath the wooden keys. In the video after the break, [Rich] gives a complete and detailed guide to building your own. There’s also a polished Google doc that includes a schematic and the pattern pieces for making the cabinet.
Speaking of which, isn’t the case design nice? It’s built out of craft plywood but aged with varnish and Mod-Podged bits and bobs from vintage electronics magazines. This really looks like a fun little instrument to play.
Would you rather control your tape synth with a MIDI keyboard? Just add Arduino.
It’s taken two years, but finally it’s happened. Finally a respected national mass-media outlet has asked the question Hackaday were posing shortly after the event: what evidence was there that a drone was actually present in restricted airspace?
The Guardian newspaper in the UK is the outlet looking into the mystery of the Gatwick drone. It was the worldwide story of the moment around this time back in 2018 when the London airport closed down for several days in response to a series of drone reports. The assumption being put forward was that bad actors in the drone community were to blame, but there was significant disquiet in those ranks as the police and media story simply lacked credibility to anyone with knowledge of drones. At no point could they point to evidence that held water, the couple they arrested turned out to be innocent, and eventually a police officer admitted that there might not have been a drone after all. The damage had by then been done, as Received Opinion had it that irresponsible drone enthusiasts had put lives in danger and caused huge economic damage by closing an airport for several days.
The Guardian piece paints a fascinating and detailed picture of the events surrounding the investigation, by bringing the investigative journalism resources of a national newspaper into tracing and interviewing people involved from all sides. They talk to former Gatwick employees, off-the-record police officers with knowledge of the case, a drone specialist journalist, and the drone community including some of its members with significant professional experience in the world of aviation. It talks about the slow drip-feed of freedom of information requests revealing the machinations behind the scenes and furthermore the continuing lack of tangible proof of a drone. It’s very much worth a read, and we hope it will prompt further investigation of the events without the focus being on a non-existent drone.
[Noel] was in possession of two non-working Sinclair QLs and made a series of videos about his attempts to repair and restore them. If you don’t remember the QL, it was a computer by the famous Clive Sinclair and while it was ahead of its time in some ways, it didn’t become as ubiquitous as some of its siblings or the IBM PC. It did, however, develop an almost cult-like following. You can see the trilogy of videos, below.
The machine was sophisticated for its day–after all, the QL was for quantum leap. Based on a Motorola 68008 processor running at 7.5 MHz, the QL included 128 KB of RAM and could handle up to 896 KB, a respectable amount for 1984. It even had a proprietary network interface. However, it was especially well known for having a pair of microtape drives. These were nicer than cassette tapes but perhaps not as handy as floppy disks. They were, however, cheaper to put into a computer. While there was an official operating system, it wasn’t long before most QL users switched to Minerva, a better OS.
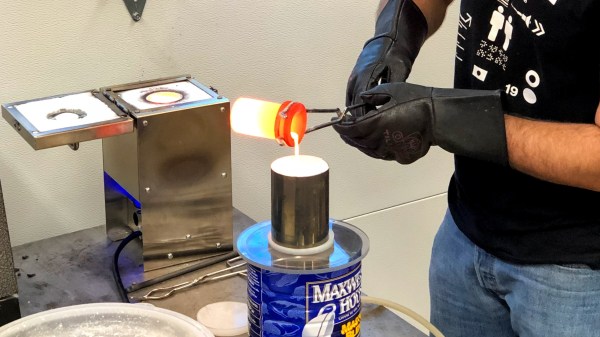
I’ve always thought that there are three things you can do with metal: cut it, bend it, and join it. Sure, I knew you could melt it, but that was always something that happened in big foundries- you design something and ship it off to be cast in some large angular building churning out smoke. After all, melting most metals is hard. Silver melts at 1,763 °F. Copper at 1,983 °F. Not only do you need to create an environment that can hit those temperatures, but you need to build it from materials that can withstand them.
Turns out, melting metal is not so bad. Surprisingly, I’ve found that the hardest part of the process for an engineer like myself at least, is creating the pattern to be replicated in metal. That part is pure art, but thankfully I learned that we can use technology to cheat a bit.
When I decided to take up casting earlier this year, I knew pretty much nothing about it. Before we dive into the details here, let’s go through a quick rundown to save you the first day I spent researching the process. At it’s core, here are the steps involved in lost wax, or investment, casting:
Make a pattern: a wax or plastic replica of the part you’d like to create in metal
Make a mold: pour plaster around the pattern, then burn out the wax to leave a hollow cavity
Pour the metal: melt some metal and pour it into the cavity
I had been kicking around the idea of trying this since last fall, but didn’t really know where to begin. There seemed to be a lot of equipment involved, and I’m no sculptor, so I knew that making patterns would be a challenge. I had heard that you could 3D-print wax patterns instead of carving them by hand, but the best machine for the job is an SLA printer which is prohibitively expensive, or so I thought. Continue reading “How To Get Into Lost Wax Casting (with A Dash Of 3D Printing)”→
For most of us, circuits based on vacuum tubes are remnants of a technological history that is rapidly fading from our collective memory. To be sure, there are still applications for thermionic emission, especially in power electronics and specialized switching applications. But by and large, progress has left vacuum tubes in a cloud of silicon dust, leaving mainly audiophiles and antique radio enthusiasts to figure out the hows and whys of plates and grids and filaments.
But vacuum tubes aren’t just for the analog world. Some folks like making tubes do tricks they haven’t had to do in a long, long time, at least since the birth of the computer age. Vacuum tube digital electronics seems like a contradiction in terms, but David Lovett, aka Usagi Electric on YouTube, has fallen for it in a big way. His channel is dedicated to working through the analog building blocks of digital logic circuits using tubes almost exclusively. He has come up with unique circuits that don’t require the high bias voltages typically needed, making the circuits easy to work with using equipment likely to be found in any solid-state experimenter’s lab.
David will drop by the Hack Chat to share his enthusiasm for vacuum tube logic and his tips for exploring the sometimes strange world of flying electrons. Join us as we discuss how to set up your own vacuum tube experiments, learn what thermionic emission can teach us about solid-state electronics, and maybe even get a glimpse of what lies ahead in his lab.
Click that speech bubble to the right, and you’ll be taken directly to the Hack Chat group on Hackaday.io. You don’t have to wait until Wednesday; join whenever you want and you can see what the community is talking about.
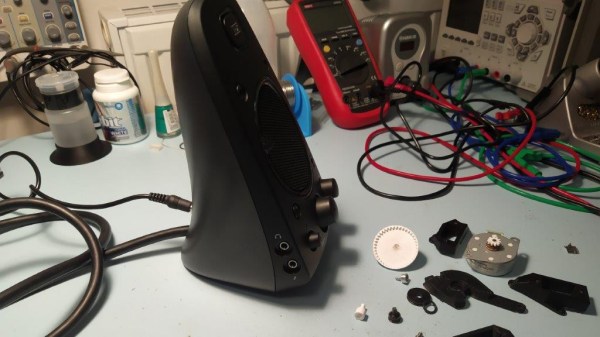
[Haris Andrianakis] likes his Logitech Z623 sound system. He likes it a lot. Which is why he was willing to hack in his own remote volume control rather than just get a new pair of speakers. But he certainly didn’t make things easy on himself. Rather than trying to tap into the electronics, he decided to take the long way around and motorize the volume knob.
The belt drive looked great, but didn’t work.
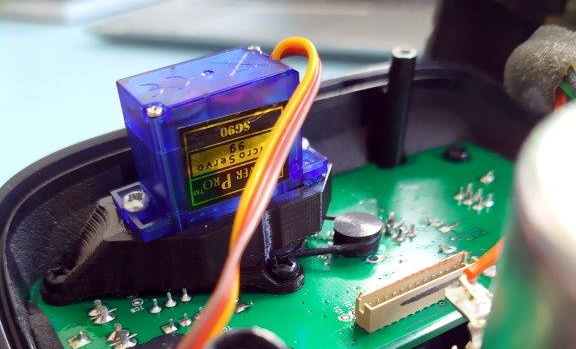
The idea seemed simple enough. Just drill a hole through the PCB behind the knob’s potentiometer, attach some kind of extension to the axle, and turn it with a small servo. Modifying the PCB and potentiometer went well enough, but the trouble came when [Haris] actually tried to turn the thing.
Attaching the servo directly to the axle worked, but it made turning the knob by hand extremely difficult. His next idea was to add a small belt into the mix so there would be some slip in the system. But after designing a 3D printed servo mount and turning custom pulleys on the lathe, it ended up having too much slip, and the knob didn’t always move when the servo turned.
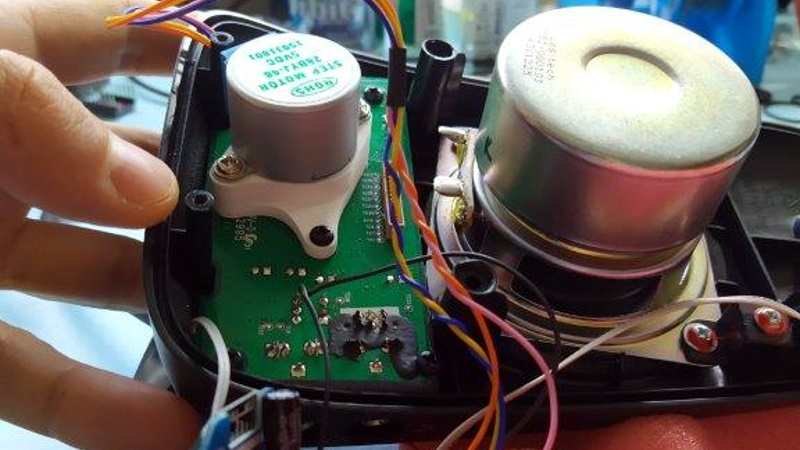
He then swapped out the servo for a small stepper motor. The motor was easy enough to spin when powered down, but didn’t have quite enough torque to turn the knob. He tried with a larger stepper motor that he salvaged from an old printer, but since he could only run it at half the recommended 24 VDC, it too had a tendency to skip steps.
After experimenting with some 3D printed reduction gears, [Haris] finally stumbled upon the 28BYJ-48. This small stepper with an integrated gearbox proved to be the perfect solution, as it had enough muscle to turn the knob while at the same time not restricting its movement when powered down. The rest of the project was relatively easy; with a DRV8825, an ESP8266, and an IR receiver, he’s able to spin the stepper with his TV’s remote. A simple web page running on the ESP8266 even allows him to control volume over the network with his smartphone. Based on similar projects we’ve seen, he could probably add support for HDMI CEC as well.
[Haris] says you shouldn’t follow his example, but we’re not so sure. He kept going when others would have given up, and the engineering and thought that went into each attempt is certainly commendable. Even if he hadn’t ultimately gotten this project working, we’d still say it was a valiant hack worthy of praise.