Make Android’s New Power Menu Work On Your Terms

Introduced in Android 11, the power menu is a way to quickly interact with smart home gadgets without having to open their corresponding applications. Just hold the power button for a beat, and you’ll be presented with an array of interactive tiles for all the gadgets you own. Well that’s the idea, anyway.

[Mat] of “NotEnoughTech” wasn’t exactly thrilled with how this system worked out of the box, so he decided to figure out how he could create his own power menu tiles. His method naturally requires quite a bit more manual work than Google’s automatic solution, but it also offers some compelling advantages. For one thing, you can make tiles for your own DIY devices that wouldn’t be supported otherwise. It also allows you to sidestep the cloud infrastructure normally required by commercial home automation products. After all, does some server halfway across the planet really need to be consulted every time you want to turn on the kitchen light?
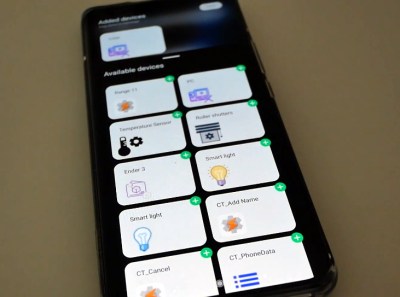
Adding tiles in Tasker.

The first piece of the puzzle is Tasker, a popular automation framework for Android. It allows you to create custom tiles that will show up on Android’s power menu, complete with their own icons and brief descriptions. If you just wanted to perform tasks on the local device itself, this would be the end of the story. But assuming that you want to control devices on your network, Tasker can be configured to fire off a command to a Node-RED instance when you interact with the tiles.

In his post, [Mat] gives a few examples of how this combination can be used to control smart devices and retrieve sensor data, but the exact implementation will depend on what you’re trying to do. If you need a bit of help getting started, our own [Mike Szczys] put together a Node-RED primer last year that can help you put this flow-based visual programming tool to work for you.

Continue reading “Make Android’s New Power Menu Work On Your Terms”

Keep An Eye On Your Bike With This DIY GPS Tracker

Owning a bike and commuting on it regularly is a great way to end up with your bike getting stolen, unfortunately. It can be a frustrating experience, and it can be particularly difficult to track a bike down once it’s vanished. [Johan] didn’t want to be caught out, however, and thus built a compact GPS tracker to give himself a fighting chance to hang on to his ride.

It’s built around the Arduino MKR GSM, a special Arduino built specifically for Internet of Things project. Sporting a cellular modem onboard, it can communicate with GSM and 3G networks out of the box. It’s paired with the MKR GPS shield to determine the bike’s location, and a ADXL345 3-axis accelerometer to detect movement. When unauthorised movement is detected, the tracker can send out text messages via cellular connection in order to help the owner track down the missing bike.

The tracker goes for a stealth installation, giving up the deterrent factor in order to lessen the chance of a thief damaging or disabling the hardware. It’s a project that should give [Johan] some peace of mind, though of course knowing where the bike is, and getting it back, are two different things entirely. We’ve seen creative techniques to build trackers for cats, too. It used to be the case that such “tracking devices” were the preserve of movies alone, but no longer. If you’ve got your own build, be sure to let us know on the tipline!


Apple Gets CP/M

In case you wanted to run WordStar on your Mac, [Tom Harte] offers CP/M for OS/X, and it looks like it would be a lot of fun. Of course you might be happier running Zork or Turbo Pascal, and you can do that, too.

There are plenty of Z80 emulators that can run CP/M, but what we found most interesting about this one is that it is written in Objective C, a language with a deep history in the Mac and NeXT worlds.

Continue reading “Apple Gets CP/M”

Nuclear Reactors Get Small

Steve Martin was ahead of his time when he told us “Let’s get small!” While you usually think of a nuclear reactor as a big affair, there’s a new trend towards making small microreactors to produce power where needed instead of large centralized generation facilities. The U.S. Department of Energy has a video about the topic, you can watch below.

You probably learned in science class how a basic nuclear fission reactor works. Nuclear fuel produces heat from fission while a moderator like water prevents it from melting down both by cooling the reactor and slowing down neutrons. Control rods further slow down the reaction or — if you pull them out — speed it up. Heat creates steam (either directly or indirectly) and the steam turns a conventional electric generator that is no more high tech than it ever has been.

Continue reading “Nuclear Reactors Get Small”

3D Printed Terminal Takes Computing Back In Time

It’s hard to look at today as anything but the golden age of computing. Even entry level machines have quad-core processors and a terabyte or more of storage space, to say nothing of the incredible amount of tech packed into the modern smartphone. But even so, there’s something to be said for the elegant simplicity of early desktop computers.

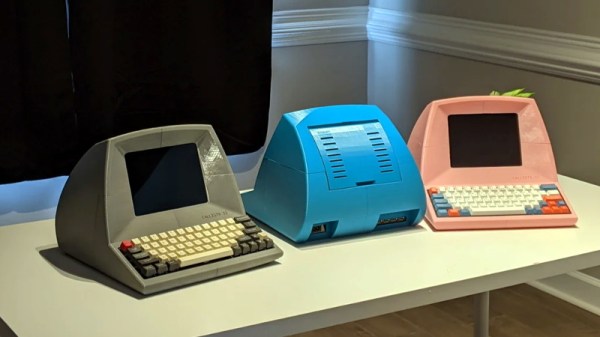
Looking to recreate the feeling of those bygone days, [Pigeonaut] created the Callisto II. Its entirely 3D printed case snaps together without glue or screws, making it easy to assemble, and the parts have been sized so they’ll be printable even on smaller machines like the Prusa Mini. Inside you’ll find a 1024×768 Pimoroni HDMI 8″ IPS LCD, 60% mechanical keyboard, four-port USB 3 hub, Raspberry Pi 4, and a 22 watt USB power supply to run it all.

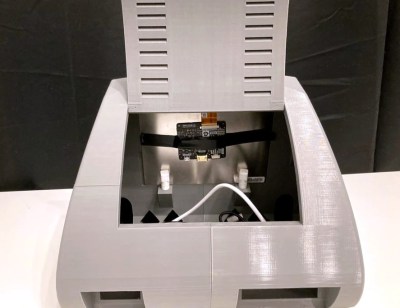
The internal components can be easily accessed with the hatch on the rear of the case, and there’s plenty of room inside to add new hardware should you want to toss in a hard drive or even swap out the Pi for a different single-board computer.

To really drive home the faux-retro concept of the Callisto II, [Pigeonaut] has created a website for the fictional computer company behind the machine, replete with all the trappings you’d expect from the early web. There’s even a web-based “operating system” you can use to show off your freshly printed Callisto II.

Incidentally the II suffix isn’t just part of the meme, there really was a Callisto before this one. We covered the earlier machine back in 2019, and while we’re a bit sad to see that the functional 3.5 inch floppy drive has been deleted, we can’t deny the overall aesthetics have been greatly improved in the latest version.

Continue reading “3D Printed Terminal Takes Computing Back In Time”

Pi Pico Project Plays Pong Perfectly

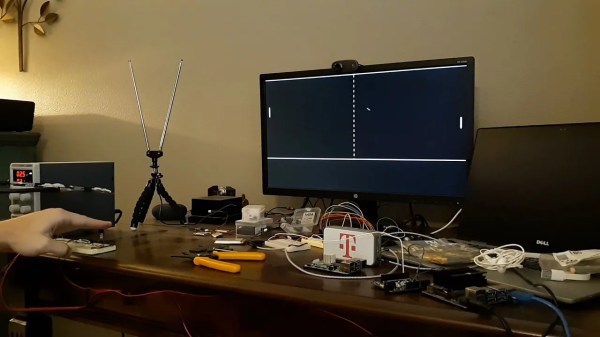
Even as technology keeps progressing, we find ourselves coming back to the classics again and again. Pong is quite possibly the classic game, and the Raspberry Pi Pico is one of the latest microcontrollers. So [Nick Bild] combined them expertly in his Pico Pong project, which includes gesture controls and a custom VGA output.

Rolling your own VGA signal is no simple feat, and this project takes full advantage of the Pico’s features to pull it off. Display data is buffered in memory, while a Programmable I/O (PIO) program reads straight from the buffer via Direct Memory Access (DMA) and writes straight to the display. This allows for nanosecond-precision while leaving the CPU free to handle inputs and run the game. Even with the display work offloaded, the ARM processor had to be massively overclocked at 258 MHz, well over its 133 MHz specs, to make things run smoothly. And still [Nick] found himself limited to a 640×350 resolution and serendipitously-retro-accurate monochrome color scheme.

Gesture controls come from a pair of IR light beams hooked up to the GPIO. IR LEDs shine up toward reflectors, and the light bounces back down to detectors. Blocking one of the beams causes your paddle to move up or down, which looks pretty responsive in the video (embedded below).

We’ve seen [Nick] play Pong before, though at that time it was handheld and based on the venerable 6502. And just recently we wrote about the Raspberry Pi Pico powering another classic game: Snake.

Continue reading “Pi Pico Project Plays Pong Perfectly”

3D Printing Restores Bandsaw

A great addition to a home shop is a bandsaw, but when [Design Prototype Test] got a well-used one, he found it wasn’t in very good shape. The previous owner put in an underpowered motor and made some modifications to accommodate the odd-sized blade. Luckily, 3D printing allowed him to restore the old saw to good working order.

There were several 3D printed additions. A pulley, a strain relief, and even an emergency stop switch. Honestly, none of this stuff was something you couldn’t buy, but as he points out, it was cheaper and faster than shipping things in from China. He did wind up replacing the initial pulley with a commercial variant and he explains why.

Continue reading “3D Printing Restores Bandsaw”