Simple Wi-Fi Cat Door Solves The Extra Critter Problem, And Nothing More

Anyone with an outdoor cat in their life knows their propensity for bringing home offerings, in the form of critters in various stages of the process of becoming ex-critters. And anyone with a hacker in their life knows that there’s a tendency to throw technology at this problem. But sometimes, the simplest solutions are the best.

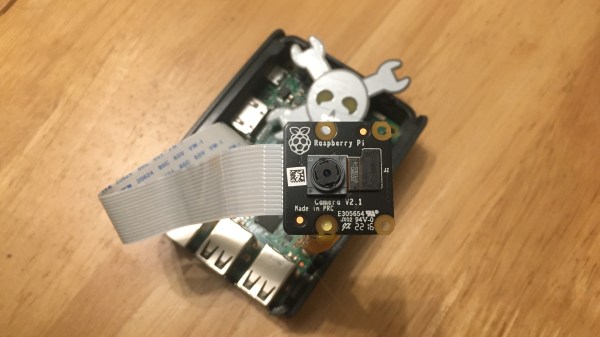
Take this simple stepper-powered cat door lock. For [Jason Winfield], the essential problem with his outdoor cat’s late-night demands for reentry was having to manually unlock the cat door after a quick visual check that no midnight snacks were along for the ride. Such activity tends to make it hard to get back to sleep. One natural reaction to this would be to completely automate the process with machine learning to recognize the offering and deny entry; we’ve seen exactly that before, after all. But recognizing that the disruptive part was the getting up to check bit, [Jason] just whipped up a simple stepper-driven lock with an ESP8266 microcontroller. With a 3D-printed case and a battery pack, and a nearby Wi-Fi camera, the lock denies entry to the cat until he gets a look at it, at which point he simply hits the lock’s webpage to unlock the door. The video below would show the lock in action, except the cat buggered off once it got a whiff of the doings. Cat’s gonna cat.

What we appreciate about this project is its simplicity. It solves the problem with the minimum feature set, which is something we see too little of sometimes. It’s also got some nice ideas, like the non-captive bolt that can be removed to unlock the door if the battery dies. Smart thinking, [Jason], and sweet dreams.

Continue reading “Simple Wi-Fi Cat Door Solves The Extra Critter Problem, And Nothing More”

Breakers for the system on a DIN rail, with markings like 48V and 24V and 12V and so on on the bottom, and two hefty devices of some kind on the bottom, probably MPTT controllers, with hefty wires running from them.

Low-Voltage DC Network Build Incited By Solar Panels

Nowadays, some people in Europe worry about energy prices climbing, and even if all the related problems disappear overnight, we’ll no doubt be seeing some amounts of price increase. As a hacker, you’re in a good position to evaluate the energy consuming devices at your home, and maybe even do something about them. Well, [Peter] put some solar panels on his roof, but couldn’t quite figure out a decent way to legally tie them into the public grid or at least his flat’s 220V network. Naturally, a good solution was to create an independent low-voltage DC network in parallel and put a bunch of devices on it instead!

He went with 48V, since it’s a voltage that’s high enough to be efficient, easy to get equipment like DC-DCs for, safe when it comes to legal matters concerned, and overall compatible with his solar panel setup. Since then, he’s been putting devices like laptops, chargers and lamps onto the DC rail instead of having them be plugged in, and his home infrastructure, which includes a rack full of Raspberry Pi boards, has been quite content running 24/7 from the 48V rail. There’s a backup PSU from regular AC in case of overcast weather, and in case of grid power failures, two hefty LiFePO4 accumulators will run all the 48V-connected appliances for up to two and a half days.

The setup has produced and consumed 115kWh within the first two months – a hefty contribution to a hacker’s energy independence project, and there’s enough specifics in the blog post for all your inspiration needs. This project is a reminder that low-voltage DC network projects are a decent choice on a local scale – we’ve seen quite viable proof-of-concept projects done at hackercamps, but you can just build a small DC UPS if you’re only looking to dip your feet in. Perhaps, soon we’ll figure out a wall socket for such networks, too.

Laser Projector Relies On Steppers Rather Than Galvanometers

Laser light shows have always been real crowd-pleasers. There’s just something about the frenetic movement of a single point of intensely bright light making fluid animations that really captures the imagination. Large-scale laser shows require a lot of gear, of course, but that doesn’t mean you can’t get in on the fun yourself using something like this homebrew X-Y laser projector.

This is actually [Stanley]’s second pass at a stepper-based DIY projector; we featured his previous build back in 2016. This time around, he wanted to move beyond the “module mix-and-match” style of construction, so rather than use an Arduino and stepper shield, he rolled his own controller PCB to hold an ESP32 and a pair of STSPIN220 stepper drivers. The business end of the new version saw improvements, too — given that he was seeing unwanted softening of corners and curving of straight lines in the first projector’s images, he opted for smaller steppers holding smaller mirrors this time around. There’s also a new 3D printed chassis to hold everything, simplifying the build and keeping the two mirrors in better alignment.

The video below has the build details and some nice footage of the projector in action — it’s hard to go wrong with lasers and smoke. The performance seems pretty good, so the improvements seem to have paid off. And for those of you tapping out your “Should have used galvos” comments below, relax; [Stanley] says he’s thinking about ways to make his own galvanometers for the next version.

Continue reading “Laser Projector Relies On Steppers Rather Than Galvanometers”

A Raspberry Pi 3 with a black Raspberry Pi Camera PCB on top of it, looking at the camera taking this picture. There's a Jolly Wrencher in the background.

Make Your Pi Moonlight As A Security Camera

A decade ago, I was learning Linux through building projects for my own needs. One of the projects was a DIY CCTV system based on a Linux box – specifically, a user-friendly all-in-one package for someone willing to pay for it. I stumbled upon Zoneminder, and those in the know, already can tell what happened – I’ll put it this way, I spent days trying to make it work, and my Linux skills at the time were not nearly enough. Cool software like Motion was available back then, but I wasn’t up to the task of rolling an entire system around it. That said, it wouldn’t be impossible, now, would it?

Five years later, I joined a hackerspace, and eventually found out that its CCTV cameras, while being quite visually prominent, stopped functioning a long time ago. At that point, I was in a position to do something about it, and I built an entire CCTV network around a software package called MotionEye. There’s a lot of value in having working CCTV cameras at a hackerspace – not only does a functioning system solve the “who made the mess that nobody admits to” problem, over the years it also helped us with things like locating safety interlock keys to a lasercutter that were removed during a reorganization, with their temporary location promptly forgotten.

Being able to use MotionEye to quickly create security cameras became quite handy very soon – when I needed it, I could make a simple camera to monitor my bicycle, verify that my neighbours didn’t forget to feed my pets as promised while I was away, and in a certain situation, I could even ensure mine and others’ physical safety with its help. How do you build a useful always-recording camera network in your house, hackerspace or other property? Here’s a simple and powerful software package I’d like to show you today, and it’s called MotionEye.

Continue reading “Make Your Pi Moonlight As A Security Camera”

Keeping An Eye On Heating Oil

Energy costs around the world are going up, whether it’s electricity, natural gas, or gasoline. This is leading to a lot of people looking for ways to decrease their energy use, especially heading into winter in the Northern Hemisphere. As the saying goes, you can’t manage what you can’t measure, so [Steve] has built this system around monitoring the fuel oil level for his home’s furnace.

Fuel oil is an antiquated way of heating, but it’s fairly common in certain parts of the world and involves a large storage tank typically in a home’s basement. Since the technology is so dated, it’s not straightforward to interact with these systems using anything modern. This fuel tank has a level gauge showing its current percentage full. A Raspberry Pi is set up nearby with a small camera module which monitors the gauge, and it runs OpenCV to determine the current fuel level and report its findings.

Since most fuel tanks are hidden in inconvenient locations, it makes checking in on the fuel level a breeze and helps avoid running out of fuel during cold snaps. [Steve] designed this project to be reproducible even if your fuel tank is different than his. You have other options beyond OpenCV as well; this fuel tank uses ultrasonic sensors to measure the fuel depth directly.

Bye Bye Linux On The 486. Will We Miss You?

A footnote in the week’s technology news came from Linus Torvalds, as he floated the idea of abandoning support for the Intel 80486 architecture in a Linux kernel mailing list post. That an old and little-used architecture might be abandoned should come as no surprise, it’s a decade since the same fate was meted out to Linux’s first platform, the 80386. The 486 line may be long-dead on the desktop, but since they are not entirely gone from the embedded space and remain a favourite among the retrocomputer crowd it’s worth taking a minute to examine what consequences if any there might be from this move.

Is A 486 Even Still A Thing?

Block diagram of the ZFx86 SoC
An entire 486 PC in a chip that only uses 1W, that would have been amazing in 1994!

The Intel 80486 was released in 1989, and was substantially an improved version of their previous 80386 line of 32-bit microprocessors with an on-chip cache, more efficient pipelining, and a built-in mathematical co-processor. It had a 32-bit address space, though in practice the RAM and motherboard constraints of the 1990s meant that a typical 486 system would have RAM in megabyte quantities. There were a range of versions in clock speeds from 16 MHz to 100 MHz over its lifetime, and a low-end “SX” range with the co-processor disabled. It would have been the object of desire as a processor on which to run WIndows 3.1 and it remained a competent platform for Windows 95, but by the end of the ’90s its days on the desktop were over. Intel continued the line as an embedded processor range into the 2000s, finally pulling the plug in 2007. The 486 story was by no means over though, as a range of competitors had produced their own take on the 486 throughout its active lifetime. The non-Intel 486 chips have outlived the originals, and even today in 2022 there is more than one company making 486-compatible devices. RDC produce a range of RISC SoCs that run 486 code, and according to the ZF Micro Solutions website they still boast of an SoC that is a descendant of the Cyrix 486 range. There is some confusion online as to whether DM&P’s Vortex86 line are also 486 derivatives, however we understand them to be descendants of Rise Technology’s Pentium clone. Continue reading “Bye Bye Linux On The 486. Will We Miss You?”

3D Printed ROV Is The Result Of Many Lessons Learned

Building an underwater remotely operated vehicle (ROV) is always a challenge, and making it waterproof is often a major hurdle. [Filip BuĊ‚awa] and [Piotr Domanowski] have spent four years and 14 prototypes iterating to create the CPS 5, a 3D printed ROV that can potentially reach a depth of 85 m.

FDM 3D prints are notoriously difficult to waterproof, thanks to all the microscopic holes between the layers. There are ways to mitigate this, but they all have limits. Instead of trying to make the printed exterior of the CPS 5 waterproof, the electronics and camera are housed in a pair of sealed acrylic tubes. The end caps are still 3D printed, but are effectively just thin-walled containers filled with epoxy resin. Passages for wiring are also sealed with epoxy, but [Filip] and [Piotr] learned the hard way that insulated wire can also act as a tube for water to ingress. They solved the problem by adding an open solder joint for each wire in the epoxy-filled passages.

For propulsion, attitude, and depth control, the CPS 5 has five brushless drone motors with 3D printed propellers, which are inherently unaffected by water as long as you seal the connectors. The control electronics consist of a PixHawk flight controller and a Raspberry Pi 4 for handling communication and the video stream to a laptop. An IMU and water pressure sensor also enable auto-leveling and depth hold underwater. Like most ROVs, it uses a tether for communication, which in this case is an Ethernet cable with waterproof connectors.

Acrylic tubing is a popular electronics container for ROVs, as we’ve seen with an RC Subnautica sub, LEGO submarine, and the Hackaday Prize-winning Underwater Glider.

Continue reading “3D Printed ROV Is The Result Of Many Lessons Learned”