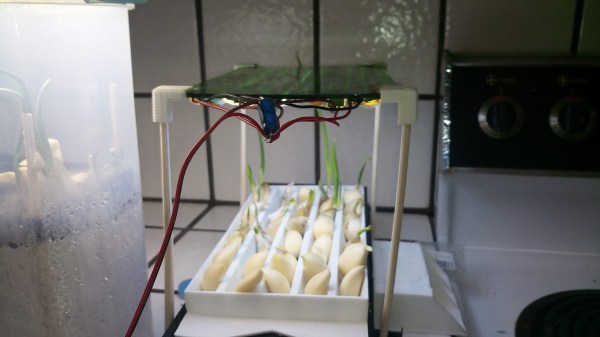
A tupperware-sized 3D-printed aeroponics cell, a grid-like contraption, with about 30 cloves of garlic in it, about five of them starting to grow. The cell is printed with white plastic, and there's a semi-transparent acrylic roof with LED strips attached to its underside, lifted about 3-4 inches above the garlic.

Aeroponic Cell Grows Garlic, Forwards CellSol Packets

Certain pictures draw attention like no other, and that’s what happened when we stumbled upon a Twitter post about “resuscitating supermarket garlic” by [Robots Everywhere]. The more we looked at this photo, the more questions popped up, and we couldn’t resist contacting the author on Twitter – here’s what we’ve learned!

This is an aeroponics cell – a contraption that creates suitable conditions for a plant to grow. The difference of aeroponics, when compared to soil or hydroponics methods, is that the plant isn’t being submerged in soil or water. Instead, its roots are held in the air and sprayed with water mist, providing both plenty of water but also an excess of oxygen, as well as a low-resistance space for accelerated root growth – all of these factors that dramatically accelerate nutrient absorption and development of the plant. This cell design only takes up a tiny bit of space on the kitchen countertop, and, in a week’s time, at least half of the cloves have sprouted!

Much like a garlic bulb, this project has layers to it – in that this aeroponic cell is also a CellSol node! The CellSol project is a distributed communication system that can use LoRa and WiFi for its physical layer, enabling you to build widely spanning mesh networks that even lets you connect your smartphone to it where it’s called for – say, as an internet-connected hub for other devices to send their data through. We’ve covered CellSol and it’s hacker-friendliness previously, and one of the intentions of this design is to show how any device with a bit of brains and a SX1276 module can help you form a local CellSol network, or participate in some larger volunteer-driven CellSol-powered effort.

If, like us, you’re looking at this picture and thinking “this is something I’d love to see on my desk”, [Robots Everywhere] has published the STL files for making a hydroponic cell like this at home, as well as all the code involved, and some demo videos. Hopefully, the amount of aeroponics projects in our tips line is only going to increase! We’ve covered Project EDEN before, a Hackaday Prize 2017 entry that works to perfect an aeroponics approach to create an indoor greenhouse. There’s also a slew of hydroponics projects to have graced our pages, from hardware store-built to 3D printed ones!

Continue reading “Aeroponic Cell Grows Garlic, Forwards CellSol Packets” →

Remoticon 2021: Unbinare Brings A Reverse-Engineering Toolkit Into Recycling

Unbinare is a small Belgian company at the forefront of hacking e-waste into something useful, collaborating with recycling and refurbishing companies. Reverse-engineering is a novel way to approach recycling, but it’s arguably one of the most promising ways that we are not trying at scale yet. At Hackaday Remoticon 2021, Maurits Fennis talked about Unbinare’s efforts in the field and presented us with a toolkit he has recently released as a part of his work, as well as described how his background as an artist has given him insights used to formulate foundational principles of Unbinare.

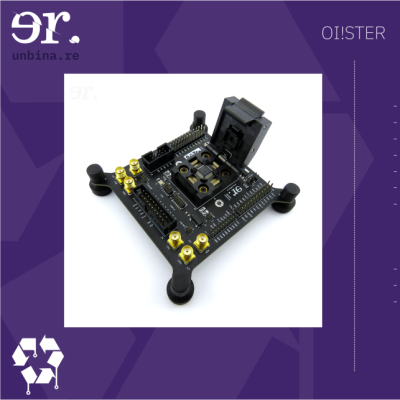
Image showing an Unbinare OISTER boardUnbinare’s tools are designed to work in harmony with each other, a requirement for any productive reverse-engineering effort. OI!STER is a general-purpose salvaged MCU research board, with sockets to adapt to different TQFP chip sizes. This board is Maurits’s experience in reverse-engineering condensed into a universal tool, including a myriad of connectors for different programming/debugging interfaces. We don’t know the board’s full scope, but the pictures show an STM32 chip inside the TQFP socket, abundant everywhere except your online retailer of choice. Apart from all the ways to break out the pins, OI!STER has sockets for power and clock glitching, letting you target these two omnipresent Achilles’ heels with a tool like ChipWhisperer.
Continue reading “Remoticon 2021: Unbinare Brings A Reverse-Engineering Toolkit Into Recycling” →

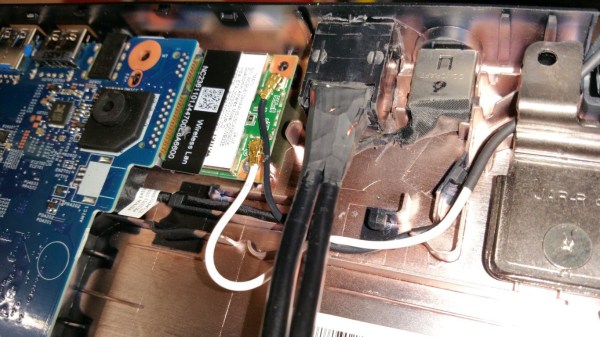
A PoE adapter's RJ45 jack added inside an Acer laptop

Laptop Empty Space Filled With RS485 And PoE

Out of all the laptop upgrade options typically available, you wouldn’t expect this specific one. [controlmypad] decided to take a part of his RS485 device programming workflow and put it inside of a spare laptop he picked up for cheap. Typically, he’d occupy some desk space and lay out an unwieldy combination of a USB-RS485 dongle, a PoE power injector, a PSU for that injector, and a few cables to join it all – being extra weight in the tool bag, cluttering the workspace when laid out, and the RS485 adapter slowly wearing out the USB ports during the work-related motions. No reason that all of this couldn’t be packed inside a laptop, however.

What helps a lot is that, in many modern cheap laptops, the motherboard is fairly small, and the DVD drive plastic placeholder can be omitted without second thought. Cutting off the plastic molding from both of the adapters turns them into a nicely reusable circuit board and a small PoE module, respectively. After laborious yet careful cutting of the laptop case with a hobby knife, the PoE injector fits right in and, essentially, adds an extra RJ45 port to the laptop. From where the Hackaday.io write-up left off, it doesn’t seem like this mod got fully completed, but most of the important details are there for us to learn from. What got left out is connecting it to an internal USB port (should help that the motherboard’s schematics are available online), as well as creating 12V-24V from the laptop’s power rails. At this point, however, this mod is a big step forward usability-wise, even if it still requires an external PSU.

Laptop internal upgrade projects are rare but cherished – it’s a combination of “daring”, “inquisitive” and “meticulous” that results in people successfully hacking on a thing they certainly were not meant to hack, and have that thing serve their needs better. Apart from all the EEE PC upgrade options that set the bar for a generation of laptop modders, there’s a myriad of unconventional laptop modification vectors – you could do a thorough from-scratch Type-C charging port conversion, replace your webcam with an FSF-endorsed open firmware WiFi dongle, build in a “12-axis” sensor for auto-orientation and data-logging, or invent a remote self-destruct mechanism for your laptop. Those are, indeed, quite a few things you won’t typically find in the list of available options while customizing your laptop at the manufacturer website.

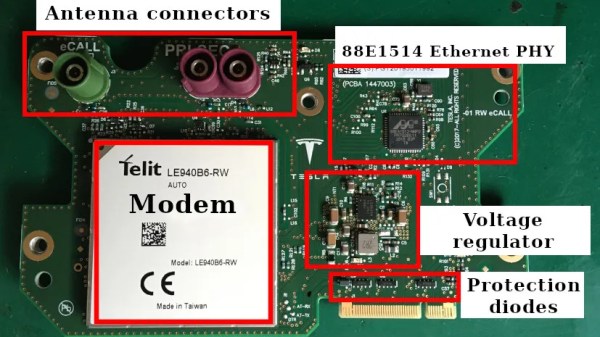
An image describing parts of a Tesla modem board

LTE Modem Transplant For A Tesla Imported Into Europe

When modern connected cars cross continents, novel compatibility problems crop up. [Oleg Kutkov], being an experienced engineer, didn’t fret when an USA-tailored LTE modem worked poorly on his Tesla fresh off its USA-Europe import journey, and walks us through his journey of replacing the modem with another Tesla modem module that’s compatible with European LTE bands.

[Oleg]’s post goes through different parts on the board and shows you how they’re needed in the bigger picture of the Tesla’s Media Computer Unit (MCU), even removing the LTE modem’s shield to describe the ICs underneath it, iFixit teardown diagram style! A notable highlight would be an SIM-on-chip, essentially, a SIM card in an oh-so-popular DFN package, and thankfully, replacing it with a socket for a regular SIM card on some extender wires has proven fruitful. The resulting Tesla can now enjoy Internet connectivity at speeds beyond those provided by EDGE. The write-up should be a great guide for others Tesla owners facing the same problem, but it also helps us make electric cars be less alike black boxes in our collective awareness.

Not all consequences of Tesla design decisions are this minor; for instance, this year, we’ve described a popular eMMC failure mode of Tesla cars and how Tesla failed to address it. Thankfully, Tesla cars are becoming more of a hacker community target, whether it’s building a computer-vision-assisted robot to plug in a charging cable, getting it repaired for a fraction of the dealership cost, or even assembling your own Tesla from salvage parts!

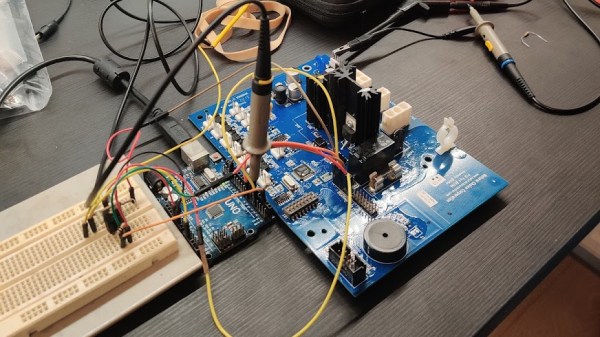
An image showing a water cooler PCB on the desk, with probes and jumper wires connected to it.

Taking Water Cooler UX Into Your Own Hands With Ghidra

Readers not aware of what Ghidra is might imagine some kind of aftermarket water cooler firmware or mainboard – a usual hacker practice with reflow ovens. What [Robbe Derks] did is no less impressive and inspiring:  A water cooler firmware mod that adds hands-free water dispensing, without requiring any hardware mods or writing an alternative firmware from scratch.

Having disassembled the cooler, [Robbe] found a PIC18F6527 on the mainboard, and surprisingly, it didn’t have firmware readback protection. Even lack of a PICkit didn’t stop him – he just used an Arduino to dump the firmware, with the dumper code shared for us to reuse, and the resulting dumps available in the same repository.

From there, he involved Ghidra to disassemble the code, while documenting the process in a way we can all learn from, and showing off the nifty tricks Ghidra has up its sleeves. Careful planning had to be done to decide which functions to hook and when, where to locate all the extra logic so that there’s no undesirable interference between it and the main firmware, and an extra step taken to decompile the freshly-patched binary to verify that it looks workable before actually flashing the cooler with it.

The end result is a water cooler that works exactly as it ought to have worked, perhaps, if the people defining its user interaction principles were allowed to make it complex enough. We could argue whether this should have been a stock function at all, but either way, it is nice to know that we the hackers still have some of the power to make our appliances friendly — even when they don’t come with an OS. Certainly, every single one of us can think of an appliance long overdue for a usability boost like this. What are your examples?

We’ve covered quite a few Ghidra-involving hacks, but it never feels like we’ve had enough. What about patching an air quality meter to use Fahrenheit? Or another highly educational write-up on cracking GBA games? Perhaps, liberating a Linux-powered 4G router to reconfigure it beyond vendor-defined boundaries? If you have your own goal in mind and are looking to start your firmware reverse-engineering journey, we can say with certainty that you can’t go wrong with our HackadayU course on Ghidra.

Picture of a monitor with a fake "ransomware" banner on it, and a PC with the ESP32 VGA devboard mounted into it in the foreground

ESP32 Pretends To Be GPU; Gives You A Ransomware Scare

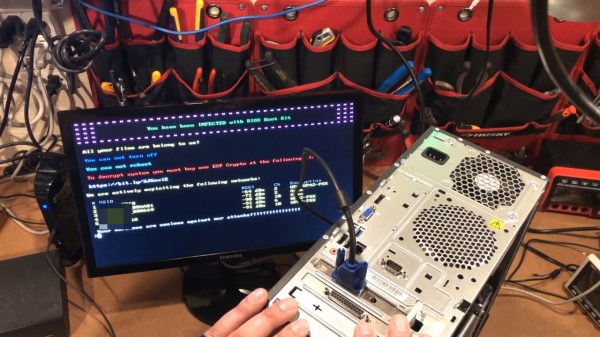
Sometimes a piece of hardware meets a prank idea, and that’s how the fun Hackaday articles are born. [AnotherMaker] shows us some harmless entertainment at the expense of an IT enthusiast in your life – programming an ESP32-powered devboard with a VGA output to show an ever-feared “all your files are encrypted” screen on a monitor connected to it. The ASCII text in its 8-bit glory helps sell this prank, making it look exactly like a BIOS-hijacking piece of malware it claims to be; akin to UIs of the past that skilled hackers would whip up in x86 assembly. The devboard’s integration into a PCI card backplate is a cherry on top, a way to seamlessly integrate this into a PC case, making it look not particularly different from an old graphics card. In such a configuration, we don’t doubt that this would be a head-scratcher to a certain kind of an IT department worker.

If you already have someone in mind as a target for this prank, you’re in luck, since [AnotherMaker] has shared his source code, too, and all you need is a ESP32 with a VGA port set up. You can get the same devboard, or you can even solder it all together with an ESP32 breakout and resistors, if you’re on a time or money budget, since the schematics for the LilyGO devboard are public. Not all devboards gets such a fun application, but it’s always fun to see when someone thinks of one – a perfect prank scenario that calls for a very specific devboard.

Wondering how it’s even possible to output VGA from the ESP32? We’ve covered this in the past – like this R&D project done by [bitluni], who then went ahead and expanded on it by connecting six displays at once. If you’ve connected your ESP32 to a VGA port and ran some test sketches, a UI library will help you upgrade your idea into a ready project in no time.

Continue reading “ESP32 Pretends To Be GPU; Gives You A Ransomware Scare” →

A CH341 programmer dongle with a stack of adapters on top (one for 1.8V and one for clip connection), and a test clip to the right of it

BIOS Flashing Journey Writeup Puts Tutorials To Shame

A couple of weeks ago, [Doug Brown] bought a Ryzen motherboard, advertised as “non-working” and discounted accordingly. He noticed that the seller didn’t test it with any CPUs old enough to be supported by the board’s stock BIOS revision, and decided to take a gamble with upgrading it.

Not having a supported CPU in hand either, he decided to go the “external programmer” route, which succeeded and gave this board a new life. This is not why we’re writing this up, however. The reason this article caught our eye is because [Doug]’s research leaves no stone unturned, and it’s all there to learn from. Whether through careful observation or thorough research, this article covers all the important points and more, serving as an example to follow for anyone looking to program their BIOS.

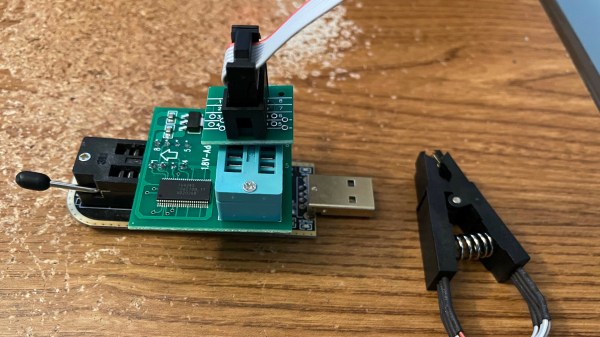
For instance, [Doug] correctly points out a design issue with these common programmers resulting in 5 V getting onto the 3.3 V data lines, and fixes it by rewiring the board. Going through all the letters in the ICs part number, something that many of us would dismiss, [Doug] notices that the flash chip is 1.8 V-only and procures a 1.8 V adapter to avoid the possibility of frying his motherboard. After finding out that the 1.8 V adapters don’t work for some people, he reverse-engineers the adapter’s schematics and confirms that it, indeed, ought to work with the specific parts on adapter he received.

Noting another letter in the part number implying the flash chip might be configured for quad-SPI operation, he adds series resistors to make sure there’s no chance of the programmer damaging the BIOS chip with its hardwired pinout. This is just an example of the insights in [Doug]’s article, there’s way more that we can’t mention for brevity, and we encourage you to check it out for yourself.

With this level of care put into the process, it’s no surprise that the modification was successful. The kind of inquisitiveness shared here is worth aspiring to, and writeups like this often surpass general-purpose tutorials in their insights and usefulness. What’s your “successfully making use of something sold as non-working” story?

If you’re looking for other insightful BIOS stories, we’ve covered someone reverse-engineering their BIOS to remove miniPCIe card whitelisting. We’ve typically covered BIOS modification stories in laptops, since there’s more incentives to modify these, but a lot of laptop BIOS articles will apply to desktop motherboards too, such as this supervisor password removal story or this LibreBoot installation journey by our own [Tom Nardi].

Thank you [Sidney] for sharing this with us!