The amateur radio community has exploded with activity lately especially in the software-defined radio (SDR) area since it was found that a small inexpensive TV tuner could be wrangled to do what only expensive equipment was able to do before. One common build with these cards is monitoring air traffic, which send data about their flights out in packets over the radio and can easily be received and decoded now. It turns out another type of vehicle, SpaceX’s Falcon 9 spacecraft, reports data via radio as well and with some slightly upgraded hardware it’s possible to “listen in” to these flights in a similar way.
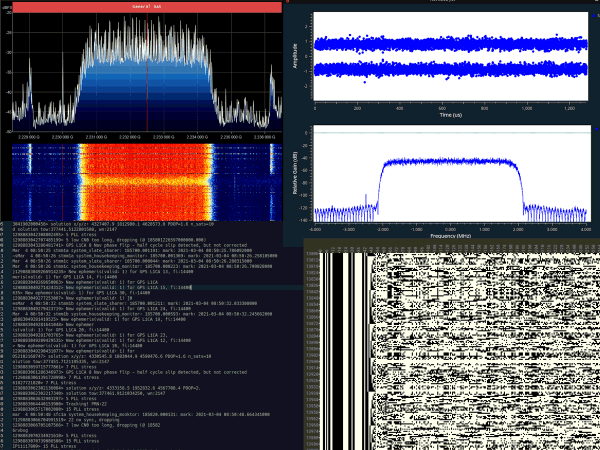
Reddit users [derekcz] and [Xerbot] used a HackRF module to listen in to the Falcon 9’s data transmissions during its latest launch. While the HackRF is a much more expensive piece of equipment compared to the RTL-SDR dongles used to listen in on aircraft, it is much more capable as well, with a range from 1 MHz to 6 GHz. Using this SDR peripheral as well as a 1.2 m repurposed satellite dish, the duo were able to intercept the radio transmissions from the in-flight rocket. From there, they were recorded with GNU Radio, converted into binary data, and then translated into text.
It seems as though the data feed included a number of different elements including time, location information, and other real-time data about the rocket’s flight. It’s a great build that demonstrates the wide appeal of software-defined radio, and if you want to get started it’s pretty easy to grab a much cheaper dongle and use it for all kinds of applications like this. Go check out [Tom Nardi]’s piece on the last seven years of RTL-SDR to get caught up to speed.
Thanks to [Adrian] for the tip!